
The number of SaaS (software as a service) platforms available to us is constantly increasing, but more critically, the uptake of these platforms is growing as well. As a result, it's becoming more and more important to be able to use the data stored in these platforms in our analytics that drive business decisions.
With different platforms for different uses e.g. web analytics, accounting, our data is often hosted across a variety of stores. As the number of platforms we use steadily increases, it can become increasingly complicated to tie these sources together. Writing custom integrations for all of these platforms can be costly and time consuming whilst also bringing in the potential for human error. Wouldn't it be great if there was an integration service that can pull these sources together? This is where Amazon AppFlow comes in.
What is AppFlow?
Released earlier this year, Amazon AppFlow is a fully managed integration service that enables you to transfer data between SaaS platforms and AWS services. In a couple of clicks you can set up a transfer of data from Google Analytics into your Redshift data warehouse, or perhaps you want to transfer your data stored in S3 back into your Salesforce org. All of this is possible with Amazon AppFlow.
Tableau users might be reading this wondering, 'what's the point, I can just use the Salesforce connector?', but using AppFlow opens up numerous possibilities. If you use multiple SaaS platforms, you can start to build up a data store which contains data from all your sources in one place, and forget about having multiple logins and connectors. You can also start to build up historical repositories of how your data has changed over time rather than just getting the current snapshot of how things look now.
You may also want to use other tools, such as Alteryx or Amazon DataBrew to start combining data sources from your various cloud platforms and creating new tables. Or perhaps your current BI tool of choice doesn't provide native connectivity to these platforms. All of these situations can be helped by AppFlow. In this example, we're going to look at how we can use AppFlow to pull Salesforce data into S3.
Setting up S3
Before diving into AppFlow, we need to have an S3 bucket created that can be used as the destination to store our data. If you already have an S3 bucket set up, then you can ignore this step.
In the AWS management console, head over to the S3 page. From here you can select create bucket. Enter a bucket name and a region you want your bucket to be placed in. It's worth noting that bucket names are global within AWS, so if you try to name your bucket 'test', even if you don't have a bucket called 'test' in your account or region, someone else in the AWS world probably does.
Once you've entered a name and region, you can configure access settings, such as whether objects in your bucket are publicly accessible or not. It's best to leave public access off, unless you require it, otherwise anyone can start to access the data in your bucket.
We can leave all other settings as default and create the bucket. You can find more information on setting up a bucket from the official AWS documentation.
Requirements for Salesforce connectivity
Before connecting to your Salesforce org in AppFlow, there are some requirements that need to be met, such as enabling API access. If these criteria aren't met then you may experience some errors when trying to set up your flow. The full list is as follows:
- Your Salesforce account must be enabled for API access. API access is enabled by default for Enterprise, Unlimited, Developer, and Performance editions.
- Your Salesforce account must allow you to install connected apps. If this is disabled, contact your Salesforce administrator. After you create a Salesforce connection in Amazon AppFlow, verify that the connected app named Amazon AppFlow Embedded Login App is installed in your Salesforce account.
- The refresh token policy for the Amazon AppFlow Embedded Login App must be set to Refresh token is valid until revoked. Otherwise, your flows will fail when your refresh token expires.
- You must enable Change Data Capture in Salesforce to use event-driven flow triggers. FromSetup, enter Change Data Capture in Quick Find.
- If your Salesforce app enforces IP address restrictions, you must grant access to the addresses used by Amazon AppFlow. For more information, see AWS IP address ranges in the Amazon Web Services General Reference.
- If you are transferring over 1 million Salesforce records, you cannot choose any Salesforce compound field. Amazon AppFlow uses Salesforce Bulk APIs for the transfer, which does not allow transfer of compound fields.
- To create private connections using AWS PrivateLink, you must enable both Manager Metadata and Manage External Connections user permissions in your Salesforce account. Private connections are currently available in the us-east-1 and us-west-2 AWS Regions.
Once that you have verified your Salesforce org is set up correctly, we can begin to work with Amazon AppFlow.
Setting up AppFlow
From the AWS management console, the first thing you need to do is to search for Amazon AppFlow. Once in the AppFlow landing page, you can select create flow.
Specify flow details
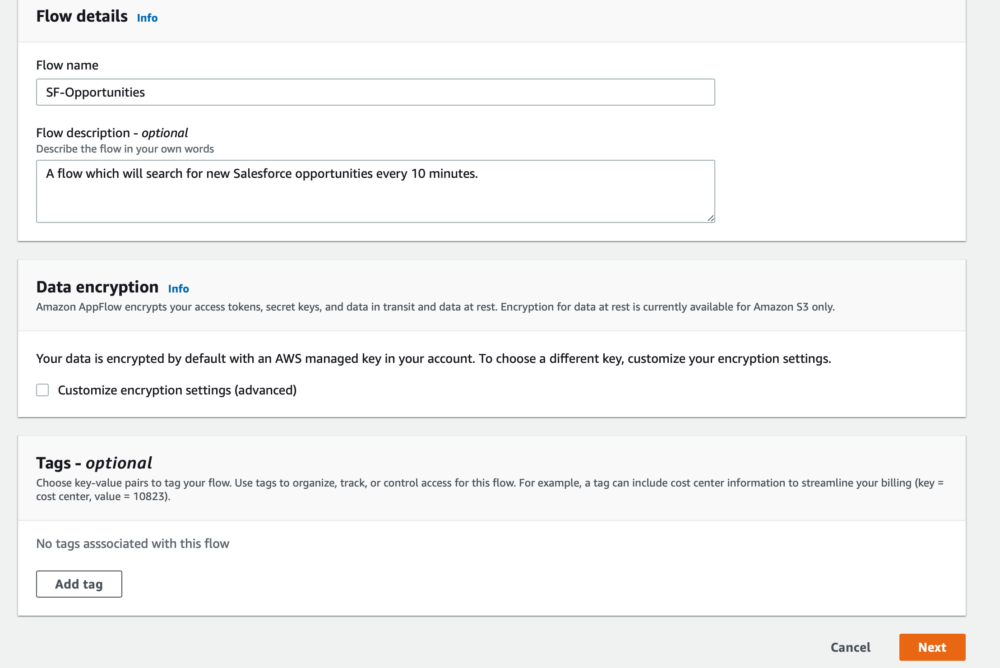
In this initial stage you can specify a name and description for your flow, whether to add tags or not, and whether you want to modify the encryption settings for your flow. AppFlow encrypts your access tokens, secret keys and data in transit and at rest by default, using an AWS managed key in your account. However, you can customise the encryption settings by choosing your own KMS key rather than the AWS default.
For our set up, we're just going to fill out the flow name and description and leave everything else as default.
Configure flow
The configure flow section is where we specify the properties for our source and destination. In this case we're going to be using Salesforce as our source and S3 as our destination. From the source dropdown you can see there are a number of SaaS platforms which you can connect to e.g. Google Analytics, Marketo. You can also use S3 as your source. In the destinations you'll see the current available options are Redshift, S3, Salesforce, Snowflake and Upsolver. Using S3 as a source, you could use AppFlow to write data from your buckets back to Salesforce if you so wished.
When you select Salesforce from the source dropdown, you want to specify a new connection (unless you already have one set up). You'll then be asked whether your environment is a production or sandbox environment, and to give your connection a name. Once you've entered these details, select continue and you'll be taken to the familiar Salesforce login page.
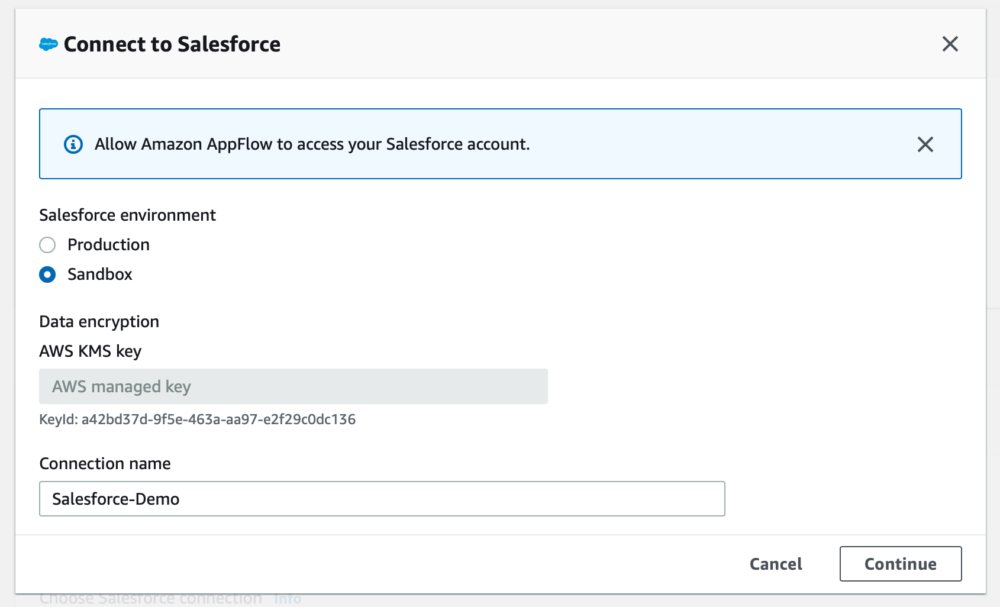
Upon successful login, you'll be asked whether to allow access to Amazon AppFlow, you should select Allow. Now your connection to Salesforce is configured!
There are two options for what we can retrieve from Salesforce, objects and events. Objects work with on demand and scheduled flows, whereas events work with flows that are set up to run on an event based trigger. An example of this is when an opportunity is changed in Salesforce, an event will be triggered and in the event response, which will be pushed through AppFlow, you'll have information about what changed in the opportunity.
In this example, we want to set up a scheduled flow to retrieve the opportunity object so we can select 'Salesforce object' and then opportunity from the dropdown.
For our destination, we want to select S3 and then we can choose our bucket that was created earlier in the blog. Alternatively, you can use a bucket that you have previously set up.
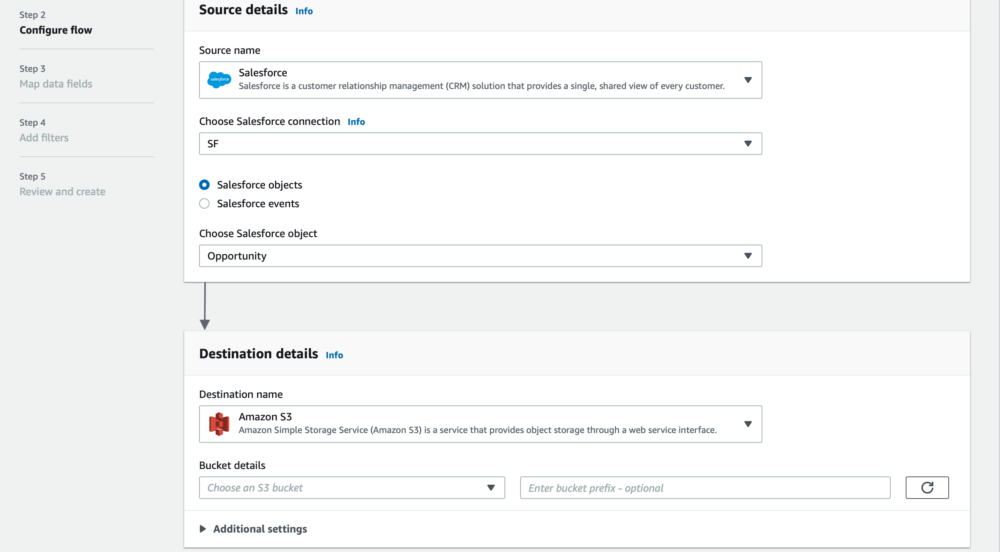
Once S3 has been specified, there are some additional settings which can be configured. Here you can specify the data format (JSON, CSV or Parquet), whether to aggregate your data and whether to add timestamps to the files or folders. We're going to leave these as default.
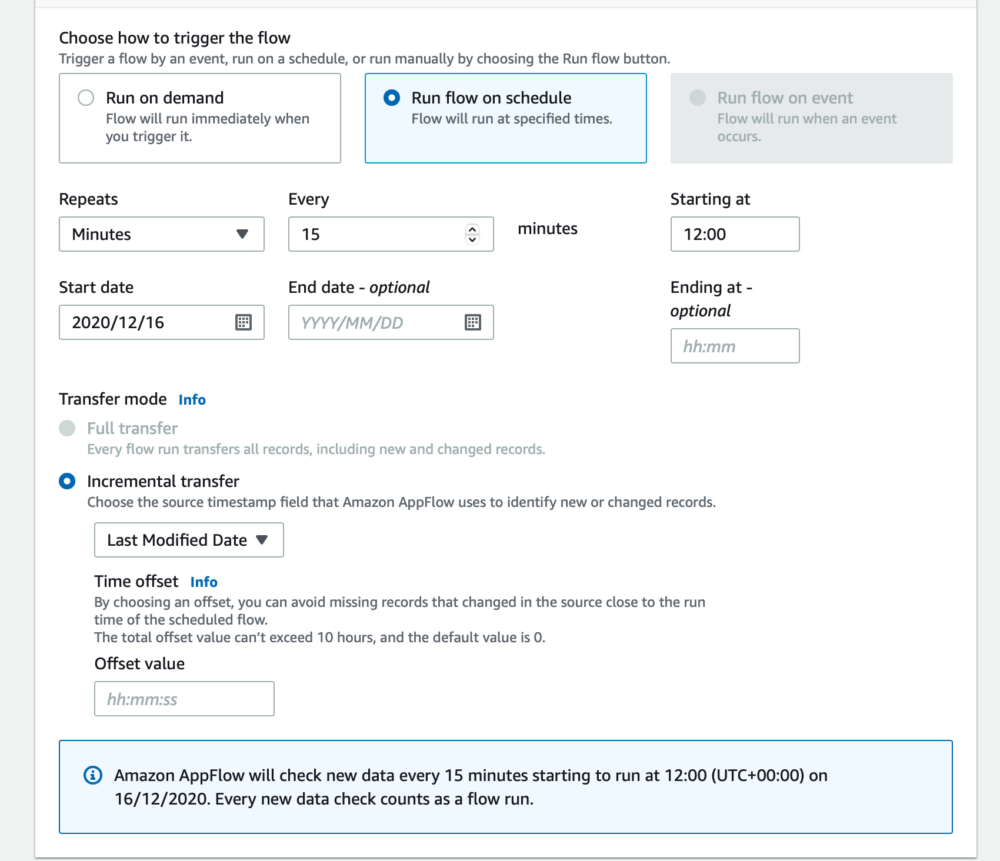
Finally, we configure whether we want the flow to run on demand or on a schedule (the run flow on event is greyed out as we are transferring a Salesforce object and not an event). We're going to set up a scheduled flow to check for new opportunities every 15 minutes. AppFlow can be configured to either transfer all the data upon each run, or you can do an incremental transfer, so only records that have been added or changed since the last run will be transferred.
Full transfers can only be set up for schedules that run on a daily interval, or higher, so in this case it's not an option. You can configure the timestamp field that AppFlow will check against to see if records have been changed or added, in this case we're going to select 'Last Modified Date'. You could configure the flow to only pull new records, and ignore those that have just been updated by selecting 'Created Date'.
The first run of a scheduled flow will pull 30 days of past records at the time of the first run, any records before this will not be pulled through. To have a full data set, you might want to set up one initial on demand flow to pull all your data, and then set up a scheduled flow to check for updated records.
Now our schedule is configured, we can move onto the next stage.
Map Data Fields
Next, we need to map our fields. There are two options, to do this manually using the console or to use a CSV where mapping is already defined. We're going to use the console in this example as it's fairly straightforward to bulk map all the fields.
Select the dropdown under Salesforce and choose the option to map all fields directly. Then, next to the mapped fields title, we want to select all 46 mappings.

At this point you can apply modifications to the data, such as masking certain fields with an asterisk (*), or by truncating fields to a certain number of characters. It's also worth noting that you do not have to map all fields, you can just map those that you want to pull through to S3 if that is your requirement.
Additional settings can be configured, such as importing newly added fields automatically and importing deleted records. We're going to allow new fields to come through automatically but ignore deleted records.
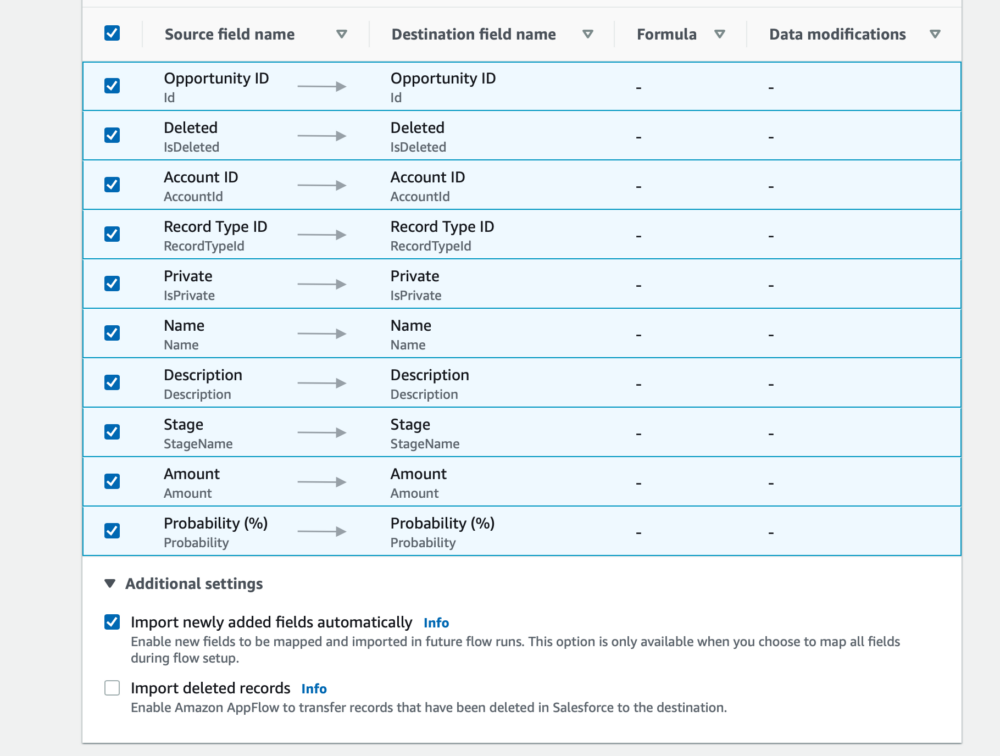
Finally, you can configure validations for the flow. For example, what to do if certain fields have null values. If an Opportunity didn't have an entry for 'Stage' then you could either terminate the flow or you could ignore the record. We're going to move ahead without any validations but do add them if you wish.
Add filters
The final stage of creating a flow before we review our configuration is to add any filters to the data. Amazon AppFlow will only transfer data which meet your filter criteria. For example, you could pull only opportunities which have a value greater than £10,000. Or only pull through data where the opportunity stage is past a certain point in the pipeline.
Once again, we're going to move on without applying any filters to our flow.
Review and create
All that's left to do now is review our configuration for the flow. If you're happy with how everything is set up then create your flow and you'll be taken to the overview page for your flow. The final thing to do is to activate your flow, which you can to in the top right hand corner, then sit back watch AppFlow start to pull data into your S3 bucket!
