

18 March 2018

URL Actions provide functionality to do a number of useful things in Tableau, such as: For Tableau Public, which is the server I used while creating this post, it’s like this:
 If you have any spaces in your file name or dashboard name, these will be removed in the URL.I’ve uploaded two simple workbooks to Tableau Public that will be used throughout this blog post. One for sending URL actions and another to receive those URL actions.Link to Sending dashboardLink to Receive dashboard
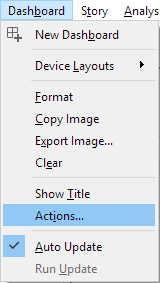 Then: Add Action > URL…
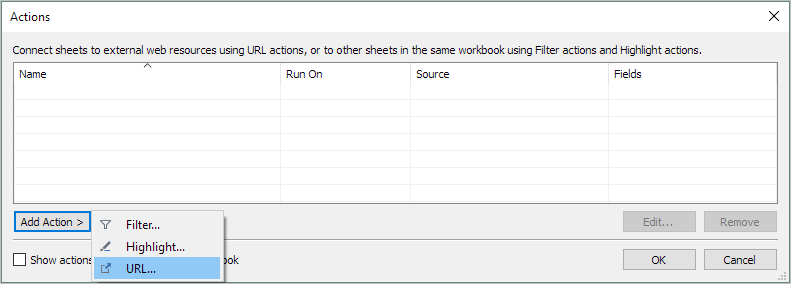 Give a name to the URL action and select the Dashboard and Sheet that the URL Action will be triggered from as well as which method to trigger the action – in this case I’m using “Menu”. Finally paste in the URL of the dashboard that you want the URL action to open.
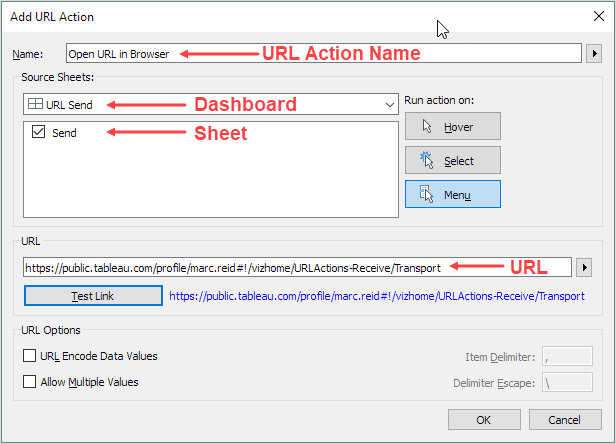 For the method of how the action will be triggered, I’m using Menu, which will add a link to the tooltip. Using Menu allows for multiple URL actions to be shown and clicked on separately as we’ll see later.Before clicking OK to save the URL action, you can click the Test Link button to ensure the link is working. When clicked, a browser should open to Tableau Public showing the specified dashboard:
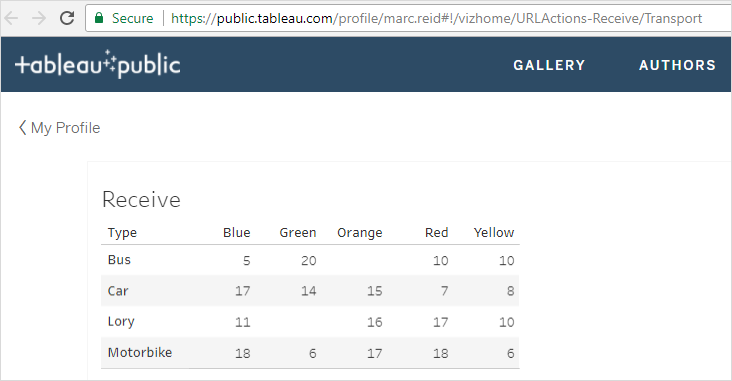 Click OK to save the URL action and now test the action from within the sending dashboard. Selecting any cell on the dashboard will show the tooltip with a link to trigger the URL action:
 The link text is the same as the URL action name I entered when I created the URL action. Clicking this link will again open the dashboard in Tableau Public that is specified in the URL.
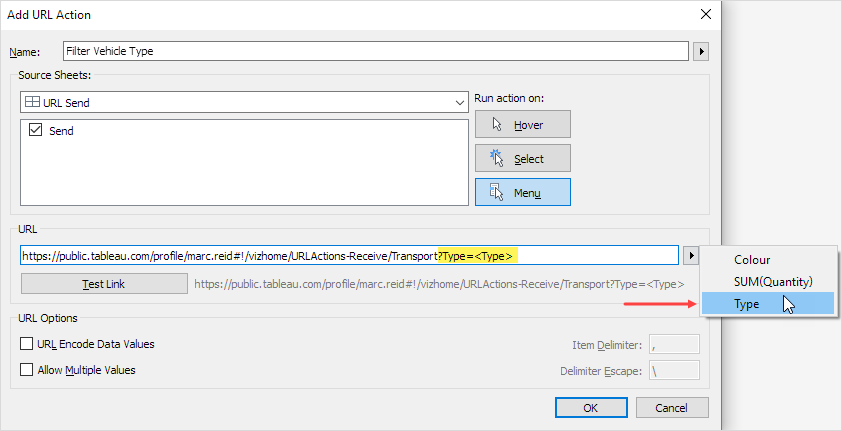 Now when we select a cell in the dashboard, we see two links, one for each URL action I created. Click the new one to open the receiving dashboard with a filter in place based on which vehicle type was selected in the sending dashboard. Below I’ve selected to filter to Lory:
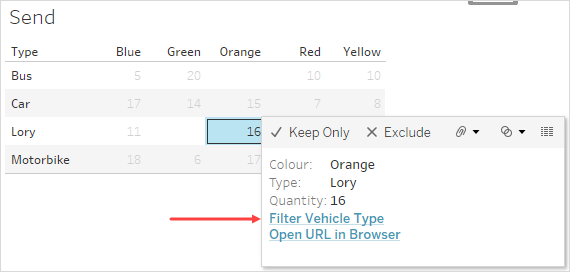 This will open a new browser tab with the same receiving dashboard filtered to show vehicles with a Type of Lory only:
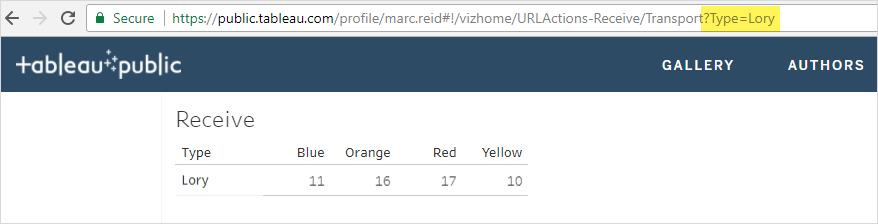 Although I clicked on the value for orange lorries, values for all lorries are shown as the URL action does not contain a filter for the colour field. Let’s create a new URL Action to filter both Type and Colour fields.When adding any additional filters to the same URL action, they must be separated with an ampersand character:?Type=<Type>&Colour=<Colour>
 Note, the fields shown in the drop-down list on the right-hand side need to be present on the source (sending) dashboard to show up here. This ensures that they contain a value that can passed in the URL action.Selecting the value for orange lorries on the dashboard again and clicking the new URL action now filters the receiving dashboard with both fields:
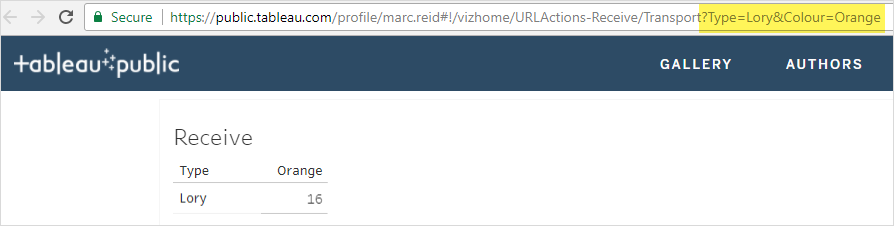 To be able to pass through multiple values for the same field in a URL parameter, the Allow Multiple Values checkbox must be checked. We can update this in the Type and Colour URL action just created:
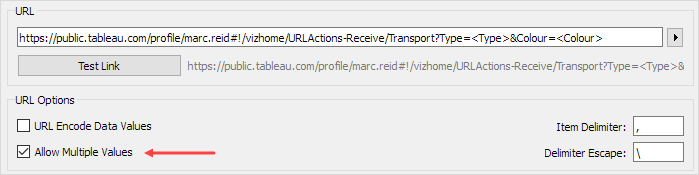 We can now select values for two different colours (holding down the Ctrl key and multi-selecting):
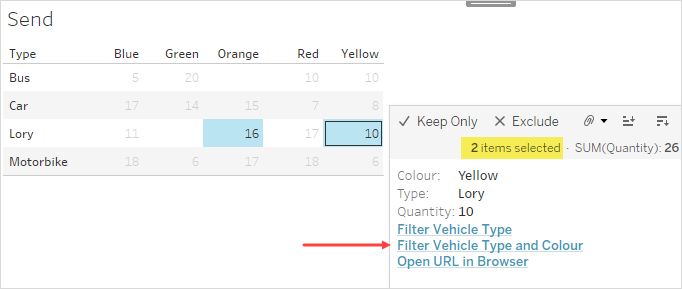 Clicking the URL Action link shows the result in the browser:
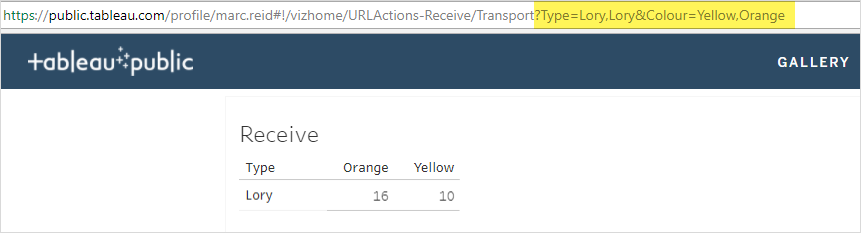 Let’s try filtering to red busses and blue lorries:
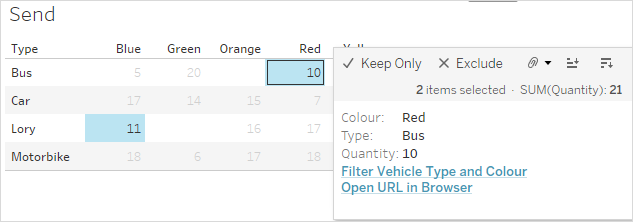 Notice that the “Filter Vehicle Type” URL action is no longer in the list of links. This is because that action had not been configured to allow multiple values and we have now selected multiple values of the field Type (Bus and Lory), so this action is not valid in this scenario (as Tableau cannot determine which one of these values should be sent).When we click the URL action we get the following result:
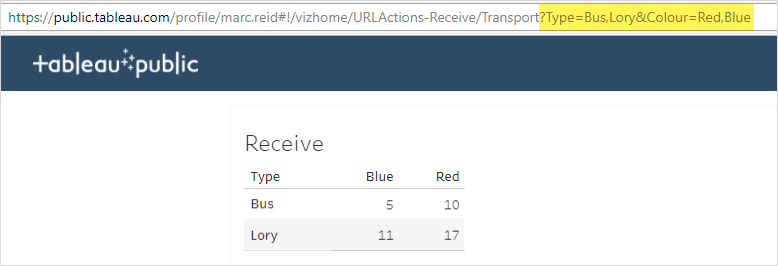 In addition to showing values for red busses and blue lorries the view is also showing values for blue busses and red lorries. This is because the default logic for URL actions is to match in the following way:(Type = Bus OR Lory) AND (Colour = Blue OR Red)But what if we want the following logic:(Type = Bus AND Colour = Red) OR (Type = Lory AND Colour = Blue)Tableau calls this Exclusive filtering and it’s implemented by appending an additional parameter (~s0) just after the field name that is being filtered in the destination dashboard as shown below:https://public.tableau.com/profile/marc.reid#!/vizhome/URLActions-Receive/Transport?Type~s0=<Type>&Colour~s0=<Colour>I’ve created a new URL action called “Exclusive filter Vehicle Type and Colour” as shown below:
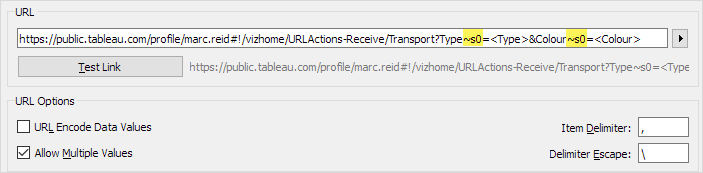 Let’s select the same values and test this new filter:
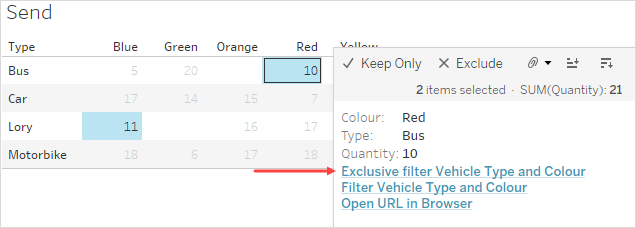 This now shows just the desired two values:
 And below, showing the parameter inserted into the title of the sheet:
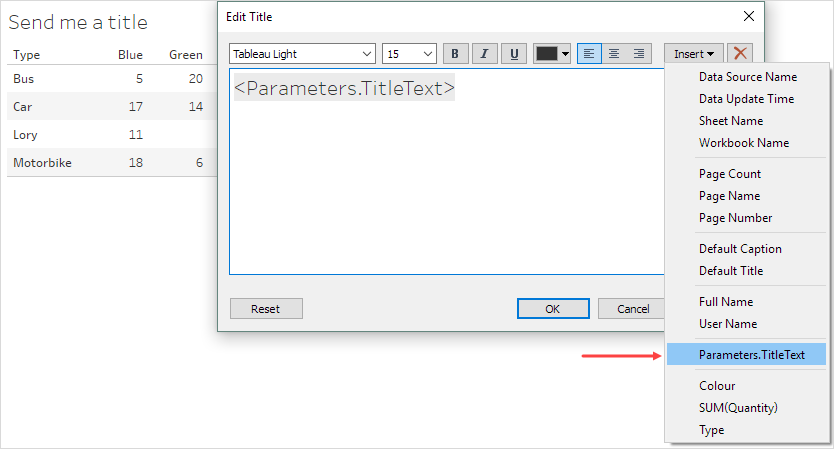 Back on the sending workbook, I’ll create a new URL action the same as the last but adding the extra URL parameter to pass a value to the Tableau parameter in the receiving dashboard:
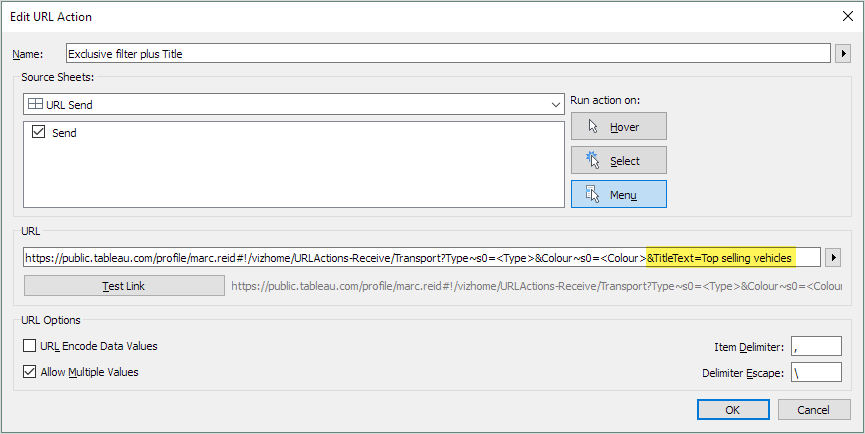 The additional text at the end of the URL is:&TitleText=Top selling vehiclesWhere “TitleText” is the name of the parameter I created in the receiving dashboardWe can now select the same two values and click this new URL action:
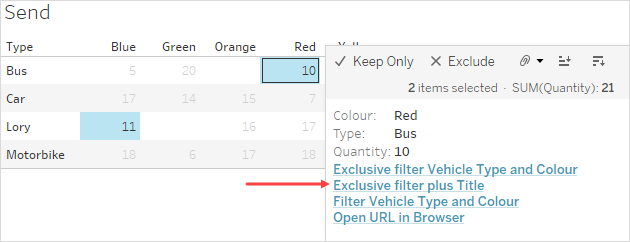 Which shows the following in the browser:
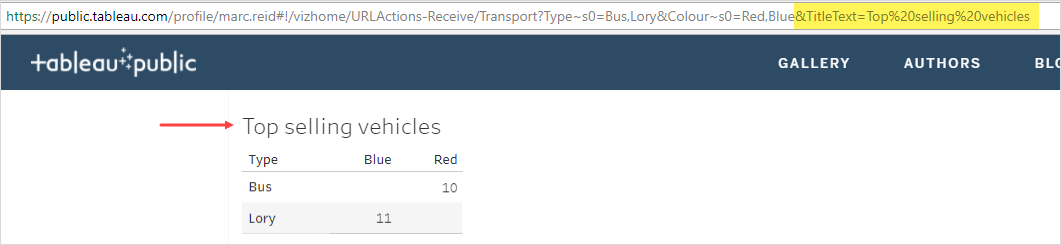 The Tableau parameter has received the value we passed it (“Top selling vehicles”) and this is now showing in the title of the worksheet on the dashboard. Note the spaces between the 3 words we passed have been replaced in the URL with the required URL encoding: %20. This happens automatically.We can also make the value that is passed to the parameter be edited dynamically by storing it in a Tableau parameter on the sending dashboard and displaying this parameter on screen for the user to type in the desired title:
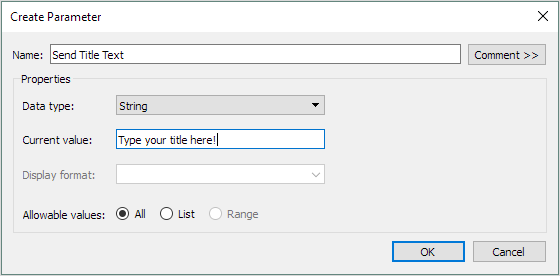 The URL action needs to be updated to use this parameter instead of the fixed text string that was used previously:
 Finally, we add the parameter to the dashboard so we can type in a title to send:
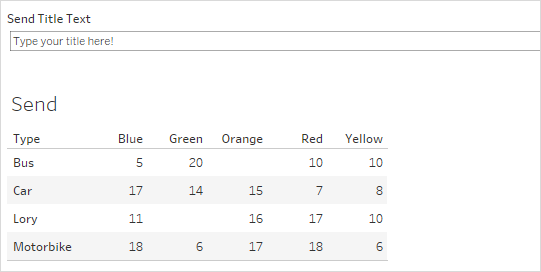 We can now type in a title we choose and select any field values:
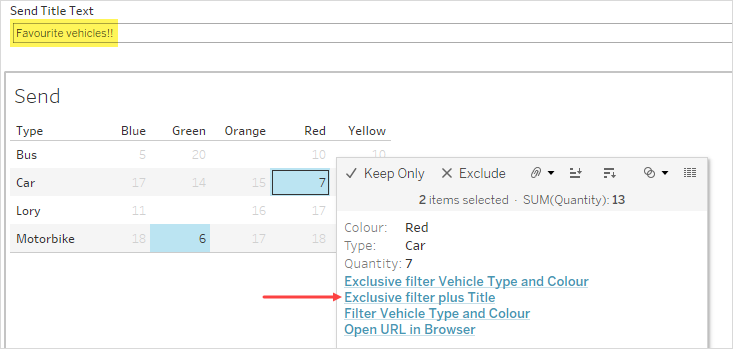 All of which are displayed in the browser when we click the URL action:
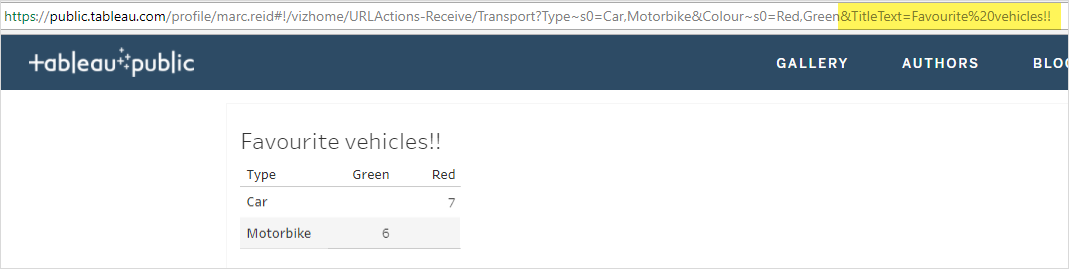 So far, we’ve only filtered on dimension values. It’s also possible to send filter values for measures. Here’s an example of a URL action to just filter on the Quantity measure that is shown in the dashboard:
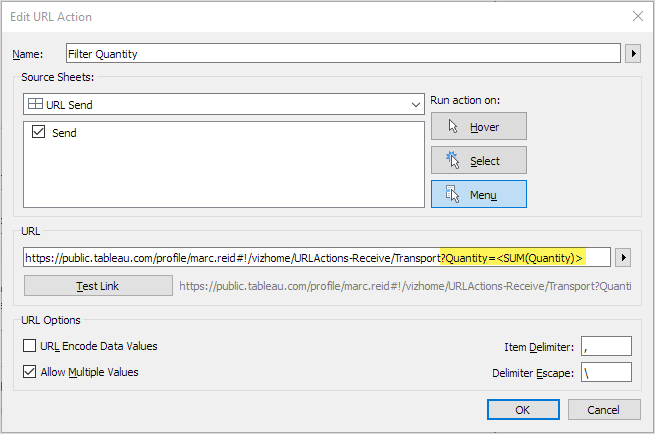 I can now select a couple of measure values and click the new URL action in the tooltip:
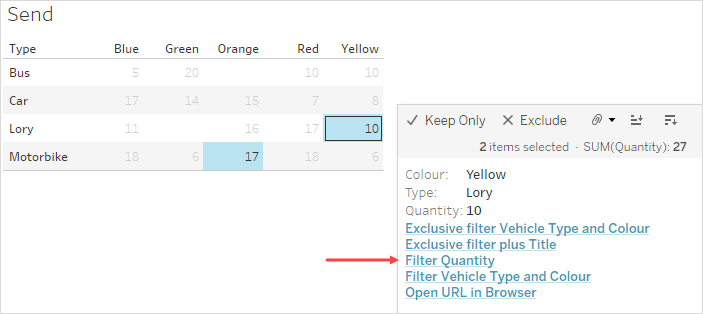 Note, this action is not filtering on the Type or the Colour, just the Quantity measure. Therefore, all matching values of the measure (17 or 10 in this example) are shown, regardless of the vehicle type or colour.
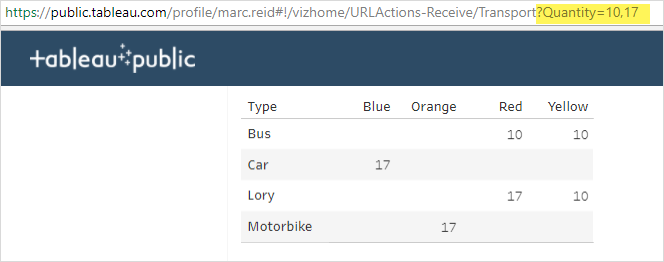 One other configuration is to send a value from a Tableau parameter to filter a dimension or measure in the receiving dashboard. So, to replicate the above example, instead of selecting the values 17 and 10 in the sending dashboard, I will create a Tableau parameter (called “Send Quantity”) so I can then type the required values in. Here’s the updated sending dashboard with the new parameter inserted to the left of the title parameter:
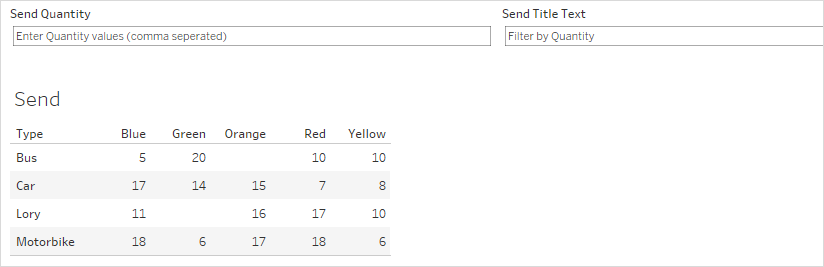 Below is the new URL action to pass values from the new “Send Quantity” parameter to filter the Quantity measure field in the receiving dashboard:
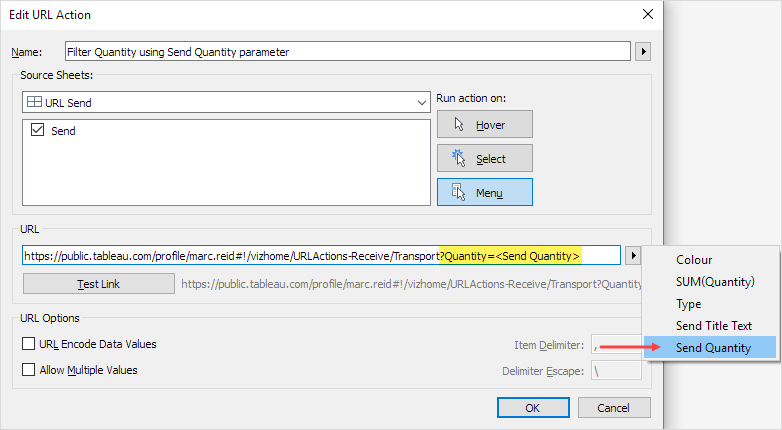 Note that “Allow Multiple Values” is not ticked. This is because we are not selecting multiple values in the source dashboard to send, but rather sending one single text string contained in the Tableau parameter, even though it may contain multiple, comma separated, values within it.We can now type values into the parameter separated by a comma (no spaces), and then click anywhere in the dashboard to see the list of URL actions and select the new action:
 And here’s the result:
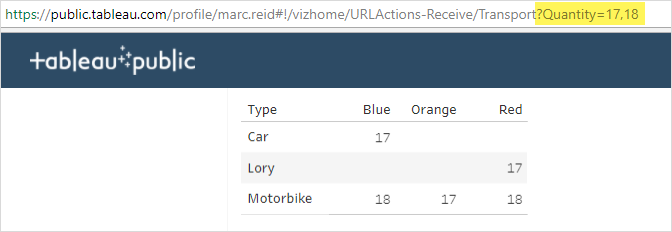
For a complete list with descriptions, see this page. Note some of these may work differently on Tableau Public versus an in-house Tableau Server, so you will need to experiment.To use one of these parameters, append it to the end of a URL. If there are no other parameters being used, it must follow a question mark, otherwise it should follow an ampersand. For example, using the same Send dashboard as previously, to move the toolbar to the top, the URL action would be:https://public.tableau.com/profile/marc.reid#!/vizhome/URLActions-Receive/Transport?:toolbar=topwith the result in the browser show below, with the toolbar highlighted at the top: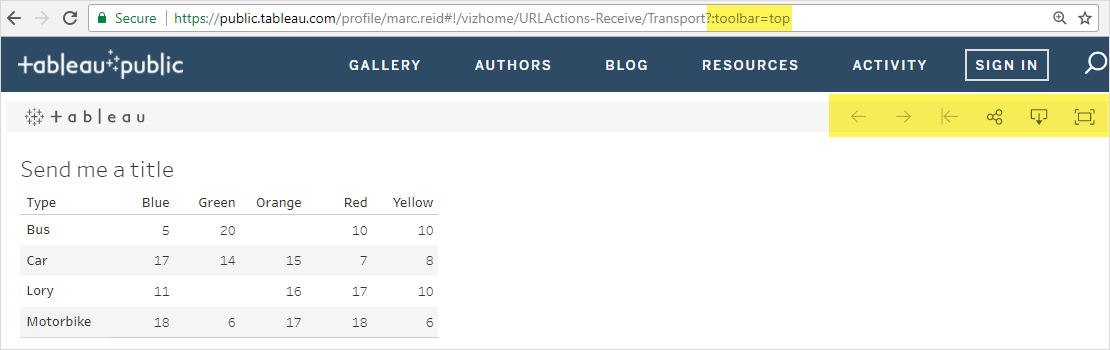
 Andy Kriebel wrote a blog post on this functionality here. There is a long list of Q&As in the comments which gives more information and answers to common questions.
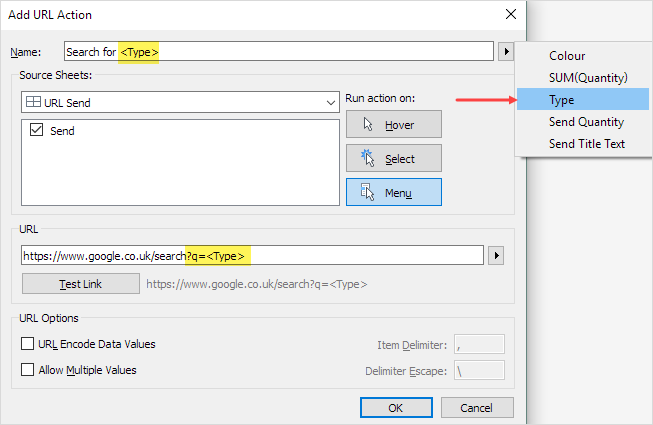 For this URL action I have inserted the Type field in the Name of the action as well as the URL. This will make the value clicked on in the dashboard appear in the URL action link in the tooltip making it clearer what will happen if the link is clicked on. Here it the resulting action in the dashboard after I click on “Bus”:
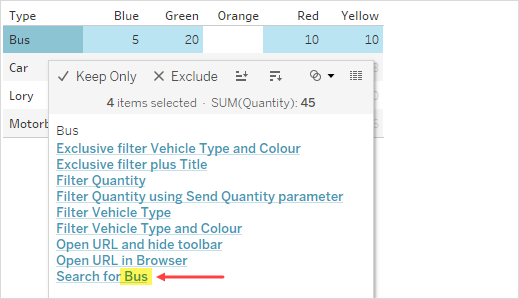 If there is a Web Page object on the same dashboard that has the URL action, instead of opening the link in a new browser window, Tableau will open the link inside the Web Object, as below:
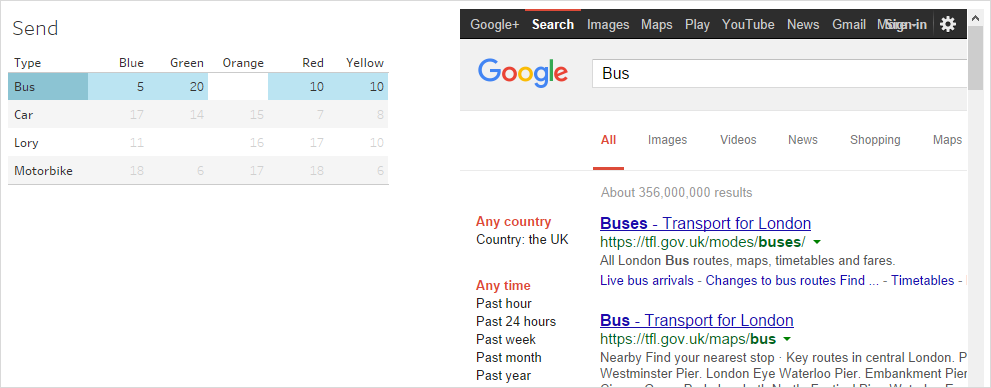
 Here is the URL action, highlighting where the Tableau parameter is being used:
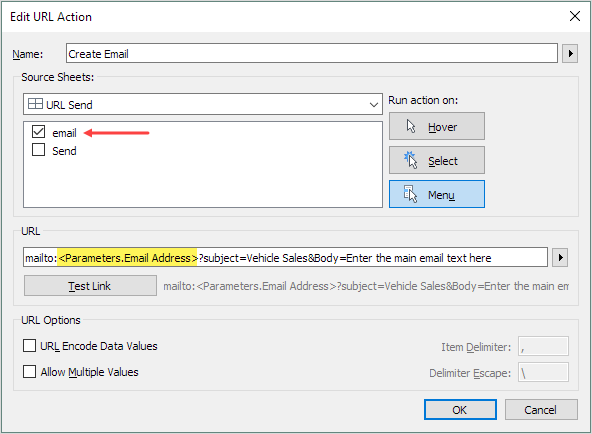 Note, as I now have two sheets on this dashboard I have to select which sheet(s) will trigger the URL action. In this case I just want the email sheet to use the action so I have deselected the “Send” sheet.I can select anywhere in the “email” sheet to see the URL action link, which when clicked opens a web browser and creates an email in my email client (Gmail). If you were using Outlook, it would create a new email there.
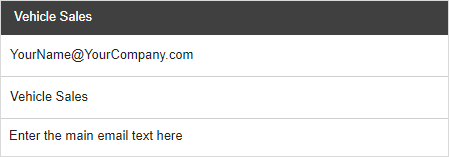 The email body could also contain selected values from the worksheet, for example, the below action will insert the selected vehicle types into the middle of the body of the email with text above and below those fields.Note, “Allow Multiple Fields” is checked and the “Item Delimiter” has been set to %0a which is the URL encoded character for a line break.
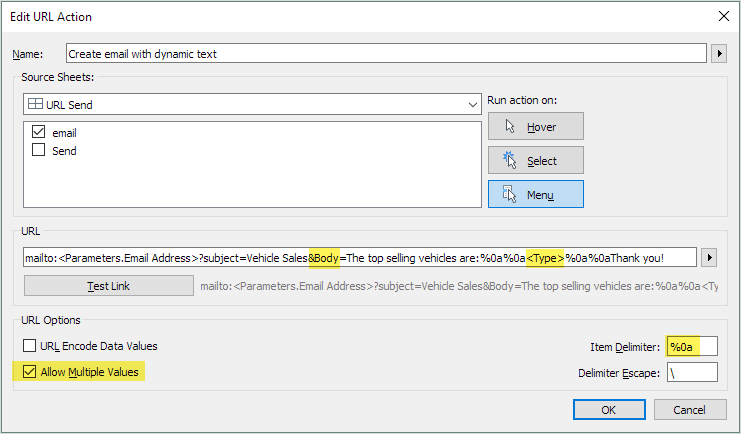 We can now select the top two selling vehicles and then trigger the URL action:
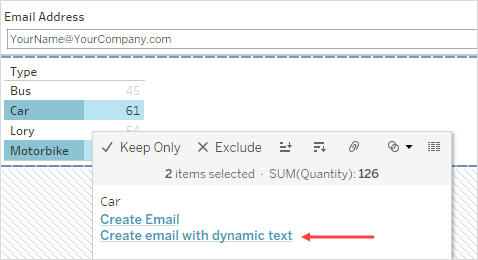 Which generates the below email in Gmail in my browser:
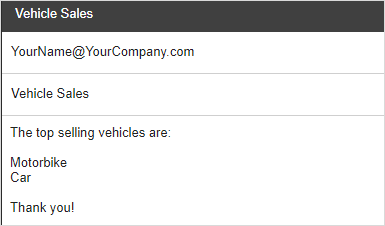 Below is the full text of the URL action for reference:
- Navigate to a different dashboard (in the same or different workbook)
- Pass filters to a dashboard (using AND or OR logic)
- Pass values to Tableau parameters
- Affect how a dashboard is displayed in a web page (such as hiding the Tableau toolbar)
- Create a CSV file of data from a published dashboard
- Create a PDF or PNG file of a published dashboard
- Open an external web page in a browser or in a Web Page object within a dashboard
- Generate an email and populate with fields from a dashboard
The Tableau URL
On a standard Tableau Server, the structure is as follows:For Tableau Public, which is the server I used while creating this post, it’s like this:If you have any spaces in your file name or dashboard name, these will be removed in the URL.I’ve uploaded two simple workbooks to Tableau Public that will be used throughout this blog post. One for sending URL actions and another to receive those URL actions.Link to Sending dashboardLink to Receive dashboard1. Navigate to a dashboard
I’ll use the URL of the published Receive dashboard as the target for a URL action.To create the URL action, select: Dashboard > Actions…Then: Add Action > URL…Give a name to the URL action and select the Dashboard and Sheet that the URL Action will be triggered from as well as which method to trigger the action – in this case I’m using “Menu”. Finally paste in the URL of the dashboard that you want the URL action to open.For the method of how the action will be triggered, I’m using Menu, which will add a link to the tooltip. Using Menu allows for multiple URL actions to be shown and clicked on separately as we’ll see later.Before clicking OK to save the URL action, you can click the Test Link button to ensure the link is working. When clicked, a browser should open to Tableau Public showing the specified dashboard:Click OK to save the URL action and now test the action from within the sending dashboard. Selecting any cell on the dashboard will show the tooltip with a link to trigger the URL action:The link text is the same as the URL action name I entered when I created the URL action. Clicking this link will again open the dashboard in Tableau Public that is specified in the URL.2. Pass filters to a dashboard
The next step is to make the URL action more dynamic by passing filter values to the destination dashboard based on what we select in the sending dashboard.Note, I’ve set the sending and receiving dashboards up with the same structure for simplicity, however, they could be completely different dashboards as long as there are matching values in the selected sending and receiving fields of each dashboard.I'll create a URL action to filter the receiving dashboard to the selected vehicle Type. The action is created the same way as before, but I'll add a URL parameter at the end of the URL, which passes a filter value to the receiving dashboard.To pass a fixed value, the format of the URL parameter is as follows:?<destination field name>=<field value>For example, to filter to show Motorbikes only, we would add the following to the end of the URL:?Type=MotorbikeBut we will make it dynamic so the value being filtered changes based on what we select in the source dashboard. To do this, type the first part of the filter (?Type=) at the end of the URL, then instead of typing “Motorbike”, we add the name of a field in the sending dashboard that contains the filter value we want to send. To do this, click the right arrow and select the Type field as shown below. This will insert the field at the end of the URL in angle brackets:Now when we select a cell in the dashboard, we see two links, one for each URL action I created. Click the new one to open the receiving dashboard with a filter in place based on which vehicle type was selected in the sending dashboard. Below I’ve selected to filter to Lory:This will open a new browser tab with the same receiving dashboard filtered to show vehicles with a Type of Lory only:Although I clicked on the value for orange lorries, values for all lorries are shown as the URL action does not contain a filter for the colour field. Let’s create a new URL Action to filter both Type and Colour fields.When adding any additional filters to the same URL action, they must be separated with an ampersand character:?Type=<Type>&Colour=<Colour>Note, the fields shown in the drop-down list on the right-hand side need to be present on the source (sending) dashboard to show up here. This ensures that they contain a value that can passed in the URL action.Selecting the value for orange lorries on the dashboard again and clicking the new URL action now filters the receiving dashboard with both fields:To be able to pass through multiple values for the same field in a URL parameter, the Allow Multiple Values checkbox must be checked. We can update this in the Type and Colour URL action just created:We can now select values for two different colours (holding down the Ctrl key and multi-selecting):Clicking the URL Action link shows the result in the browser:Let’s try filtering to red busses and blue lorries:Notice that the “Filter Vehicle Type” URL action is no longer in the list of links. This is because that action had not been configured to allow multiple values and we have now selected multiple values of the field Type (Bus and Lory), so this action is not valid in this scenario (as Tableau cannot determine which one of these values should be sent).When we click the URL action we get the following result:In addition to showing values for red busses and blue lorries the view is also showing values for blue busses and red lorries. This is because the default logic for URL actions is to match in the following way:(Type = Bus OR Lory) AND (Colour = Blue OR Red)But what if we want the following logic:(Type = Bus AND Colour = Red) OR (Type = Lory AND Colour = Blue)Tableau calls this Exclusive filtering and it’s implemented by appending an additional parameter (~s0) just after the field name that is being filtered in the destination dashboard as shown below:https://public.tableau.com/profile/marc.reid#!/vizhome/URLActions-Receive/Transport?Type~s0=<Type>&Colour~s0=<Colour>I’ve created a new URL action called “Exclusive filter Vehicle Type and Colour” as shown below:Let’s select the same values and test this new filter:This now shows just the desired two values:3. Pass values to Tableau parameters
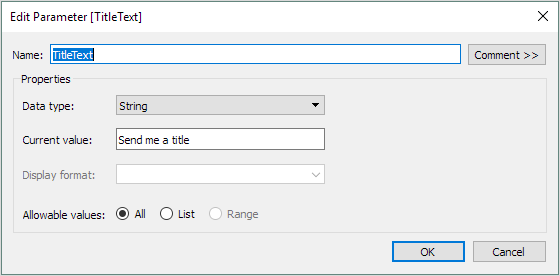
As well as passing values to filters in a destination dashboard, we can also pass values to Tableau parameters. The good news is that this is done in exactly the same way, but simply replacing the field name with the parameter name. So, if I create a parameter in the receiving dashboard called TitleText and then add this to the Title of the receiving dashboard, I can then send a value to this parameter to change the title:Here’s the parameter:And below, showing the parameter inserted into the title of the sheet:Back on the sending workbook, I’ll create a new URL action the same as the last but adding the extra URL parameter to pass a value to the Tableau parameter in the receiving dashboard:The additional text at the end of the URL is:&TitleText=Top selling vehiclesWhere “TitleText” is the name of the parameter I created in the receiving dashboardWe can now select the same two values and click this new URL action:Which shows the following in the browser:The Tableau parameter has received the value we passed it (“Top selling vehicles”) and this is now showing in the title of the worksheet on the dashboard. Note the spaces between the 3 words we passed have been replaced in the URL with the required URL encoding: %20. This happens automatically.We can also make the value that is passed to the parameter be edited dynamically by storing it in a Tableau parameter on the sending dashboard and displaying this parameter on screen for the user to type in the desired title:The URL action needs to be updated to use this parameter instead of the fixed text string that was used previously:Finally, we add the parameter to the dashboard so we can type in a title to send:We can now type in a title we choose and select any field values:All of which are displayed in the browser when we click the URL action:So far, we’ve only filtered on dimension values. It’s also possible to send filter values for measures. Here’s an example of a URL action to just filter on the Quantity measure that is shown in the dashboard:I can now select a couple of measure values and click the new URL action in the tooltip:Note, this action is not filtering on the Type or the Colour, just the Quantity measure. Therefore, all matching values of the measure (17 or 10 in this example) are shown, regardless of the vehicle type or colour.One other configuration is to send a value from a Tableau parameter to filter a dimension or measure in the receiving dashboard. So, to replicate the above example, instead of selecting the values 17 and 10 in the sending dashboard, I will create a Tableau parameter (called “Send Quantity”) so I can then type the required values in. Here’s the updated sending dashboard with the new parameter inserted to the left of the title parameter:Below is the new URL action to pass values from the new “Send Quantity” parameter to filter the Quantity measure field in the receiving dashboard:Note that “Allow Multiple Values” is not ticked. This is because we are not selecting multiple values in the source dashboard to send, but rather sending one single text string contained in the Tableau parameter, even though it may contain multiple, comma separated, values within it.We can now type values into the parameter separated by a comma (no spaces), and then click anywhere in the dashboard to see the list of URL actions and select the new action:And here’s the result:4. Affect how a dashboard is displayed in a web page
The Tableau server can also interpret a number of different parameter values (or tags), that alter how the dashboard is displayed in the browser. A small sample is listed below:| URL Parameter | Function |
| :embed=yes | Hides the navigation controls and toolbar (not on Tableau Public) |
| :tabs=no | Hide the tabs used to navigate to different worksheets in the same workbook |
| :toolbar=top | Move the toolbar from the bottom of the page to the top.You can also use “no” instead of “top” to not show the toolbar. |
5. Create a CSV file of data from a published dashboard
Very often users of your dashboard want to be able to extract the raw data to use it elsewhere. A csv file can be easily created by simply adding .csv at the end of the URL. Unfortunately, this didn’t work when I tried on Tableau Public, but it did work on our internal Tableau Server. Your browser will prompt you to save the file. Below is the file I saved and opened in Excel:Andy Kriebel wrote a blog post on this functionality here. There is a long list of Q&As in the comments which gives more information and answers to common questions.6. Create a PDF or PNG file of a published dashboard
Similar to the previous tip, to create either of these filetypes you just add the relevant extension to the end of the URL.- To create a PDF of your dashboard, add: .pdf
- To create a PNG of your dashboard, add: .png
7. Open an external web page in a browser or in a Web Page object on a dashboard
Instead of navigating to another Tableau dashboard with a URL action, you can also open any other web page. For example, using the below URL in an action would open a browser window to Google:www.google.comFor more interactivity with your dashboard you can also pass values from the dashboard to external websites, such as a search parameter in the above example. So if we want to search Google for the selected type of vehicle on the dashboard, we can create the following URL action:For this URL action I have inserted the Type field in the Name of the action as well as the URL. This will make the value clicked on in the dashboard appear in the URL action link in the tooltip making it clearer what will happen if the link is clicked on. Here it the resulting action in the dashboard after I click on “Bus”:If there is a Web Page object on the same dashboard that has the URL action, instead of opening the link in a new browser window, Tableau will open the link inside the Web Object, as below:8. Generate an email and populate with fields from a dashboard
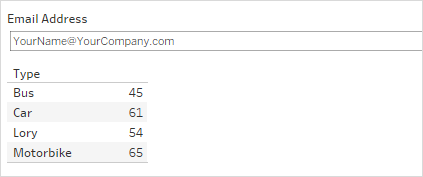
It’s possible to auto generate an email using a URL action and populate certain fields in the email based on what data you have selected in the dashboard and/or contained in parameter values when the URL action is triggered. The minimum format of the URL is:mailto:Name@YourCompany.comHowever, two predefined URL parameters can also be used when creating emails with URL actions: Subject and Body. These are used in the same way as before in that the first parameter is prefixed with a question mark and the next one with an ampersand, such as:mailto:Name@YourCompany.com?subject=Vehicle Sales&Body=Enter the main email text hereInstead of having the email address be fixed, this could be populated from a Tableau parameter. In the example below, I’ve added a parameter to the dashboard where the email address can be entered.Here is the URL action, highlighting where the Tableau parameter is being used:Note, as I now have two sheets on this dashboard I have to select which sheet(s) will trigger the URL action. In this case I just want the email sheet to use the action so I have deselected the “Send” sheet.I can select anywhere in the “email” sheet to see the URL action link, which when clicked opens a web browser and creates an email in my email client (Gmail). If you were using Outlook, it would create a new email there.The email body could also contain selected values from the worksheet, for example, the below action will insert the selected vehicle types into the middle of the body of the email with text above and below those fields.Note, “Allow Multiple Fields” is checked and the “Item Delimiter” has been set to %0a which is the URL encoded character for a line break.We can now select the top two selling vehicles and then trigger the URL action:Which generates the below email in Gmail in my browser:Below is the full text of the URL action for reference:mailto:<Parameters.Email Address>
?subject=Vehicle Sales
&Body=The top selling vehicles are:%0a
<Type>
%0a%0a
Thank you!
Below are some reference pages for more information and to help problem solve when using URL actions.