

Note: The python scripts and libraries shown in this blog post were deployed using Python 3.8.
A year or so ago I published a blog series where I looked at how we can use Alteryx to create Lego images from someone’s portrait. I recently went back to this project to look at how I could automatically trigger this Alteryx workflow to run when an image is loaded to Amazon Web Services (AWS) S3.
In this blog, we’re going to look at a more ‘businessy’ example whereby we want to trigger a transformation process to occur when a new .csv file is loaded to our AWS S3 bucket.
To do this, we’re going to use another of AWS’s services, Lambda and this short video showcases what the end result looks like...
Let’s start with an example workflow. We’ve generated a simple example which makes use of the ‘S3 Download’ tool available within the platform to download a specific CSV file. Our workflow then performs some simple transformations before loading it into our database so that it can be further analysed by our business.
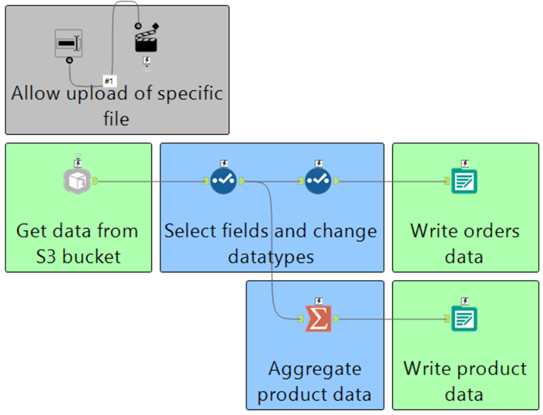
Now those of you whom aren’t completely new to the product may be thinking, ‘hold on, there is an interface tool on the canvas and therefor this cannot be a workflow’, you’d be correct in this thinking, my canvas is in fact, an analytic application.
The reason for this is that I want to dynamically change the object that is retrieved from S3 based on the file that has been uploaded.
This application has then been published to our Alteryx Server so that we can make use of the ‘Alteryx Gallery API’ which we can use to trigger our workflow/application to run.
In this example, we are going to look at how we can interact with the Alteryx Gallery API using the Python programming language, however, AWS Lambda can process other languages, so feel free to use those if they are more familiar to you!
Let’s start by making our lives as easy as possible and utilise some pre-built functions that make executing a workflow on the Alteryx Gallery a much simpler process. These functions can be dowloaded from The Information Labs GitHub, here.
We can then import these functions so that we can execute them from within our script.
from AYXAPIFunctions import *The function that we are going to use in order to trigger our workflow/application to run is the ‘execute_workflow’ function which has several parameters.
Execute_workflow(apikey,apisecret,baseurl,workflowid,payload)
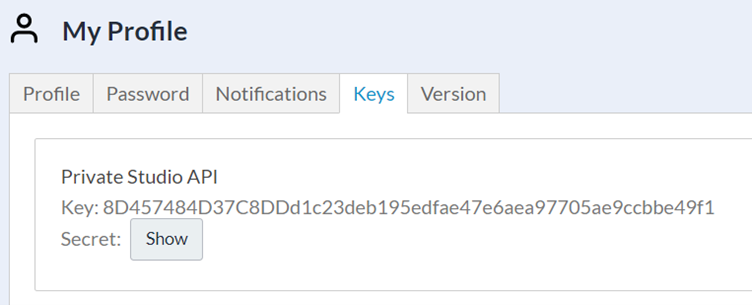
Let’s start with he apikey and apisecret, these are items which allow us to authenticate ourselves with the Alteryx Gallery API. These credentials can be found by going to the ‘My Profile’ tab in your Alteryx Gallery.
Permissions to use the Alteryx Gallery API must be granted to you by an Alteryx Gallery administrator.
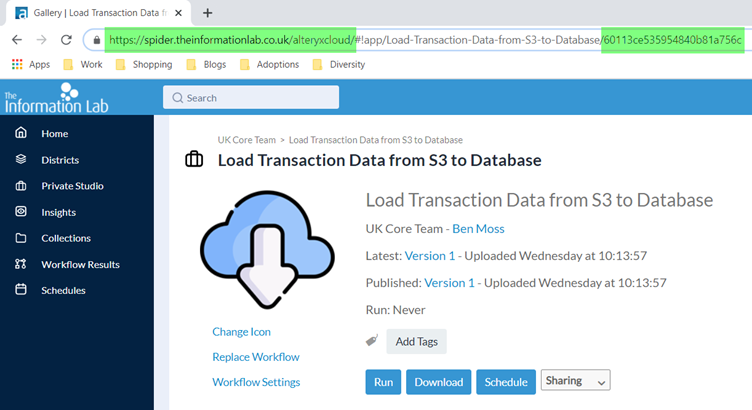
The next two components, the baseurl and the workflowid can easily be extracted from the url that is presented when you navigate to your workflow/application in the Gallery.
The final item we must give is the payload. The payload is how we inform Alteryx of what values we wish to pass into our application for each of the different interface tools that we may have in our application (if you are running a workflow, you will have no interface tools, and therefor your payload should be empty).
Generating the payload for your application isn’t as easy a process as with the other items, but it’s certainly nothing to strenuous, the format of the payload is in JSON and follows the structure outlined below…
{'questions': [{'name': 'question1name','value': 'question1value'},{'name': 'question2name','value': 'question2value'}],'priority': ''}We can simplify this slightly, in my case I have no interest in setting the priority, so we can remove this element from our string; In our example, we also only have one interface tool and therefor only require a single question element.
{'questions': [{'name': 'question1name','value': 'question1value'}]}Now in terms of what the ‘question1name’ actually is, this is the name shown in the image below for your chosen interface tool…
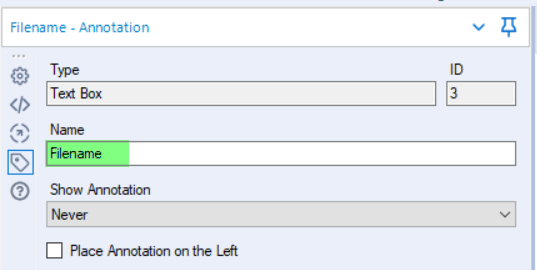
This name is generated by default but editable and I’d recommend customising it to make your work for understandable to yourself and others.
The value represents the value you wish to pass into that interface tool. We’re going to make this dynamic later, when we convert this into a Lambda Function, but for now I’m just going to give a placeholder value which I know will work.
Finally, you don’t need the JSON formatting...
{'questions': [{'name': 'Filename','value': '202012.csv'}]}We now have all the elements we require to build out our execute_workflow expression…
execute_workflow('8D457484D37C8DDd1c23deb195edfae47e6aea97705ae9ccbbe49f1','secretgoeshere','https://spider.theinformationlab.co.uk/alteryxcloud/','60113ce535954840b81a756c','{'questions': [{'name': 'Filename','value': '202012.csv'}]}')We can now take our entire script and execute it on our local computer, either by running python in the same directory as where we have saved our 'AYXAPIFunctions.py' file, or within Jupyter notebooks, in which case you will have to add a change directory operation to point at the location where your 'AYXAPIFunctions.py' file is stored.
##import the os library and change the directory so that it points at the location where our 'AYXAPIFunctions.py' is stored.import osos.chdir('C:/Users/BenMoss/Desktop/Execute Alteryx Workflow')##Import our functionsfrom AYXAPIFunctions import *##Execute our workflowexecute_workflow('8D457484D37C8DDd1c23deb195edfae47e6aea97705ae9ccbbe49f1','secretgoeshere','https://spider.theinformationlab.co.uk/alteryxcloud/','60113ce535954840b81a756c','{'questions': [{'name': 'Filename','value': '202012.csv'}]}')If things have gone well, you should get a response which returns the results log for the executed job.
If things have not gone well, the printed output will give some indication of the error you are facing, but make sure you check each of the required variables carefully before submitting an issue with the function that we have created and shared.
{'id': '6017fe5757250000ae002039','appId': 'None','createDate': '2021-01-29T13:12:55Z','status': 'Completed','disposition': 'Success','outputs': [],'messages': [{'status': 1,'text': 'Running at a Low Priority.','toolId': -1},{'status': 1,'text': 'Alias translated to ODBC:DRIVER={MySQL ODBC 8.0 Unicode Driver};Server=transactions.cik8ucqi8yqe.us-east-2.rds.amazonaws.com;Database=transactions;Uid=admin;Pwd=__EncPwd1__;|||store_orders','toolId': 8},{'status': 1,'text': 'ODBC Driver version: 03.80','toolId': 8},{'status': 1,'text': 'No Lua script was found for corresponding ODBC driver.','toolId': 8},{'status': 1,'text': '29 were read from s3-us-east-2.amazonaws.com/transactionfileuploads/202012.csv','toolId': 1},{'status': 1,'text': 'Alias translated to ODBC:DRIVER={MySQL ODBC 8.0 Unicode Driver};Server=transactions.cik8ucqi8yqe.us-east-2.rds.amazonaws.com;Database=transactions;Uid=admin;Pwd=__EncPwd1__;|||store_products','toolId': 9},{'status': 1,'text': 'ODBC Driver version: 03.80','toolId': 9},{'status': 1,'text': 'No Lua script was found for corresponding ODBC driver.','toolId': 9},{'status': 1,'text': '29 records were summarized to 28 groups','toolId': 6},{'status': 1,'text': '28 records were written to transactions (store_products)','toolId': 9},{'status': 1,'text': '29 records were written to transactions (store_orders)','toolId': 8}],'priority': 0,'workerTag': 'None','runWithE2': false}Now we've created our script in Python we can now look to move it into AWS Lambda, if you wish to understand more about what this service is then I'd advise watching this video.
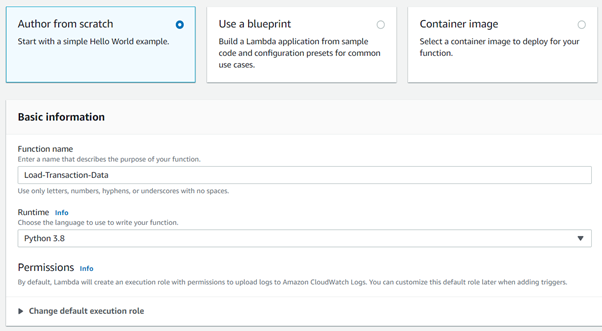
Let's now login to the AWS Management Console and launch Lambda; we’re then going to choose to ‘Create Function’.
We’ll choose to author our Lambda function from scratch, and we’ll give our function a name, in this case, I’m going to call my function ‘Load-Transaction-Data’.
The functions that we have developed in python 3.8 so we would recommend using this as the Runtime language.
We can leave all further settings as their default and then move to create our function.
We’ll now be presented with a view that allows us to control our elements of our Lambda function. We’ll start by creating a trigger so that our Lambda function will execute when a new file is loaded to our S3 bucket, as shown in this short video...
Next, we're going to bring in our dependencies, specifically our 'AYXAPIFunctions.py' file and also any python libraries which our functions are dependent on.
So with our functions file, there's a few ways to do this, but I found that the easiest method was to move to the 'Function Code' console., navigate to 'File > New File' and copying the content from our .py file and pasting it into the new file we've created in the 'Function Code' console.
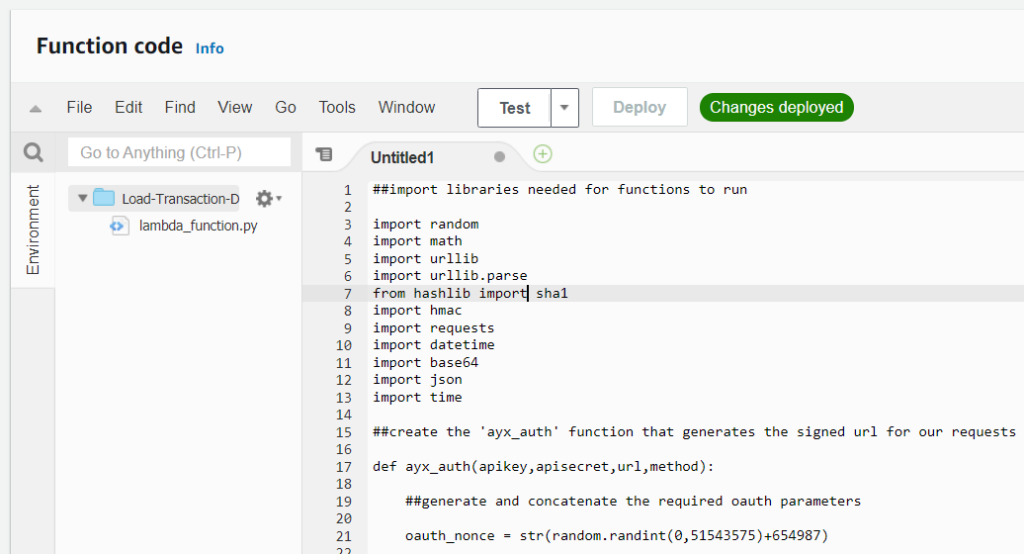
We can then save this file ('File > Save As') in our console, making sure to title it 'AYXAPIFunctions.py'.
Now we'll discuss the dependent packages which our functions are reliant on, these are listed below...
random
math
urllib
urllib.parse
hashlib
hmac
requests
datetime
base64
json
time
Fortunately, AWS have us covered for the most part, they have a wide set of packages which are already installed and available, this list can be found here.
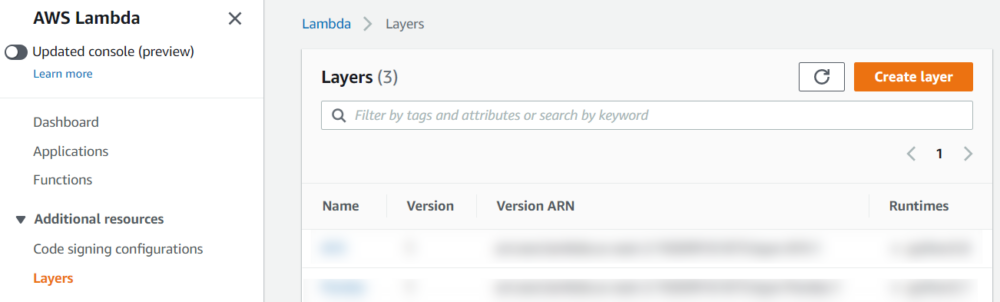
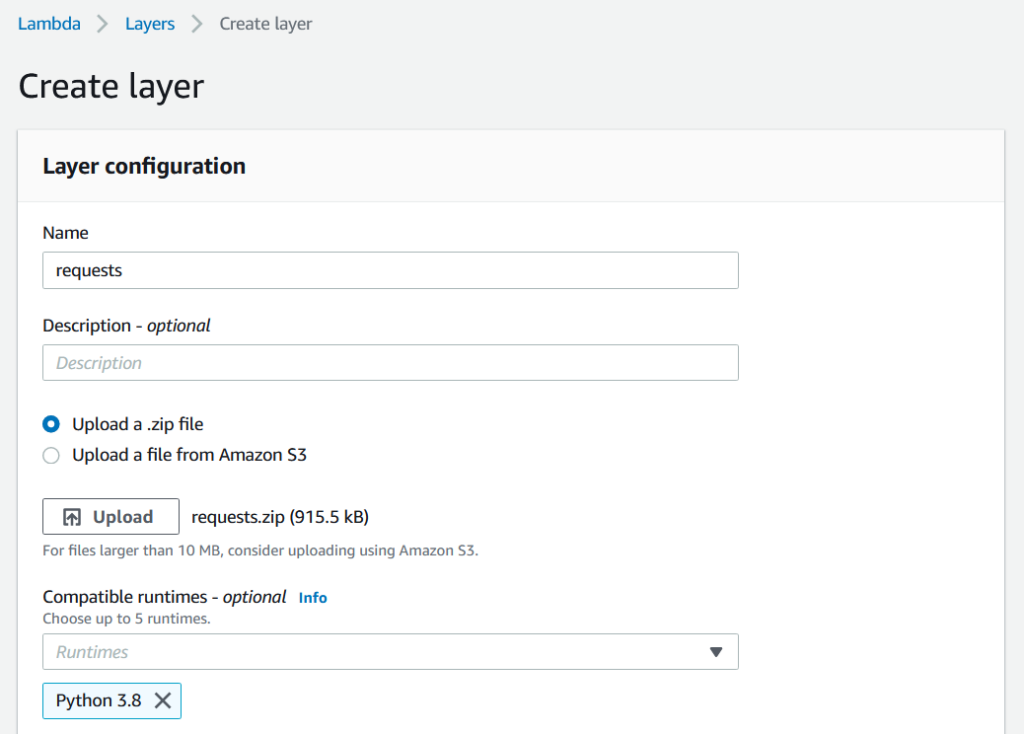
Unfortunately, one of our libraries is not available, 'requests', so we will need to make this available to our Lambda function, which can be done using 'Layers'.
We've shared a zip file of the requests package which can be added as a layer to our function. To do this we must first go to the 'Layers' area in the Lambda service (layers sit separately to functions so that they can be referenced by multiple functions).
We'll select 'Create Layer' and give our layer a need, for the sake of simplicity, I'll call this layer 'requests'.
We can then uload the shared .zip file and specify that we want to make this layer available to functions using Python 3.8.
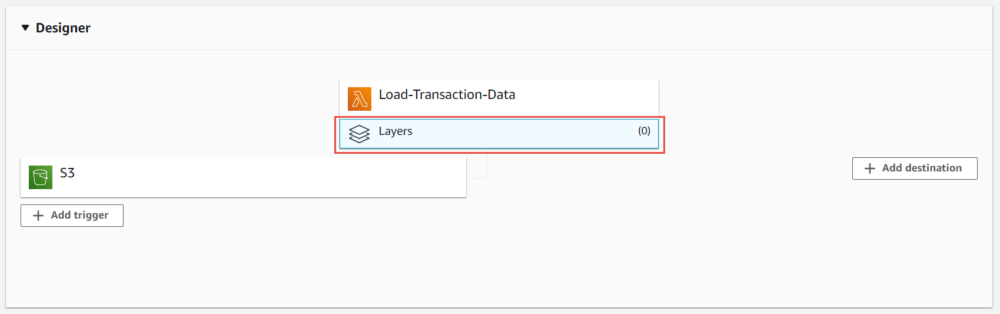
Now that we've created our layer, we now need to link this with our function. This is done by selected the 'Layers' option which sits underneath our function in the designer console.
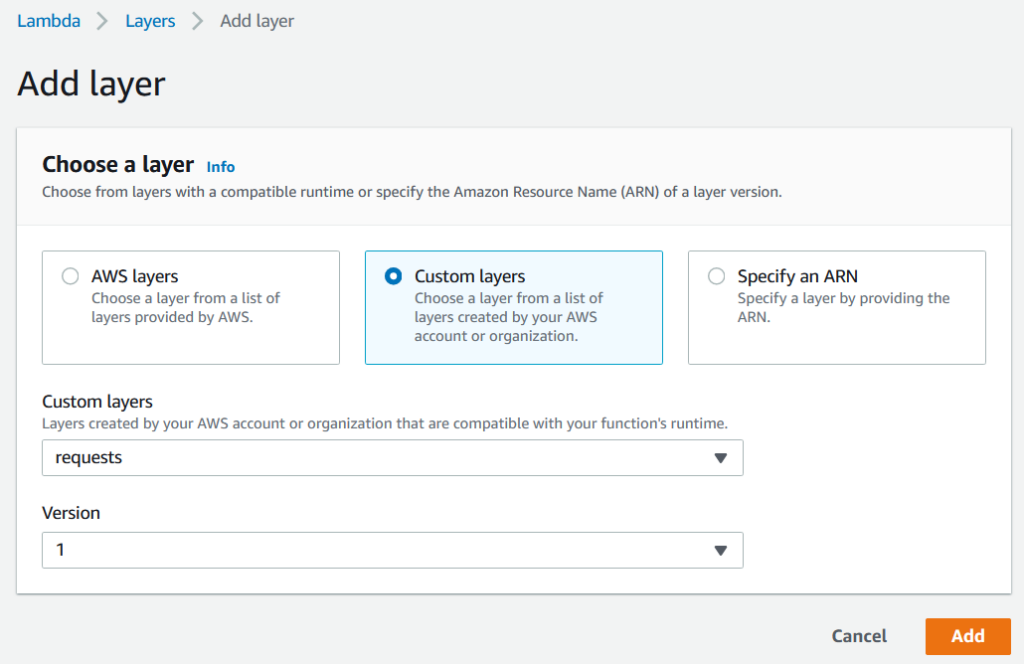
We can then scroll down and select 'Add Layer' and you'll be taken to the console shown in the image below. Here we can choose different ways in which we can add layers into our function. In our case, we have created a custom layer so we'll select this option.
Now that we have done this we can move on to adjusting our Lambda function via the function code console. By default there is some boiler plate code, we're going to adjust this so that it works for our usecase.
import jsondef lambda_handler(event, context):# TODO implementreturn {'statusCode': 200,'body': json.dumps('Hello from Lambda!')}The line # TODO implement is trying to direct us and indicate that this is where we should drop the script that we generated earlier, so let's make this adjustment (however, we will place our import * statement outside of the lambda function and at the top of our module).
##Import our functionsfrom AYXAPI import *def lambda_handler(event, context):##Execute our workflowexecute_workflow('8D457484D37C8DDd1c23deb195edfae47e6aea97705ae9ccbbe49f1','secretgoeshere','https://spider.theinformationlab.co.uk/alteryxcloud/','60113ce535954840b81a756c','{'questions': [{'name': 'Filename','value': '202012.csv'}]}')Now, you'll probably notice that our script is sitting within a function called 'lambda_handler', and one of the variables that is available from this function is the 'event' function.
In our usecase, we specified an upload to S3 as a trigger for our Lambda function. Information about this upload is passed into the event variable, which we can reference and draw valuable information out of, such as the name of the upload file (BING BING BING, this event variable is how we can make our script dynamic and reference the file that is being uploaded each time).
In order to understand what the event looks like, we can create a 'Test' event (by hitting the 'Test' button on our function code toolbar, and selecting 'Configure Test Event).
We can select the 's3-put' event template which is the trigger that we specified our function should run on; we are then presented with the format of the json object which will be passed into our function as the event variable.
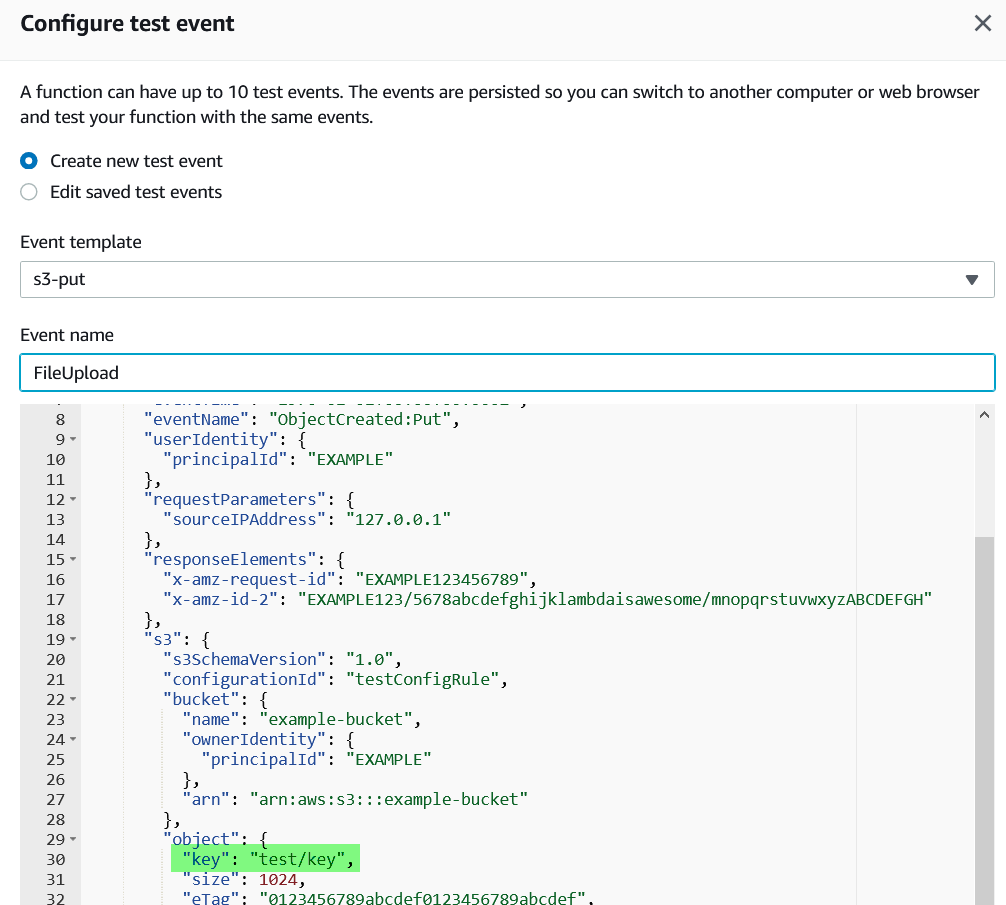
The item highlighted, the 'key' is actually the filename of the object uploaded, this is the item we need to make our workflow dynamic, it's our filename that we want to drop into the app. We must add a line within our script to extract the key from our json event object.
Filename = event['Records'][0]['s3']['object']['key']And we can then pass this variable into the payload element of our execute_workflow function...
##before'{'questions': [{'name': 'Filename','value': '202012.csv'}]}'##after'{'questions': [{'name': 'Filename','value': ''+Filename+''}]}')The final edit we are going to make before deploying our script and performing a test is to create a mechanism to allow us to understand if our workflow has executed correctly or not.
When a Lambda function is ran, information is written to AWS's CloudWatch service, things like how long the function took to execute and how much memory it used (this information is then used to bill us for use of the Lambda service).
Any variables that are set to print() in our function are also written to our log, and therefor I'm going to wrap our execute_workflow function within a print statement, meaning the response will get written to our CloudWatch logs.
Therefor our final Lambda_Function.py file looks something like...
##Import our functionsfrom AYXAPI import *def lambda_handler(event, context):Filename = event['Records'][0]['s3']['object']['key']##Execute our workflowprint(execute_workflow('8D457484D37C8DDd1c23deb195edfae47e6aea97705ae9ccbbe49f1','secretgoeshere','https://spider.theinformationlab.co.uk/alteryxcloud/','60113ce535954840b81a756c','{'questions': [{'name': 'Filename','value': ''+Filename+''}]}'))When you hit test, you'll likely be prompted that the status of the test was 'failed', the reason will be outlined in the json response, in which case we are informed that the task timed out after 3.00 seconds. This timeout can be tailored to the length of time you expect your workflow to take to execute, at a maximum of 15 minutes.
If your workflow takes longer than 15 minutes to run then this method is not for you! Your workflow will still be triggered however the result will be unknown because the Lambda function will timeout before the response is returned.

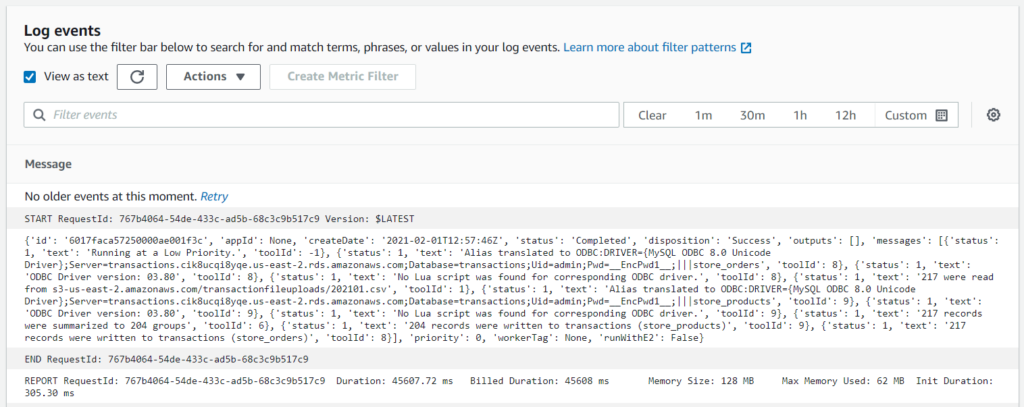
Once you've made this adjustment and test the function again, your function should now return a status 'succeeded', and the result of your execute_workflow call will be displayed in the function logs.
START RequestId: 1157f09a-028d-439c-83ab-0c54958551e7 Version: $LATEST{'id': '60149432ca430000570067bb', 'appId': None, 'createDate': '2021-01-29T23:03:14Z', 'status': 'Completed', 'disposition': 'Error', 'outputs': [], 'messages': [{'status': 1, 'text': 'Running at a Low Priority.', 'toolId': -1}, {'status': 3, 'text': 'The object 'test/key' does not exist.', 'toolId': 1}], 'priority': 0, 'workerTag': None, 'runWithE2': False}END RequestId: 1157f09a-028d-439c-83ab-0c54958551e7REPORT RequestId: 1157f09a-028d-439c-83ab-0c54958551e7\tDuration: 7198.44 ms\tBilled Duration: 7199 ms\tMemory Size: 128 MB\tMax Memory Used: 62 MB\tInit Duration: 234.86 msIn the json object returned by the function you'll notice that our job executed correctly, however the workflow returned an error message, which is shown in the subsequent messages element. In this case, our workflow has failed because the object name given in our test event, 'test/key' doesn't actually exist within our s3 bucket, and therefor our workflow cannot find the object; therefor you may choose to adjust the test event that we set-up in order reference an actual filename and to truly understand if your function would succeed if given a valid object.
Once you've tested your function, it's now time to see if it works in production, so it's time to take a file and drop it into your S3 bucket and then review the CloudWatch logs to understand if it has worked as expected.
You can do this in two ways, either by navigating to the CloudWatch service, finding the appropriate log group for your function, and then by reviewing the different log streams that have been created, or, alternatively, navigate to your function in the Lambda service, select 'Monitoring' and then choose to 'View logs in CloudWatch'.
And that's that; they'll be a full walkthrough video at some point in the future, and I'll link to that once it has been made available.
Ben