

WARNING: modifying Alteryx-made tools means they are not eligible to receive troubleshooting from Alteryx Support. Modifying the underlying files should only be done to discover underlying errors or issues and then the changes should be reverted or the tool re-downloaded from scratch. This has not been tested for all edge cases or versions of the tool/Alteryx and should be used as a proof of concept for your own investigations or tool modifications.
NOTE: This guide will not propose underlying causes nor will it address the ‘Credentials Denied’ issue that occurs in the Tableau Output UI before you even get to the point of actually configuring the tool let alone running it.
NOTE: The following was tested and confirmed using the Tableau Output tools v1.4.1 & v1.5.0 and Alteryx 2024.1.1.49. It has not been tested on other versions.
UPDATES:
[13th Jan 2025] Moved the 'Request method' and 'Request URL' log lines in the requestor.py file to before the 'response = session.request()' function rather than after it. If an error occurred during the request it could skip those two log lines since they were after the request was made.
[13th Jan 2025] Added note regarding spaces when using Notepad.
[13th Jan 2025] Confirmed this works on Tableau tools v1.4.1. Minor differences in existing code in the files can be ignored. Main testing still done on 1.5.0.
If you are a regular user of the Tableau Output tool you have probably run into various errors which may include but isn’t limited to:
Connection to platform was not successful.
'Failed to Append data to <dsName>'
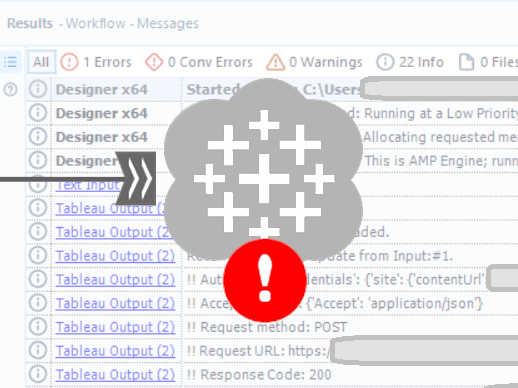
If so, then like me you’ve probably considered these error messages frustratingly obscure and cried out for the underlying REST API call and response to be spat into the Results Pane and workflow logs so you can actually potentially troubleshoot the connection. Well I’m here to show you how go from this:
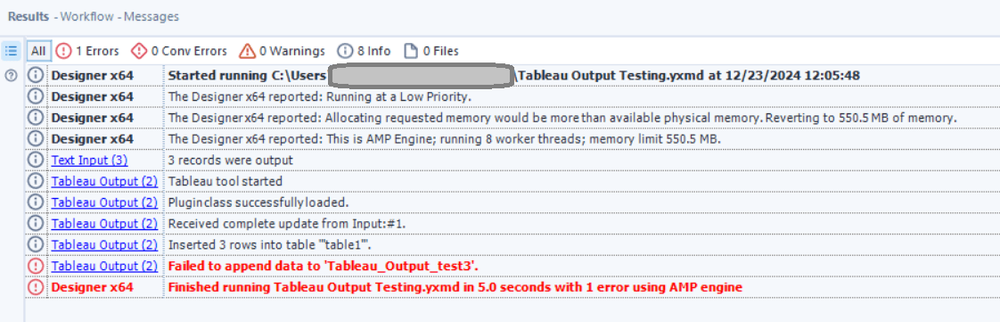
To this:
At the bottom I’ll include a TL:DR series of steps for those that want answers more quickly without the additional information.
Pre-Prep:
This process includes modifying two of the installation files for the Tableau Output tool so we’re going to take copies of these so they can be reverted. These files can be found in the following location:
C:\Users\<user>\AppData\Roaming\Alteryx\Tools\TableauInput_1_5_0\site-packages\tableau\utilities
Just go ahead and copy that entire folder and keep it somewhere safe. If you then later want to revert any of the files inside or the entire folder you can overwrite them safely.
To that end, we only care about 2 specific files.
Step 1: Updating the requestor.py file.
Requestor.py is essentially the file that handles actually firing off and receiving the Tableau Server API requests. It contains a function called ‘request_handler()’ which is the main function and where we’ll be adding extra reporting.
In order to add messages to the Alteryx Results Pane, there’s two main functions:
For errors we use:
provider.io.error(self.xmsg(“My Error Here”))
For info we use:
provider.io.infor(self.xmsg(“My Message Here”))
Both accept strings so if you convert any piece of info to a string we can spit it in there. Based on this, we want to add the following lines:
provider.io.info(self.xmsg("!! Request method: " + str(method)))
provider.io.info(self.xmsg("!! Request URL: " + str(url)))
provider.io.info(self.xmsg("!! Response Code: " + str(response.status_code)))
provider.io.info(self.xmsg("!! Response Body: " + str(response.text)))
NOTE: The indents are important! See my screenshot below.
NOTE: If using Notepad to edit the file rather than an IDE like VS Code, use spaces rather than tabs. If you use tabs in Notepad you'll get a 'deadlock' error when trying to run the file.
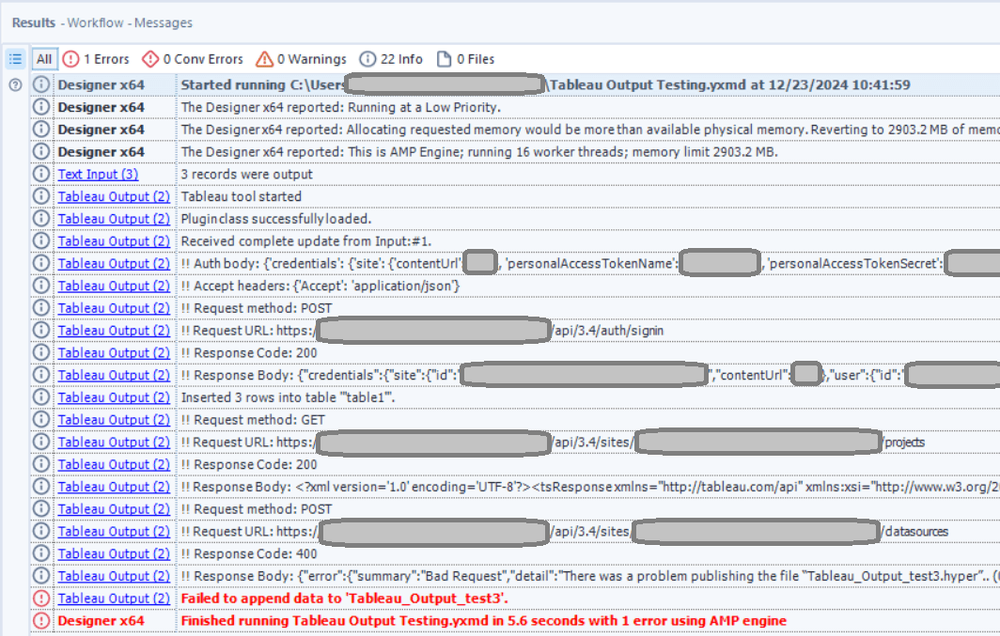
This captures:
The REST API request method.
The REST API request URL.
The REST API response code.
The RESP API response body.
The request URL and the response body are the two main things here. The others show how you can modify the code more and add further messages.
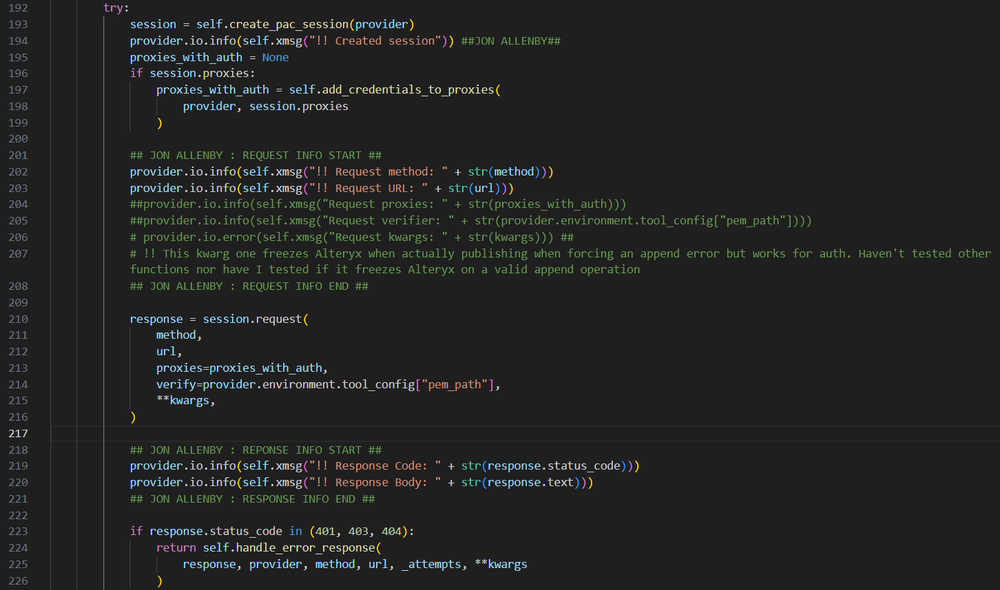
You want to add these lines at a specific point. In an IDE, this will be before and after the following function at about line 200.
            response = session.request(
                method,
                url,
                proxies=proxies_with_auth,
                verify=provider.environment.tool_config["pem_path"],
                **kwargs,
            )
You'll want the 'Request' lines to before that function and the 'Response' lines to be after it. Below is a screenshot showing my setup along with some other messages I tried and decided weren’t worth helpful or, in one case, caused the tool to error out in a specific circumstance).
This addition of 4 lines will already give you the most useful thing the tool can have: the actual response body for whenever the Tableau Output tool contacts Tableau Server! No more obscure pre-filled error message.
Note: To read all built-in error messages check out the constants.py file.
If you’re testing this in Alteryx Designer you can simply hit ‘Save’ on the requestor.py file and view the changes in real time in Alteryx Designer without having to save, close, re-open, or reload any other tools or files.
There’s one last change we want to make.
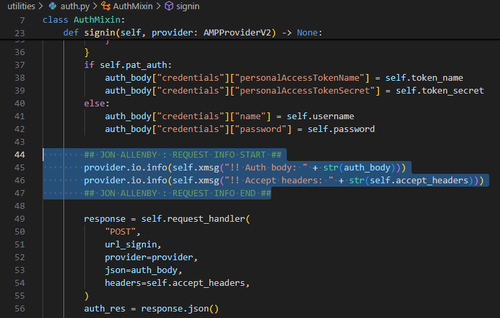
Step 2: Updating the auth.py file.
The one thing the previous change doesn’t capture is the body of the initial sign in request to Tableau. We can see if authorization requests were rejected but we want to see what we sent them to review if anything was malformed.
The auth.py file contains all the main authorization functions including one called ‘signing()’. To grab the body (and the ‘accept headers’ value for good measure) we’ll add the following lines:
provider.io.info(self.xmsg("!! Auth body: " + str(auth_body)))
provider.io.info(self.xmsg("!! Accept headers: " + str(self.accept_headers)))
NOTE: Again, the indents are important! See my screenshot below.
NOTE: Again, if using Notepad to edit the file rather than an IDE like VS Code, use spaces rather than tabs. If you use tabs in Notepad you'll get a 'deadlock' error when trying to run the file.
You’ll need to do this after line 42 and before the following function:
response = self.request_handler(
"POST",
url_signin,
provider=provider,
json=auth_body,
headers=self.accept_headers,
)
Below is a screenshot showing my setup.
Simply hit save and review the changes in Alteryx!
Reverting Changes
As mentioned in the pre-prep, once you have captured the errors you can simply revert the changes by either restoring the entire utilities folder or by replacing just the auth.py and requestor.py file specifically.
Hopefully this guide will help you in uncovering some of the frustrating obscurity around errors with the Tableau Output tool! Feel free to use this guide to add your own messages or investigate the code further.
TL:DR:
Pre-Prep:
Make a copy of the following folder:
C:\Users\<user>\AppData\Roaming\Alteryx\Tools\TableauInput_1_5_0\site-packages\tableau\utilities
Step 1:
Open requestors.py.
Find the following function (should be after line 203)
if response.status_code in (401, 403, 404):
return self.handle_error_response(
response, provider, method, url, _attempts, **kwargs
)
Right before it, add the following lines of code ensuring that the indents line up:
provider.io.info(self.xmsg("!! Request method: " + str(method)))
provider.io.info(self.xmsg("!! Request URL: " + str(url)))
provider.io.info(self.xmsg("!! Response Code: " + str(response.status_code)))
provider.io.info(self.xmsg("!! Response Body: " + str(response.text)))
Save the file.
Step 2:
Open auth.py.
Find the following function (should be after line 42):
response = self.request_handler(
"POST",
url_signin,
provider=provider,
json=auth_body,
headers=self.accept_headers,
)
Right before it, add the following lines of code ensuring that the indents line up:
provider.io.info(self.xmsg("!! Auth body: " + str(auth_body)))
provider.io.info(self.xmsg("!! Accept headers: " + str(self.accept_headers)))
Save the file.
Reverting the changes:
Once the errors have been found, replace the requestor.py & auth.py with their original copies you saved in the Pre-Prep step.