
Many applications and pieces of software proud themselves to be code-free. What's special about alteryx, is that it's code-friendly. Huh? It means, you don't need to code to be able to use it, but you can.
In this blog post, I will describe one of my recent projects where I built an app that looks at the images in a specified folder, identifies duplicate images and moves those duplicates into a new sub-folder called Duplicates. This Analytic App incorporates alteryx functionality and resources available for python users.
Glossary
New to Python or programming in general? Some terms below might sound unfamiliar. Here's the way I understand them* so we can be on the same page 🙂
*some comparisons are more to give you an intuition understanding and are not precise
- programming language - a way to communicate with the computer and tell it to do some operations
- Python - a type of programming language. Comparing to other programming languages (bear in mind I have limited knowledge on this, but still have had some experiences in using C/C++, Matlab, Java, JavaScript, and Assembly), I like a few things about Python: it is a high-level language, so it's pretty easy to read as a human and to understand the code; it enforces indentations and the layout of the code, making it fairly easy to understand the hierarchies of elements and looks clean to me; I find it easier to grasp than other languages
- function - performs a specific task, which can be adjusted by specifying arguments and parameters of the function. It is pretty much an equivalent to a tool in Alteryx. Similarly to Alteryx, you can have functions that are coming as part of Python language (normal Alteryx tools), or you can write/create one yourself! (equivalent to a macro)
- class/object - in a way it's a custom type of data, that can store different information and be subjected to different operations.
- module - a collection of functions and objects that are extending Python functionality, saved in a single python file. It's kind of like a category of tools in Alteryx
- package - a collection of modules around a similar topic. Think about predictive tools in Alteryx. There is a number of categories that fall under the predictive package you have to install separately from Alteryx installation. It's very similar to packages in python. Except there are MANY of those packages...
Why?
Why use Python in Alteryx?
First of all, let's take a look at some of the reasons I decided to dip my toes in the python tool:
- Expand Alteryx functionality - Alteryx is great on its own most of the time. There are, however, situations where a problem you're trying to solve doesn't have an easy or feasible solution in baseA approach (pure Alteryx). Thankfully, Alteryx is endlessly extensible and we can leverage bash scripts, R and Python codes, and more.
- Practice Python - I have used Python in the past and enjoyed it. I thought it would be easier for me to get into the area of expanding Alteryx functionality building on something I'm familiar with. I was also looking forward to coding again as it is something I did at uni and enjoyed, but haven't had the chance to do it in client work recently.
- I went to a talk that mentioned the Python Tool during Inspire Europe 2019 and I found it very encouraging to try it myself. Mind you it took almost a year but there was a lot going on in that year so I'm happy I finally made it.
Why this project?
All is great. I know I want to use Python Tool, I know I'll have about two days for the project, but what exactly am I going to do? I wanted to use the time for the project to build my Python muscles and learn something new but I also wanted to do something that will be useful. Instead of spending hours on the internet and trying to find something mildly interesting, I asked within The Information Lab if any of my co-workers have any ideas, hoping there will be at least one specific problem to solve. Lo and behold, there was! Ben Moss needed to clean up some images by removing duplicates.
Other suggestions included webscraping pages with dynamic content, accessing AWS API, OCR (Optical Character Recognition, in other words, reading text from images), optimisation tasks with genetic algorithms, or anything with matrix calculations. Thanks to JMac, David Sanchez Martin and Brian Scally for their suggestions! I might actually review them and attempt them as well. The reason I went with Ben's suggestion, was that it was a specific problem to tackle that was also easy for me to imagine and set up a testing environment. Here is my folder for tests:

Alright, let's get to it!
High-level plan
The outcome of the project was supposed to be an analytic app (run locally) that uses python as one of the steps. Before diving into the Python tool, I needed to figure out how to approach the whole task. I broke it down to smaller steps (with implementation in parenthesis):
- Get the folder location (folder browse)
- Get the list of all images (directory tool)
- Get the pixel information of all images (python tool)
- Identify duplicates (python tool)
- Create a new location (python tool)
- Move duplicates to the new location (started with python tool but ended up using run command and bash script)
Let's look at these steps in more detail
Get the folder location and the list of images
This step was straightforward as it was implemented with tools I've used before:

The Directory tool (no. 1) lists the contents of the specified directory. In normal set up, you simply select a folder on your machine. Adding the Folder Browse tool (no. 2) allows the user of the analytic app to change the folder location in a nice interface, rather than having to open up the workflow. The Action tool (no. 3) is set to Update Directory with Folder Browse (Default). Finally, I'm using Select tool (no. 4) to limit the information I'm passing down the workflow only to columns that I need: FullPath, Directory, and FileName.
After these four tools, I have the list of images I want to make unique. How?
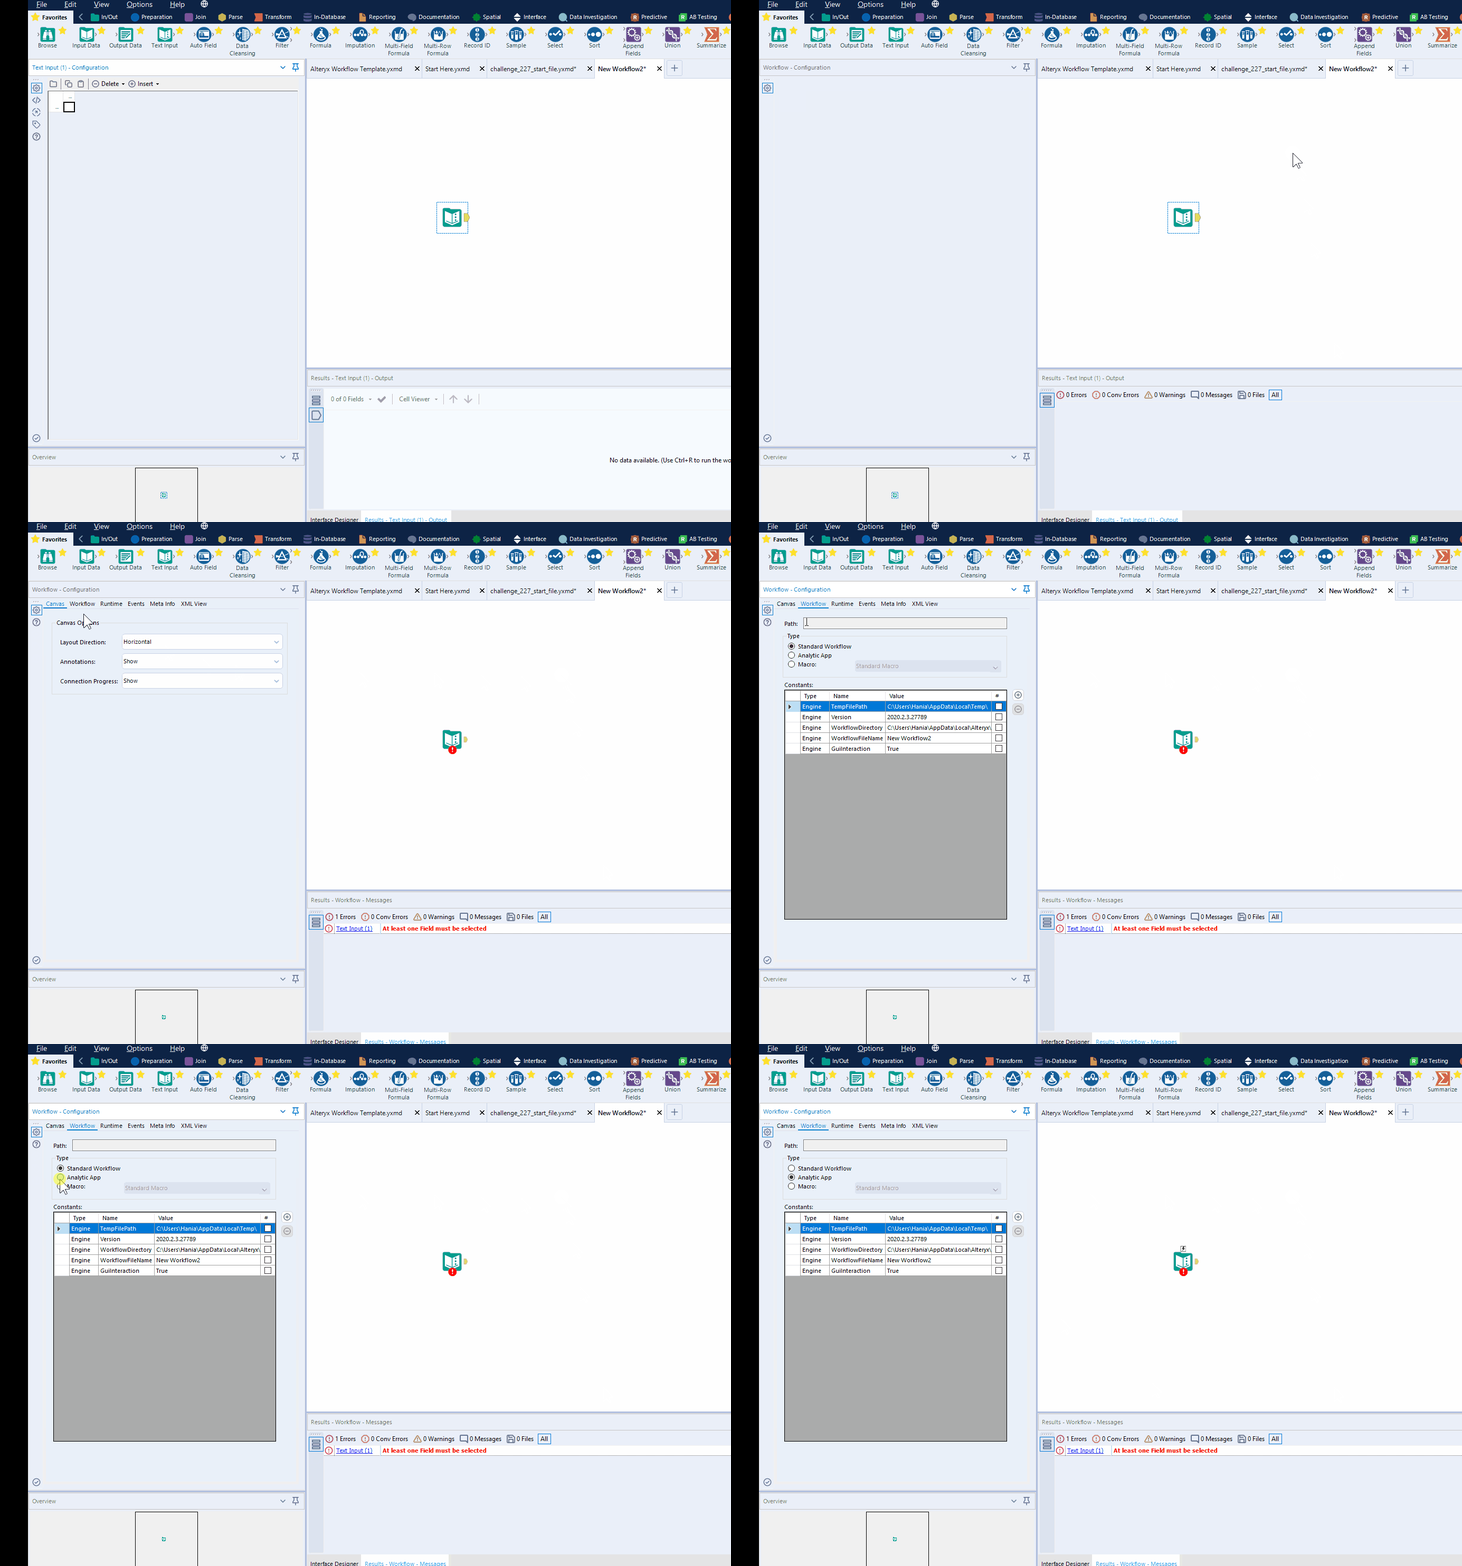
EDIT (forgot to mention how to make an analytic app in alteryx... oops!): To make sure your workflow is recognised as an app, go to Workflow Configuration -> Workflow -> In Type, select Analytic App. As per gif below:
How can I identify duplicate images?
This is the hard part. I have done some image processing in uni but it was fairly straightforward and with Matlab, not Python. It was also a few years ago, so, ya know... Anyway, just like whenever I'm tasked with something I don't know much about, I started googling.
Before reading in the images, I wanted to know how does one compare two images in Python. I expected that different methods for comparing images may require different ways of reading images in the first place.
I have come across an article How-To: Python Compare Two Images by Adrian Rosebrock. The article explored two methods of comparing two images: Mean Squared Error (MSE) and Structural Similarity Index (SSIM). Mean Squared Error looks at pixel-by-pixel values and compares the difference between them, which I would expect to be quite temperamental (more sensitive to changes in the shade or intensity of an image rather than change to the content). SSIM, developed by Wang et al, compares the structural information of a section of the image. I'm gonna be honest, I read through that article, it seemed to me that SSIM despite being more computationally heavy was a better option so decided to go with that. (I wanted my application to get rid of very similar images too, not only exact duplicates.)
Thankfully, SSIM has been already implemented and is available as part of scikit-image library. Being able to actually use it and get it to work took a few trials but I finally made it and will only write up the version that worked (with some notes where possible). Let's park it for now, we will come back to it later.
Python Tool
Before we read in the images and identify duplicates, let's talk Python tool itself.


It's a part of the Developer tools, it can take multiple incoming connections and has 5 output anchors. When you click on this tool what you will see in the configuration pane is Jupyter Notebook, which will allow you to run code bit by bit in an interactive manner. It means you can write blocks of code (like you see in the image above) that will print messages when run. I have found it very helpful when I was developing the code as I was able to see the variable values pretty much at any point, pinpointing any issues that came my way. Jupyter Notebook also allows you to add blocks of text to add any notes or documentation (which I could have used a bit more).
You may have noticed, that there are two modes: Interactive (Jupyter Notebook) and Production. As I mentioned, Interactive is useful for development part because it prints out messages and you can easily change separate sections of code and see how the results change. The second option, Production, transforms the code you wrote in interactive mode into a single piece of code that doesn't print out anything and so it will be faster to run when you are working on other parts of the workflow. I will be using the Interactive mode with Jupyter Notebook for the rest of this blog.
Packages
As mentioned in the glossary, packages allow me to expand the functionality of Python (and, by proxy, of Alteryx). First, we need to make sure we have installed all packages we'll be using:
# List all non-standard packages to be imported by your# script here (only missing packages will be installed)from ayx import PackagePackage.installPackages(['pandas','scikit-image','opencv-python'])Package is a module within ayx package that allows to manage Python packages in Alteryx installation. Especially, to install packages that are not included by default. You can see that I am installing pandas, scikit-image, and opencv-python packages. Good news is that these packages will be only installed if they are missing, so I think it's good to leave that section in.
Now that I have all the necessary packages installed in my Alteryx Python environment, I can import them to my code:
# to read from and write to alteryx workflow:from ayx import Alteryx# to apply structural similarity index for identifying duplicates:from skimage.metrics import structural_similarity as ssim# extra mathematical operations:from statistics import medianfrom math import floor# to be able to know the time of execution and improve performance of the code:from timeit import default_timer as timer# a package for data analysis and handling tabular data:import pandas as pd# to create a new directory:import os# to open imagesimport cv2Finally, I'm ready to read in the data connected to the Python tool and get on with the project.
Connecting to data and opening up the images
First, let's take a look at the help document to know how to import data from the workflow.
Alteryx.help()# Prints out information on how to read data from the connections to the Python toolWhat it looks like in Jupyter notebook:
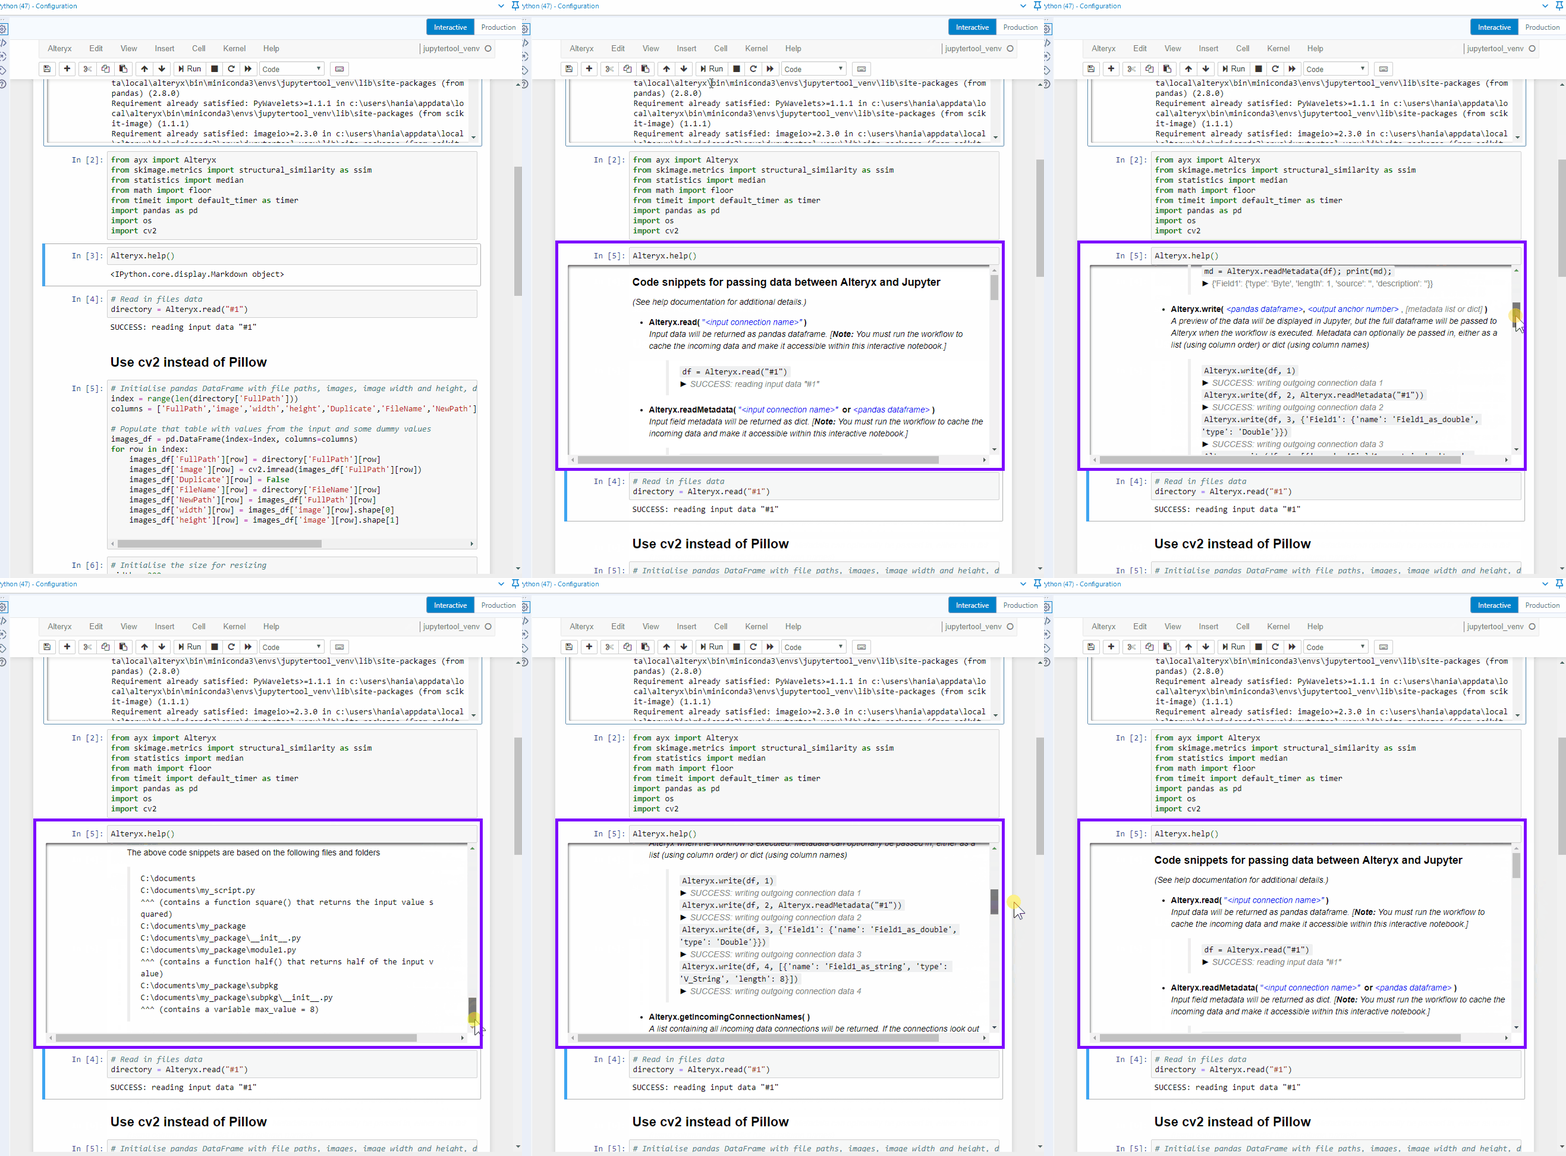

I can see that Alteryx.read() function allows me to read in data from a connection that I need to specify (Python tool can take multiple incoming connections) in '#1' format (a string). To be able to see the data, you need to run the workflow with the python tool on the canvas and connected to desired tools. I tried running the workflow with the python tool in a collapsed container but that didn't work, sadly. Which means that the Python tool has to be run as well. The data is brought in a pandas dataframe format.
Let's read in the data coming in incoming connection #1 and assign it to directory variable:
# Read in files datadirectory = Alteryx.read('#1')
It is exactly the same information going into the Python tool, so everything works great! One thing you might have noticed is that Python starts indexing (row numbers) from 0 instead 1.
Moving on, let's prepare a table that will hold the image data. What I will need:
- full path to access the image,
- filename to later create a new path if the image is a duplicate,
- duplicate flag so that I can store all images together whether they are duplicates or not,
- new path, which I will change for images flagged as duplicates,
- image to store the pixel values,
- width and height to know the size of the image (the images need to be of the same size to be compared)
# Initialise pandas DataFrame for storing image informationindex = directory.indexcolumns = ['FullPath','FileName','Duplicate','NewPath','image','width','height']images_df = pd.DataFrame(index=index, columns=columns)On the second line, I am creating a new variable which is the same as the index of directory dataframe (data from incoming connection #1). That's because I want to have a table that has a single row for each image in my folder. Next, I'm creating a variable that has all of the columns I want to include in my table (you may notice they are very similar to what I've described above). Finally, I am initialising a pandas (pd) dataframe, with rows indexed after my new index variable and with columns I specified in my columns variable.
Now that I have a skeleton for my table, I can populate it with some default values:
# Populate that table with values from the input and some dummy valuesfor row in index:images_df['FullPath'][row] = directory['FullPath'][row]images_df['FileName'][row] = directory['FileName'][row]images_df['Duplicate'][row] = Falseimages_df['NewPath'][row] = directory['FullPath'][row]images_df['image'][row] = cv2.imread(images_df['FullPath'][row])images_df['width'][row] = images_df['image'][row].shape[0]images_df['height'][row] = images_df['image'][row].shape[1]First thing you may notice is 'for row in index:'. This goes through all values within my index (0 through to 6) and holds the current index value in variable row. This approach is called for-loop and it is in a way similar to a batch macro where you repeat the same operation for a list of options.
Columns FullPath and NewPath are initialised to be the same as later I will be only changing NewPath for duplicate images. The default for Duplicate flag I decided to set to False as I expect only a small portion of the images to actually be duplicates. So far, I have either referenced my previous table directory or set a specific value (False). However, we're getting to the realm of images, and I'm using cv2.imread() function to open the image and store its pixel information in my images_df dataframe. For getting width and height of the image, I am accessing shape attribute of the image I opened on the previous line. shape returns the shape (wink wink) as an object with two positions, the first position is the width (index of 0), the second position is the height (index of 1).
Let's have a look if that worked:

I can see my table nicely populated with data and so I can continue the fun!
Identifying duplicates
Setting up
Alright, I have previously decided on using SSIM to identify duplicate images. Before we get on to running those comparisons let's consider the restrictions of that method:
- you can only do a one-to-one comparison
- the images that you are comparing have to be of the same size
Ok, what does it mean in practice? Let's start with point no. 2 because that has an easier answer. I will need all images to be the same size. There are fortunately functions to resize the image, but what size would be best? Finding the answer took me a while and, frankly, I could have dived deeper into that topic to find the best answer. I didn't do that because I got to a point where it was good enough and wanted to move on.
My initial thought was to find the maximum dimensions and resize all images to fit that so that the comparisons will be as precise as possible. The problem is if you have one massive image, all images will be massive. What about a minimum dimension? Similar issue, if you have a very tiny image, all images would be tiny and the comparisons may not make sense. Then I decided to use the median thinking that I wouldn't have to resize many images a lot. I was quite happy with this approach. The problem was that the comparisons were taking quite a lot of time. In the end, I settled on using 200x200 dimension for all comparisons and it seems to be working fine.
If I wanted to find the optimal size, I would need to run my code with a number of setting and see what is the minimum size for comparison that also has an acceptable level of comparison accuracy. That sounds like a lot of work for a small reward so I will save this for a rainy day.
First, I initialise the sizing. Having width and height as separate variables made it easier for me to tweak it between set values, min, max, and medians:
# Initialise the size for resizingwidth = 200height = 200 Then I could move on to looping through the rows in images_df and use cv2.resize() function to make all images equal in size:
# Resize the imagesfor row in index:images_df['image'][row] = cv2.resize(images_df['image'][row],(width, height))Back to restriction no. 1: only one-to-one comparisons mean I will need to do a lot of comparisons and I need to find a way to limit them as much as possible. The minimum would be not duplicating the comparisons. If we have two images: image1 and image2, image1-image1 comparison is pointless as we're comparing the same image with itself, image1-image2 comparison will have the same SSIM as image2-image1 so I only need to do one of those. Great. How do I translate this for many more images than two?
Let's 'draw' it out. Imagine I have four images with indices of 0, 1, 2, 3. I can split them into comparisons table with image1 and image2 columns (both identifying the indices of the images I want to compare within a single comparison), and ssim column for storing the results of that comparison. First, I want to make all possible and sensible comparisons with image 0, and so I compare 0-1, 0-2, 0-3. (I don't want to compare 0-0 because that's comparing the image with itself. Doesn't make sense.)
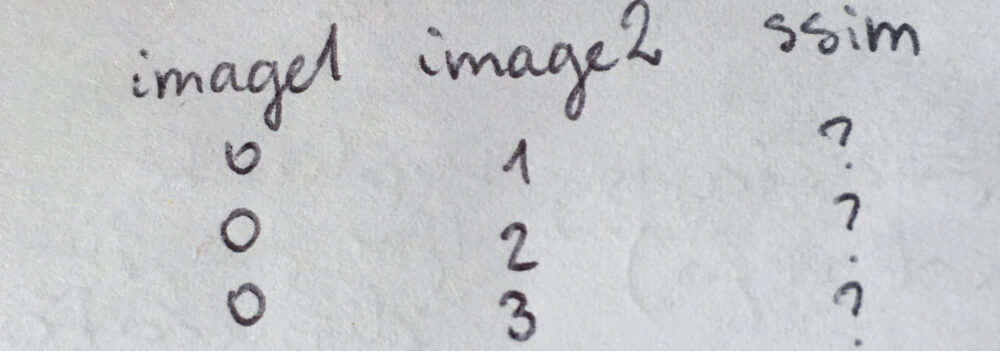
Then, I can do all remaining comparisons with image 1: compare 1-2, 1-3. (1-0 comparison has been already done previously as 0-1 so I don't need to worry about that.)
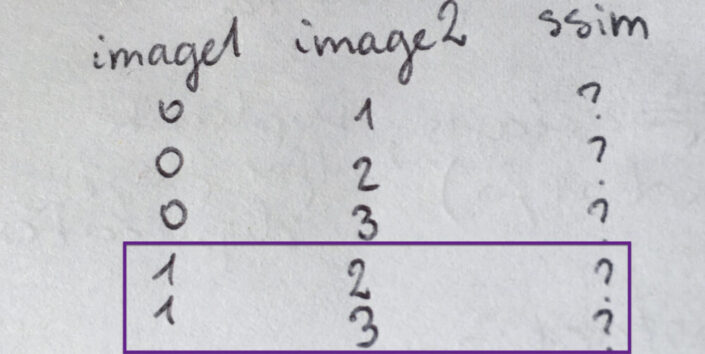
Now I'm left with 2-3 comparison because all of the other possible comparisons have been listed previously (or don't make sense as I would be repeating comparisons).
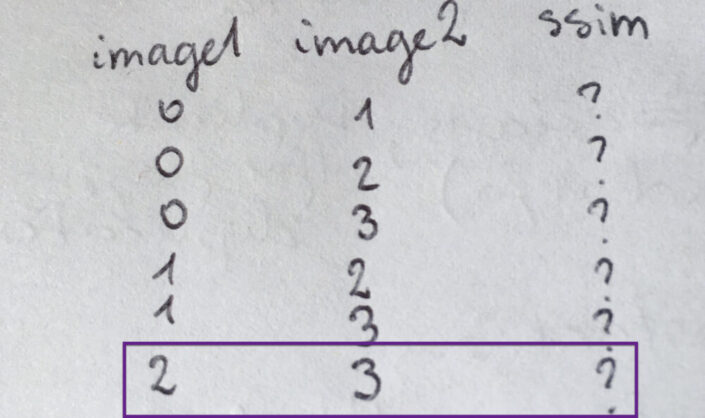
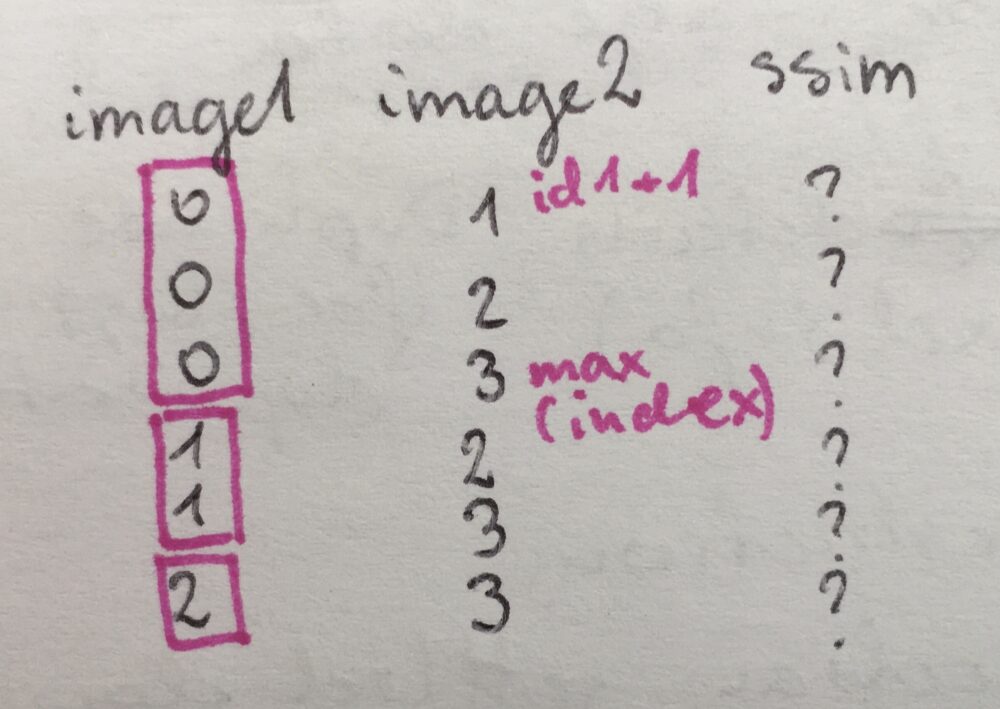
How do I turn it into something automated that will be built out depending on the number of images my app is dealing with? Well, I can see that starting with the lowest possible index for image1 (ind1), the values of image2 will vary from one index higher (ind1+1) until the maximum value of index (max(index)). Then I'm moving onto the next index for image1 and repeat the same process for image2:
With the above as my plan, I can initialise the comparisons table:
# Initialise data frame for comparisonstotal_comparisons = sum(index)comparisons_index = range(total_comparisons)comparisons_columns = ['image1', 'image2', 'ssim']comparisons_df = pd.DataFrame(index=comparisons_index, columns=comparisons_columns)Based on my experience, the performance is better when you know how big of an object (here a data frame), you want to build in python. And so I needed to figure out the total number of comparisons I will need to be prepared for. Looking at my simple example with four images and indices of 0, 1, 2, 3, the number of comparisons I needed to do was 3 (for image1 index of 0) + 2 (for image1 index of 1) + 1 (for image1 index of 2). 3+2+1 for indices of 0, 1, 2, 3. Luckily the indices in python start at 0, because the total number of comparisons I need to do is the sum of all indices I have (3+2+1 = 3+2+1+0).
The first step, then, is to get the total number of comparisons. Now I can build the new index for comparisons table which is done by range(total_comparisons). range function, when given one argument, is creating a range from 0 to the given number - 1. So that the total number of steps in the created range is equal to the given number.
Next, I specify the columns I am interested in and initialise an empty dataframe.
Moving onto filling out the comparisons table with the image combinations I want for my comparisons:
row = 0for image1 in index[0:-1]:for image2 in range(image1+1,max(index)+1):comparisons_df['image1'][row] = image1comparisons_df['image2'][row] = image2row += 1Previously, I was looping through the rows of the data frame. This time I found it easier to loop through indices for image1 and for image2, and change the row manually. To get it sorted, I initialise the row at 0. Then I start a loop through indices for image1. index[0:-1] will go through all values from 0 (the first one) to the penultimate one (noted in python as -1). Once I have the value for image1, I want to loop through indices for image2. The expression for this loop may look a bit complex but let's break it down.
range(image1+1, max(index)+1)I am passing two arguments to range function, which means it will create a range between the first argument, to the second number - 1:

The first argument is the point where I want to start. Based on my previous analysis it will be the index above than for image1, so image1+1. The second argument will be where I want to end (max(index)) increased by 1, so max(index)+1.
Once I'm within the loop for image2, I can fill in the values of image1 and image2 for the current row. The final step is to move to the next row with row += 1. This way of writing it down is a bit faster than writing row = row+1.
What happens in the next row? The most inner loop will finish first, so python will iterate over the values for image2, and then move on to the next value in image1, create a new list for image2 and go over that again. Until it gets to the last value for image1 and the corresponding last value for image2.
Extracting the Threshold
One of the things I wanted my app to be able to do was to identify images that are very similar and not only identical duplicates. SSIM is returning values between -1 and 1, where 1 is an identical image. (I couldn't find what -1 is, but I assume it is exactly opposite, similar to the correlation of -1. Don't quote me on that though.) I decided to mark images as duplicate if the SSIM index was above a certain threshold. To give the user even more power (dangerous, I know), I added a numeric up and down so that they can specify the threshold whenever they run the app:

I use the Text Input tool (no. 1) to have a placeholder for the threshold (set it up to 0.9). Then I added Numeric Up Down (no. 2) with the range of -1 and 1 (possible values of SSIM index) and default value of 0.9. The Action tool (no. 3) updates the threshold value in the text input tool and passes it over to the Python tool as connection #2.
In the python tool, I need to read the threshold in with Alteryx.read function:
# Get the thresholdthreshold = Alteryx.read('#2')['threshold'][0]I am accessing the value itself by taking out the content of threshold column and 0-th row, then assign it to threshold variable.
Running comparisons
Seems that I am finally ready to run my comparisons:
# Initialise duplicates list and run the SSIM comparisonsduplicates = []for comparison_index in comparisons_index:image1 = images_df['image'][comparisons_df['image1'][comparison_index]]image2 = images_df['image'][comparisons_df['image2'][comparison_index]]comparisons_df['ssim'][comparison_index] = ssim(image1,image2,multichannel=True)if comparisons_df['ssim'][comparison_index] >= threshold:duplicates.append(comparisons_df['image2'][comparison_index])As I don't know how many duplicates I will have, I am starting with an empty list []. Then I'm looping through all comparisons, assign image from images_df to image1 and image2 based on the indices in the comparisons table. Moving onto running the function that returns the ssim index for two images, I have what I need to identify if the images are similar enough to be marked as duplicates.
The way I decided to handle or assign duplicate flag, was as follows: For every comparison with ssim value of greater than or equal to threshold, add the index of image2 to the duplicates list. If there are are more images that are similar to each other, all but the first one should be marked as duplicates.
Now that I'm writing it up, I think I could optimise the process and limit the number of comparisons even more. I could remove any future comparisons that reference images already known as duplicates. There's always something to improve on :)
In case some images would show up multiple times as duplicates, I wanted to make my duplicate list unique. I was pretty disappointed that it wasn't as straightforward in python as it is in Alteryx (or at least that I didn't find anything as straightforward as the unique tool). What I had to do was to change my list of duplicates to a set - this would result in a unique set of values - then back to list so that I could easily access the duplicate indices:
unique_duplicates = list(set(duplicates))Create a new location
Before I update images_df I want to create the folder to move all duplicates. (I could do it after updating that table, but I wanted to update it only once the location existed.)
# Make Duplicates foldercurrent_dir = directory['Directory'][0]path = current_dir + 'Duplicates'try:os.mkdir(path)except OSError:print ('Creation of the directory %s failed' % path)else:print ('Successfully created the directory %s ' % path)First, I assign the directory from connection #1 to the python tool (data from the directory tool) as current_dir. Adding 'Duplicates' to current_dir will build a path of the new folder, where I want to move the duplicate images to. I have to tell the local machine to actually create the folder (the path on its own is not enough). The try, except <error>, else is a way of handling errors in python. (To be honest, I googled creating a folder with python and found this code on stackoverflow.) Python will try to execute the code in try section (make the folder based on the path). If there will be the specified error (OSError), Python will execute the code in the except section (printing out message that the creation failed). If no such error is raised, Python will move on to else (printing out the message that the location has been created).
With the folder finally created, I can update my main table images_df:
# Create new file paths and update duplicate flagsfor row in unique_duplicates:dest_path = path + '\\\\' + images_df['FileName'][row]images_df['NewPath'][row] = dest_pathimages_df['Duplicate'][row] = TrueThis time, I am only going through the indices in the duplicates list. For each duplicate, I am building the destination path which is the Duplicates folder path combined with the file name, and use it to overwrite the value in NewPath column. I am also changing the duplicate flag to true.
The final step regarding the python tool, is to output the result back into the workflow:
# Output the data to alteryx workflowoutput = images_df[['FullPath','Duplicate','FileName','NewPath']]Alteryx.write(output, 1)As I don't need all columns from images_df in my output, I create a new dataframe that has only FullPath, Duplicate, FileName, and NewPath. Then I am writing it to output anchor #1. (Notice Alteryx.write function takes numbers, not strings as the argument for identifying the output anchor. Something I found a little annoying...)
Move duplicates to the new location
The last step was to move the images from the original location to the newly created Duplicates folder. I thought it would be easy but it turned out to be a little challenging. My first try was to do it within the python tool (use it as much as I can!) Unfortunately, I was getting errors that the files I am trying to move are open by another process. I am not 100% sure that's the reason but my thinking was that because these files were open within the same python tool (to read the image information), they were considered as open files. Even though they were not open in a traditional way (as you would open a text file in python to edit its contents) and so I couldn't figure out how to enforce them being closed. As a result, I turned to The Information Lab and Ben came to the rescue once again, suggesting using bash script to get this part done.
I had a mixed reaction to this. On the one hand, I wasn't too happy about it as I had another step to do and another thing to learn before the app would work. On the other hand, I was very happy about it as I had another thing I could learn :)
To sort this one out, I had to figure out what are batch scripts, how to write a simple one, how to apply it to multiple images, then how to implement it in alteryx. Again, it took some googling, setting up a simple testing environment, and troubleshooting with my colleagues. Batch scripts are files with a code you would normally execute in the command line. The magic is that you can save them and run them from within Alteryx.
The script I had to build was not a very complex one. Nevertheless, it went down not without any technical problems... Thanks to Jonathan Sherman who shared his solution which helped me identify issues in my approach.

I decided to only do it for the duplicate images as for non-duplicates, NewPath (destination) was the same as FullPath (origin). (#1 the filter tool)
The command line cannot have any spaces within the path, and if it does it needs to be bookended by quotation marks. So in #2 (Formula tool, Update paths) I'm doing just that both for NewPath and FullPath:
''' + [NewPath] + '''''' + [FullPath] + '''In step #3 (Formula tool, script), I am building a script at the level of each image. Adding a column called script:
'MOVE ' + [FullPath] + ' ' + [NewPath]The summarize tool (#4) is set to concatenate the script field with the separator of \ (newline character), so that scripts for all files are in a single cell, operation for each file starting on a new line.
The last step (#5, Run Command tool), saves the script into a file and then executes it. I set it up so that it's save to a temporary file (which should be cleaned after Alteryx is finished), and give it a meaningful name of moveFiles.bat

This is the place where I was running into issues. It turned out that the set up of output in Write Source [Optional] was the culprit:

I knew the file would need to be set to a text file, the bit I missed was that delimiters needed to be set to \\0.
Conclusion
Surprisingly it has been a short and a long project at the same time. A short one as I managed to get a lot done in a short amount of time. A long one as describing it take a long time, making me realise there was a lot of planning and learning involved (which is great!)
I really enjoyed building an application that combined the worlds of Python and Alteryx, actually making the most of the two, and learning extra bits such as batch scripts!
The final app sits on The Information Lab's public alteryx gallery and you can download it here.
As mentioned above, there are a few improvements I would like to make but I am still pretty happy with the current outcome. Let me know if you have other ideas on how to optimise this solution or on improvements I could add!
Have you used the python tool yourself? If so, what did you use it for? If not, what would you use it for? Let me know!
