

At The Information Lab, we as consultants have had a real focus on Alteryx and Tableau - tools used for data transformation and visualisation respectively. With the recent addition of Snowflake we are now able to complete the ‘Full Stack’. In this blog I am going to discuss my thoughts around optimising costs whilst using Snowflake - I will primarily focus on Alteryx and Tableau, however the way in which we will leverage these products builds on the native Snowflake architecture which can be utilised across all software that connect to Snowflake.
How Snowflake works and how it charges
When considering how we can optimise costs using Snowflake, we should first discuss how Snowflake functions, what makes it different from other databases and thus how it actually charges its users.
Traditionally databases follow either a shared-disk architecture or a shared-nothing architecture. Both have their benefits and downsides, but the key point is that Snowflake takes parts from each architecture and creates a hybrid model.
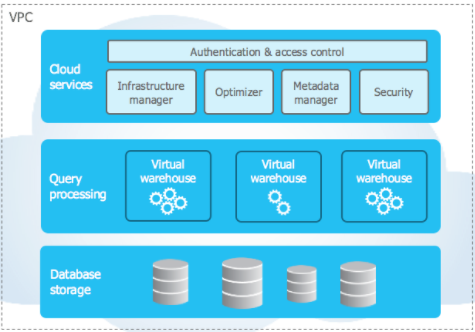
Snowflake’s architecture consists of three layers:
- Storage
- Query processing
- Cloud services
We see a central data repository of data that is accessible by all compute nodes (like shared-disk) yet when Snowflake runs a query, the compute clusters work in parallel storing a portion of the data locally (like shared-nothing).
When thinking about the cost of Snowflake, we only need to focus on the storage and query processing layer. In terms of storage, the concept is quite simple, the more you store, the more you are charged for. When we come to the compute layer, the unique architecture of Snowflake comes into its own - a basic understanding allows us to understand how we are charged and how this can be optimised.
A cloud-based, serverless solution
Before databases like Snowflake, a database would require physical hardware. A company would have to decide how much computation they were going to require, and pay for a fixed number of servers. Generally, companies would over-budget for servers in case there were any spikes in traffic that would result in downtime for the servers - possibly costing more money down the line.
Snowflake is serverless, this means a company does not need to purchase any physical hardware, in fact they don’t even have to install anything onto their computer - it is entirely accessible through the browser. Serverless computing allows a company to deploy servers from the cloud (off-premises) on a flexible basis. No upper or lower limit of compute power needs to be provisioned. When the computational demand goes up, Snowflake can scale up and provide more computational resources, before scaling down again when the demand drops.
Snowflake charges its users based on the use of compute clusters used to execute queries, load data and perform general DML (Data Manipulation Language) operations. These charges are measured by the use of Snowflake credits. These credits are used by virtual warehouses - these are essentially compute clusters used to perform the operations described above.
Warehouses only charge for the time that they are running - when a warehouse is not required for any processes, it will go into a state of suspension and stop charging snowflake credits.
This is the crux of the blog - now we know that the use of Snowflake credits by virtual warehouses are what costs us money, how can we ensure we are optimising our costs?
Alteryx
Don’t be afraid of the run button!
In the compute layer of Snowflake, you will find the result cache. The result cache holds the result of all of the queries executed in the past 24 hours, which are available to every virtual warehouse. Therefore if you are in the early stages of developing a workflow and you are concerned you have hit the run button a lot of times and this would have used lots of compute power, that is not the case, Snowflake will be delivering the results from its result cache - costing no compute power. Of course, if you are changing your query or the underlying data changes, this will cost compute power on the first run.
Create a yxdb file for development
Once you are happy with your query and you know you are pulling in the correct data, consider creating a yxdb file to store locally on your machine. This can then be used as your input for your Alteryx workflow. Of course, workflows can be built across several days or weeks so the 24 hour result cache will be cleared. A yxdb ‘extract’ of your data will mean that you are not using up Snowflake credits to pull the same dataset that doesn’t necessarily need to be right up to date for development.
Make use of SQL
There are a few options within Alteryx for when to use SQL, such as the Input data tool, output data or the connect In-DB tool. When inputting data, think about utilising GROUP BY, WHERE and LIMIT clauses to only bring in necessary data at the granularity required. Of course this can be done later on in the workflow, however by doing this in the custom SQL you are being selective on what data we use and reducing the amount of compute required to bring in the whole dataset.
Use record limits in development
The more data you pull from the database, the more compute power you will use. Therefore when developing a workflow, you probably don’t need all of your data, just a sample. This is a similar concept to using LIMIT as discussed above, but an Alteryx no code solution. Do not confuse record limits with the sample tool, with a sample tool you would still bring in all of the data and then cut it down. Instead in the configuration of your input tool, you can set your record limit. Remember to change it back when you’re ready for production!

Think COPY TO, not INSERT TO
When writing data to a Snowflake database, we have the option between INSERT and COPY. INSERT will write data to the database one record at a time, whereas COPY will make use of Snowflake’s bulk loader, in which data is copied in batches. Not only will we see enhanced performance when using COPY, the fact the process will be faster, means the server will run for less time and accrue less cost.
What does this mean in Alteryx terms? On your workflow, when using the input data tool you will see two options, Bulk and ODBC. The Bulk option will utilise the COPY process, whilst ODBC is INSERT.

Tableau
Use Extracts
Using extracts is highly recommended when working with Snowflake, the reason for this is that with a live connection to your database, every time a user changes a parameter or filter etc the database will be queried. When the database is queried the warehouse will come out of suspension, fire up and send through the result, this is a fast process but keeps the warehouse working, using compute power and Snowflake credits.
Use Incremental refreshes
When it comes to refreshing your extracts, consider utilising incremental refreshes. The reason again is down to limiting the computational resources required. An incremental refresh will only bring in new data the dataset did not have before - to do this it uses a timestamp to see where it has data upto before and then only brings in data marked with a later timestamp. When you do a full refresh, we are asking our database to bring back every single record in the database again. An incremental refresh is asking for a fraction of this data, and thus much less credits will be used up. Do note a full refresh is recommended from time to time, it may be that new data has been brought in with an earlier timestamp than your last incremental refresh. To ensure we don’t lose out on data stored in Snowflake consider a full refresh at an appropriate recurring rate.
Hide unused fields when creating extract
We can either do this manually ourselves in the data source tab or in Tableau or when creating the extract (see screenshot). When we have created our work within Tableau, we are bound to have some fields that we didn’t use. If we include these in our extracts we are essentially asking Snowflake to bring back data that we have no use for. Consider hiding these fields, of course this reduces the load on the server and again cuts down the computational power required.

Create Tableau dashboards to monitor your Snowflake usage
If you really want to understand the impact of your Tableau work on the Snowflake database then I recommend creating dashboards to see where your workload is being concentrated and if you are able to make these more efficient. They have built a suite of dashboards that allow you to connect directly to your own Snowflake account and provide insight into your own organisation's Snowflake usage. The dashboards allow you to see which warehouses are costing the most and when, individual user’s usage and elapsed time per warehouse. Check out this link to plug straight in. https://www.tableau.com/about/blog/2019/5/monitor-understand-snowflake-account-usage
In Summary
Well there we have it, Snowflake presents a fantastic solution to many clients out there - it is just worth considering how we can utilise our ETL arsenal to optimise both our performance and our cost. We have focussed on Tableau and Alteryx in this discussion but as I emphasised earlier, we are simply using these products to leverage the in built functionality of Snowflake. I hope this discussion has given you food for thought on being efficient with our utilisation of Snowflake!