

In February 2022, Alteryx introduced the new Server V3 API endpoints. These new endpoints focused on content administration, allowing Alteryx Server Administrators to programmatically manage user details, schedules, collections, or credential and connection information. In addition, the new capabilities enable new workflow actions to be automated and evolve the embedding capabilities for workflows.
One fundamental change was migrating the authorisation framework from OAuth 1.0a to OAuth 2.0, meaning you authorise queries to the V3 endpoints with a Bearer token rather than the previous signing method.
What is the new authentication flow?
The new authentication flow adds a step to request a new access token. Then, you can repeatably use the access token in queries until its expiration.
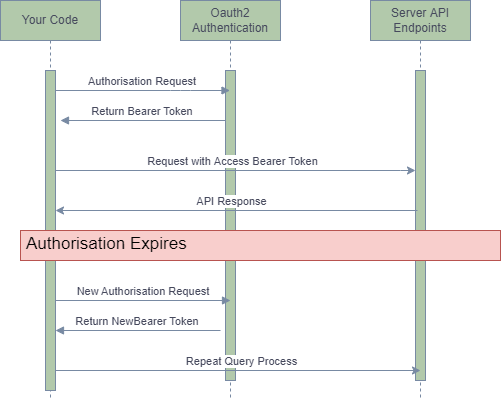
The authentication process follows three steps:
- Call the /webapi/oauth2/token endpoint with your client id & client secret. The client details will be sent as header in the format “Authorization: client_id:client_secret” where the client_id:client_secret is base64 encoded.
- The Oauth end service will return an access token for future calls. You append this token to the string “Bearer “ (note the space after bearer) and then send it to all other endpoints as the Authorization header
- After 60min, the bearer token will expire, requiring you to reauthenticate to the webapi/oauth2/token endpoint
How do I authenticate to the Alteryx Server using OAuth 2.0
The easiest method to use the new V3 API endpoint is with the V3 macro pack workflows. But before you create a workflow, you can view the documentation and test the calls using the swagger documents at [YOUR ALTERYX SERVER WEB API ADDRESS]/swagger/ui/index].
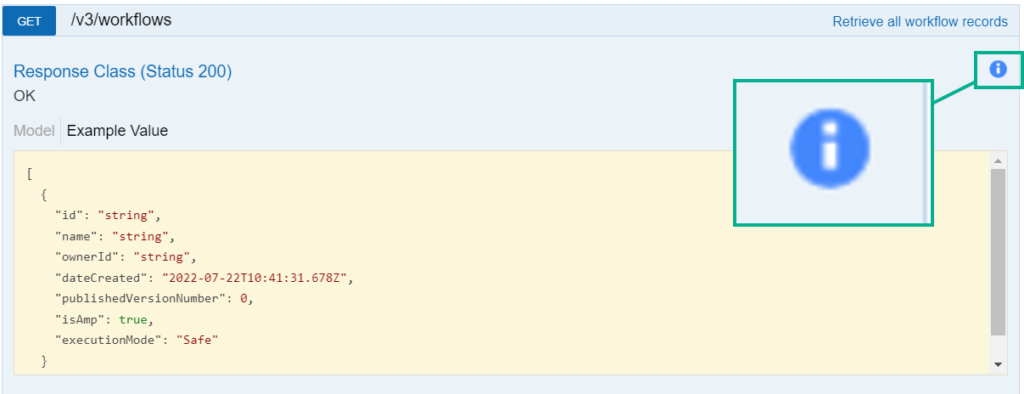
As seen in the previous short video, you create a new token in four steps:
- Selecting any endpoint
- Clicking on the “i” button in the top right of the endpoint documentation
- After clicking that button, select the “Basic Auth” type from the download.
- Finally, enter your client ID and secret and authorise.
The only indication that the authentication has worked is the “i” button colour will change to blue once authenticated.
Authenticating using the Alteryx V3 Server Macros
A second method for authenticating to the API endpoint is to use the V3 Macro pack. You can download the macros from the community here. This macro pack includes five macros:
- Server API Authenticate
- Server API GET
- Server API DELETE
- Server API POST
- Server API PUT
The Server API Authenticate macro provides a simple method for authenticating and getting an access token. The other four macros offer simple access to all the V3 endpoints for each REST verb.
The configuration of the Server API Authenticate takes three parameters:
- Web API Address: this is where the /webapi/ is hosted
- API Access Key: the access key you will be authenticating with
- API Access Secret: the secret associated with the access key
The Authentication macro will output four fields:
- baseURL: You can use this for making later API calls
- base64 Key+Secret: This is passed as a parameter into later API calls
- Authorization Token: use this as the header for subsequent calls
- tokenExpiration: this provides the time your access token will expire and need refreshing. This is useful if you are iterating through the API calls without knowing the end of the call.
How does the authentication change impact my development
For any existing API processes, this authentication change has no impact on your scripts. The V1 and V2 endpoints will continue to work. How long Alteryx will continue to support OAuth 1.0a for authorisation is not known, but you don’t need to change your existing API processes.
However, you should develop all-new API processes using the new OAuth 2.0 framework. For example, if you need to use an endpoint from the V1 or V2 endpoints. You can access the OAuth 2.0 framework by changing the path to /webapi/ from the original /api/ (these are the default options for API calls and might have been customised by your server administrator).
What more authentication methods?
So the new authentication creates applications for managing users and content programmatically. For automation, you can also integrate these processes with other external systems (like helpdesk request processes or slack messaging). Please let me know if you want a guide on how to do that.