18 November 2014
It’s great to see more businesses investing not only in Tableau Desktop but in Tableau server as well these days, and with this we’re getting asked a lot of questions by enterprise IT folks about how to monitor and get ‘under the hood’ of the Tableau Server. Well, most Tableau Server admins can tell you that there are a set of administrative dashboards in the admin panel that provide information on server activity, user activity, background processes and more. The data source for these dashboards is, of course, the database that underlies the Tableau Server, otherwise known as the repository.And you can in fact gain unfettered access to it to build your own administrative views. Readers who have been following our blog will remember that we had a guest blogger write about this very topic some time ago, but I think we’re due an update as some things have changed since then.
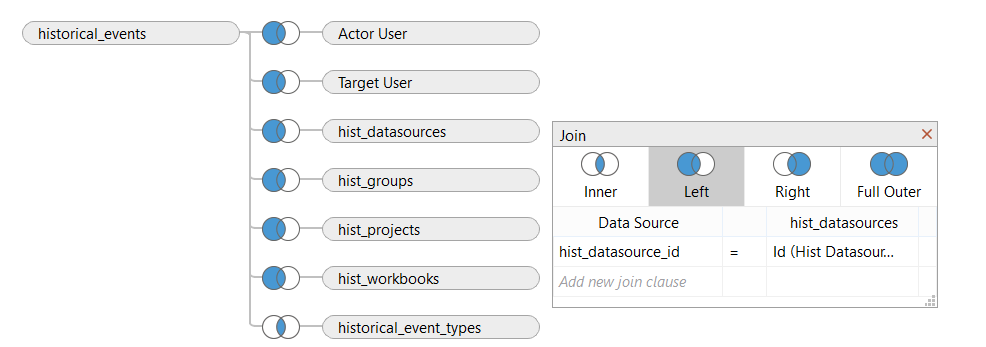
 In addition, you’ll then likely want to bring in user information from the hist_users table so you can tie these events to specific users. In the historical events tables there are actually two IDs you can join the hist_users table to: hist_actor_user_id and hist_target_user_id. The first one, the ‘Actor’ ID, as the name suggests, relates to the user that was responsible for creating, or ‘actioning’ the event. For the most part you’ll only ever want to know the ‘Actor’ user if you’re analysing things like extract refreshes, workbook publishing etc. The ‘Target’ ID only comes into play when the event relates to a user administration activity, for example when an administrator adds a new user, updates a user password, or adds a user to a group. In these types of events, there is both an Actor ID relating to the user who actioned the event, and a Target ID relating to the user that the event impacted. You could simply join the hist_users table twice, using the Actor ID as the key in one join, and the Target ID in the other join. This would give you more User information for both fields.
 You could also join on hist_projects, hist_groups, hist_workbooks or more, to get more details on events related to these specific entities.
 Remember to LEFT join these tables as not every event will be related to a workbook, a project, or even a user – activities performed by the backgrounder server automatically, like an extract refresh, wouldn’t have an Actor user ID associated with it.At this point you should be able to build your own set of basic administrative views that show all the various activities taking placed on your Tableau server. For some more reading on the history tables, take a look at Russell Christopher’s excellent blog post on this topic, which includes a diagram of the schema.
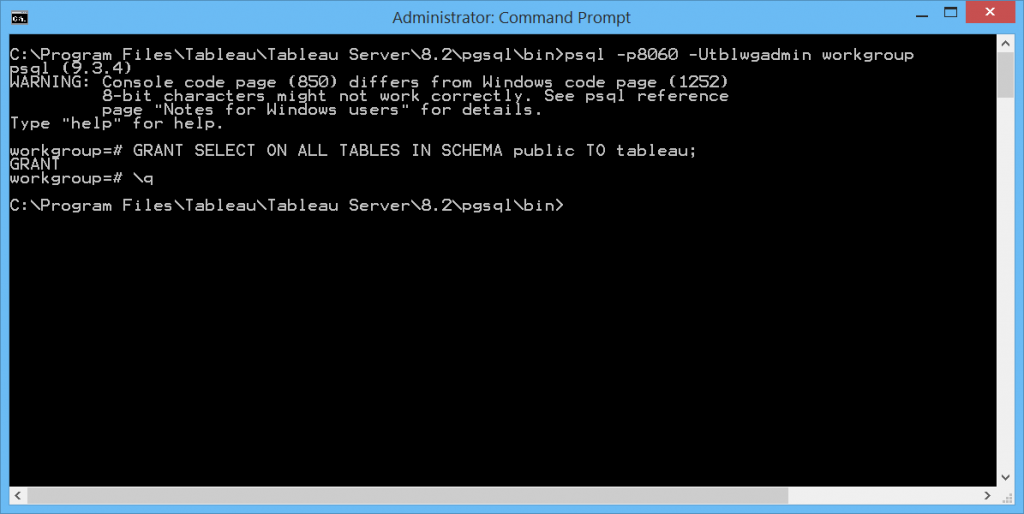
Before we go further, I should highlight: here be dragons. Everything you do from now on is at your own risk, and it’s very likely Tableau will not support you if you mess up the database. I strongly encourage you to test these methods out on a throwaway/development Tableau Server instance and not your production server!You’ll recall earlier I mentioned there was a super user account on the database, ‘tblwgadmin’. This user has administrator rights on the whole database, and given its power, you can only use it to connect to the database from the Tableau Server machine itself, i.e. localhost. This user doesn’t have a password.We could just use this super user account to access those additional tables, but what I recommend doing is to use this account to simply grant read only privileges on all tables to the standard Tableau user account. This will give you the ability to read these tables, from your local machine, and will also help prevent you from fat-fingering a drop table or something equally horrendous. To do this, we need to go back to the command prompt (remember to run it as Administrator) on the Tableau Server. Navigate to the bin Postgres folder inside your Tableau Server working directory, e.g.D:Program FilesTableauTableau Server8.2psqlbinRun the following command to login to the PostgreSQL database from the command line using the super user:psql -p8060 -Utblwgadmin workgroupYou should then be presented with the PostgreSQL command line, where you can then enter the following command to grant the permissions:GRANT SELECT ON ALL TABLES IN SCHEMA public TO tableau;Then type q and press enter to quit.
You should now have read-only access from the tableau user to the full list of tables and views in the Tableau Server database. Enjoy, and stay tuned for more posts on what’s in these tables and how best to leverage it!Edit: No need to run all these PSQL commands any more to access all the tables, since 9.0 there is a new built-in user, 'readonly', which you can set a password for using tabadmin dbpass and that will do the same thing!
Gaining access
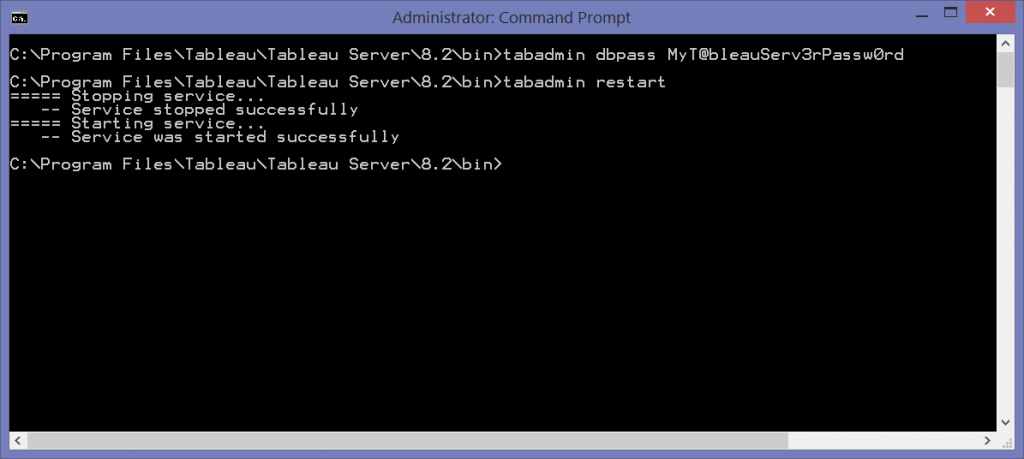
The repository is essentially a Postgres database, and there are two default users that we can use to gain access initially, ‘tableau’ (standard user with limited permissions) and ‘tblwgadmin’ (super user). For now, let’s ignore the super user, we don’t want to go there just yet.Tableau actually provides great instructions on how to enable the user ‘tableau’ here. By default, ‘tableau’ does not have a password set for it, so access is effectively disabled. To fix this, open an administrator command prompt on your Tableau Server, navigate to your Tableau Server bin directory and issue the tabadmin dbpass command, specifying your chosen password. Then restart your server to let the change take effect. It should go a little something like this…
Connecting to the database
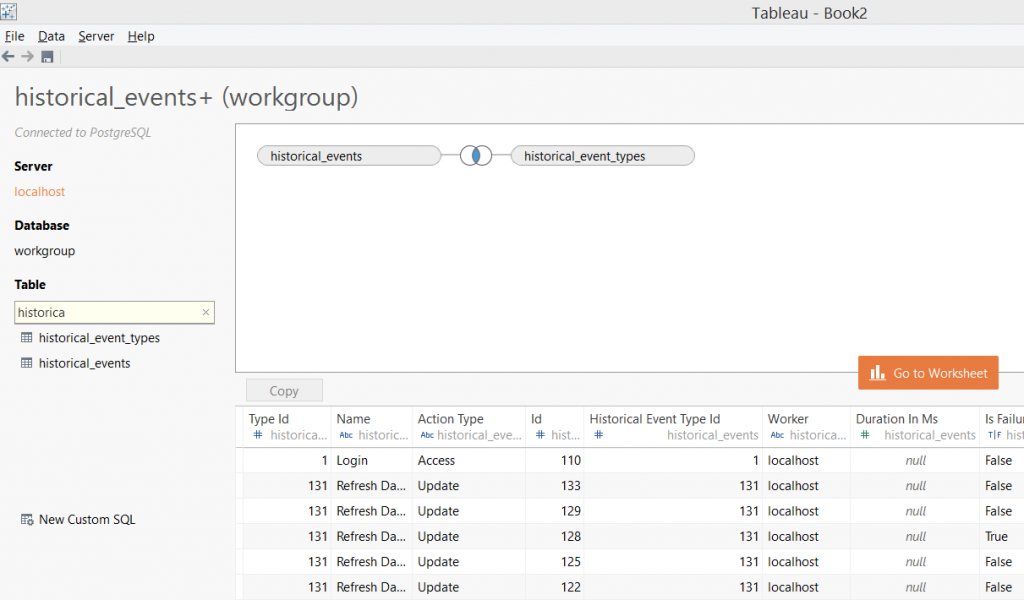
Now that you have set a password for the ‘tableau’ user and restarted the server, you can connect to the database using your favourite SQL editor (I like RazorSQL), or even Tableau Desktop. To connect using Tableau Desktop from your local machine, you’ll need to have the Postgres database drivers installed – you can find them here.If you are connecting to the database from Tableau Desktop installed on the machine which hosts Tableau Server itself, then you can skip this step since Tableau Server already comes bundled with the Postgres drivers.To connect, we use the following details:Server: (your tableau server hostname, e.g. tableau.intranet.mycompany.com)Port: 8060 (this is the default port)Database: workgroupUser: tableauPassword: (the one you just set in the above step)Exploring the database
Now as I said before, the standard ‘tableau’ user has limited permissions in that it can only access a set of historical tables (prefixed by ‘hist_’) and a set of views (prefixed by an underscore ‘_’) in the database. The views contain information on the structure of your server, e.g. lists of users, groups, sites, projects, dashboards and views, and information relating to those entities.The historical tables contain information on events occurring on your server, and to get the most out of these you’ll need to join a few together. The two key tables here are historical events (historical_events) - this logs all the events happening on the server - and historical event types (historical_event_types), which describe what these events are. Try using an inner join to join these two tables together to see a list of events on the server. In addition, you’ll then likely want to bring in user information from the hist_users table so you can tie these events to specific users. In the historical events tables there are actually two IDs you can join the hist_users table to: hist_actor_user_id and hist_target_user_id. The first one, the ‘Actor’ ID, as the name suggests, relates to the user that was responsible for creating, or ‘actioning’ the event. For the most part you’ll only ever want to know the ‘Actor’ user if you’re analysing things like extract refreshes, workbook publishing etc. The ‘Target’ ID only comes into play when the event relates to a user administration activity, for example when an administrator adds a new user, updates a user password, or adds a user to a group. In these types of events, there is both an Actor ID relating to the user who actioned the event, and a Target ID relating to the user that the event impacted. You could simply join the hist_users table twice, using the Actor ID as the key in one join, and the Target ID in the other join. This would give you more User information for both fields.
 You could also join on hist_projects, hist_groups, hist_workbooks or more, to get more details on events related to these specific entities.
 Remember to LEFT join these tables as not every event will be related to a workbook, a project, or even a user – activities performed by the backgrounder server automatically, like an extract refresh, wouldn’t have an Actor user ID associated with it.At this point you should be able to build your own set of basic administrative views that show all the various activities taking placed on your Tableau server. For some more reading on the history tables, take a look at Russell Christopher’s excellent blog post on this topic, which includes a diagram of the schema.
Going deeper
While the views and the history tables are a great starting point, you might also notice there are a bunch of other tables in the database that you can’t get access to, and there are some interesting bits in there for helping to monitor and analyse your server set up. For example you may want to get data on permissions, user creation dates (great to see the uptake in server usage over time), or more detailed information on the different data connections in use on the server.
