

It can be tricky when working with a large number of files in Alteryx to remember which ones have been processed, especially when they're all kept in a central directory. Manual file management is not only a time sink, but prone to human error. If only Alteryx could do the hard work for you!
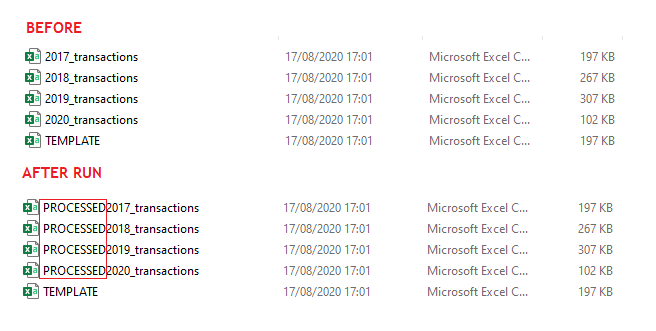
Thankfully, there is a fairly elegant solution. This blog will demonstrate how to build a 'Renaming' process into your workflows, prompting Alteryx to add an identifying feature into the names of your input files once they've been successfully run through the workflow. And yes, this is 'Rename' with a capital 'R': this process will change their names permanently, outside of Alteryx, as seen in File Explorer.
'Successfully run' is the key phrase here: should Alteryx stumble upon any errors while writing your outputs, the original files will remain untouched, so no unread files are unintentionally marked as processed. The workflow also prevents these files from being re-run, avoiding duplicate data.
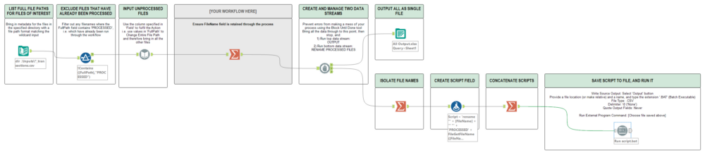
Before we delve into the details, here's a reference screenshot of the complete workflow:
(Text too small? Try downloading the images, or loading them in a new browser window.)
Let's break down the process.
1. Dynamically Input Files
Here, we're working with data contained in .CSV files, with consistent name formats and schemas (structures, column headers, etc.). The Directory tool is used to return the metadata for files in the specified directory which match the File Specification.
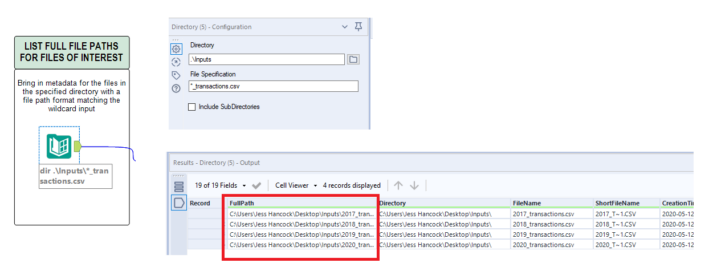
(In this example, we use the relative filepath notation '.\\Inputs', which tells Alteryx to start looking in the same folder as the workflow (.) and choose the Inputs sub-folder. The wildcard (*) notation can be read as 'anything': here, '[anything]_transactions.csv', will pull in '2017_transactions.csv', '2018_transactions.csv' and so on.)
'FullPath', a field containing the full path of the file (including filename and extension) is the field we're interested in.
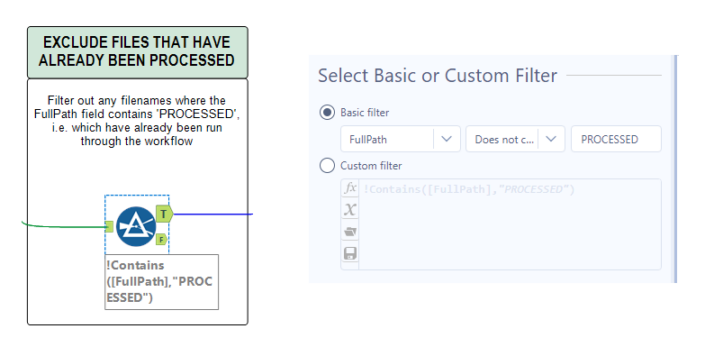
Drop in a filter to exclude file paths which contain the word 'PROCESSED':
Take the 'True' output and feed these unprocessed files into a Dynamic Input tool, found via search or in the Developer tool palette:
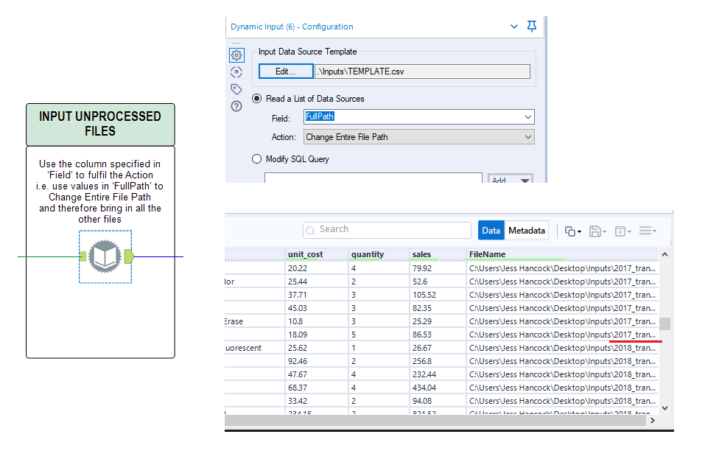
The top option, 'Input Data Source Template', requires the user to specify a single 'guiding' file: this is so Alteryx can understand what to expect schematically of the files to be brought in. When the other options are configured as shown, the Dynamic Input will use the FullPath field to read in the list of data sources. Alteryx stacks the data in these files on top of each other, much as a Union tool does, to create a consolidated table.
(Confusingly, the full file path is now in a field called 'FileName'!)
INSERT WORKFLOW HERE.
This is the part where you conduct all your data magic: transform and analyse as you like. You will need the FileName field to be present at the end, so Alteryx can be told which files to rename.
2. Split into Two Data Streams: 'Output' and 'Renaming'
The second part of the process begins with a Block Until Done tool, again found within the Developer palette:
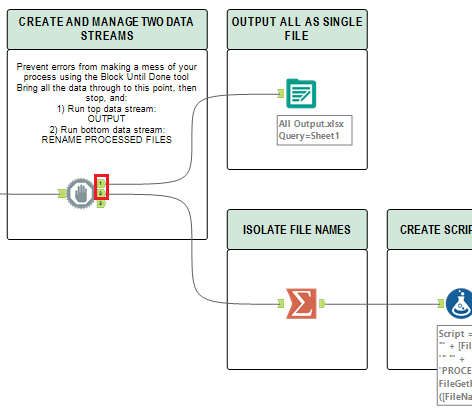
Set up as shown, this tool ensures the actual data file/s you're interested in are written first (as they're streamed from the priority '1' output). In this example, all our data is output into a single .xlsx file.
Once run without issue, the input files used can be renamed -- this happens in the stream from output '2'.
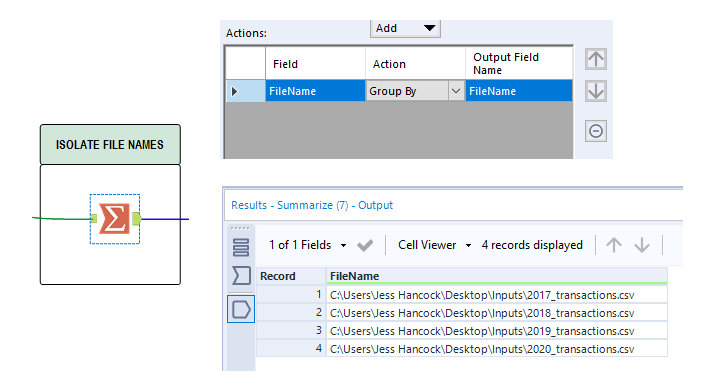
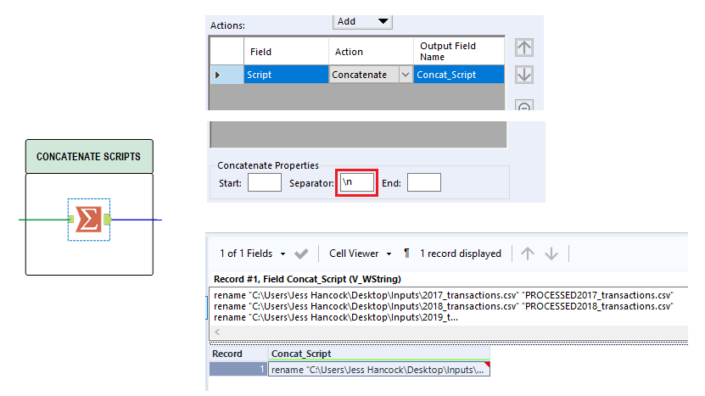
3. 'Renaming' Stream: Create and Run Script
Begin by isolating the individual input file names. You can use a Summarize tool that groups by FileName:
Then, use a Formula tool to create the 'Script' field. At the moment, it's just a static String field within Alteryx, but it will form the basis of the command to be 'read' by the command line.
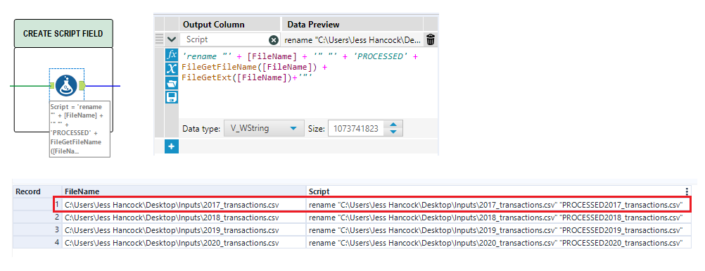
Here's a version of the formula you can copy:
'rename '' + [FileName] + '' '' + 'PROCESSED' + FileGetFileName([FileName]) + FileGetExt([FileName])+'''
The command is straightforward: 'Rename '[CurrentFilePath]' '[NewName]'. The new name is cobbled together at the end of the formula by adding the prefix 'PROCESSED' to the existing [File Name] and [Extension].
(Note: Don't include the full file path when specifying a new name, or the process will error out.)
So these scripts can be run consecutively, use another Summarize tool and concatenate the Script field. Use '\', i.e. a new line, as the separator:
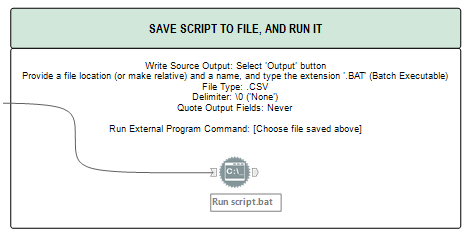
Now we're ready to feed our script into the Run Command tool. (The fun begins!)
For context, the Run Command tool engages the computer's command line, which is entirely separate to Alteryx. Most operating systems have an interface to interact with the command line (such as Command Prompt for Windows); with these, users type commands for the computer to execute. A huge variety of important back-end bits take place using the command line, including troubleshooting, and tasks can also be automated via scripts (such as the one we wrote above).
To quote the official documentation, the Run Command tool 'is similar to running applications directly from the Windows command line, but with the convenience of remaining within the Alteryx GUI'. In short: we're engaging the command line automatically, from within Alteryx. We need little, if any, expert knowledge for it.
You can find the Run Command tool in the Developer tool palette, or, as always, by using the Global Search.
The tool configuration is as follows:
For clarity, I'll walk through those steps with screenshots of the UI.
Once the Run Command tool is on your canvas, and has been selected, press the 'Output...' button at the top of the configuration pane. Here, we tell Alteryx where to save the script and what properties it should have. A window will appear that mirrors the options of the standard Output tool, which makes sense: we're generating an output here too, albeit an unusual one.
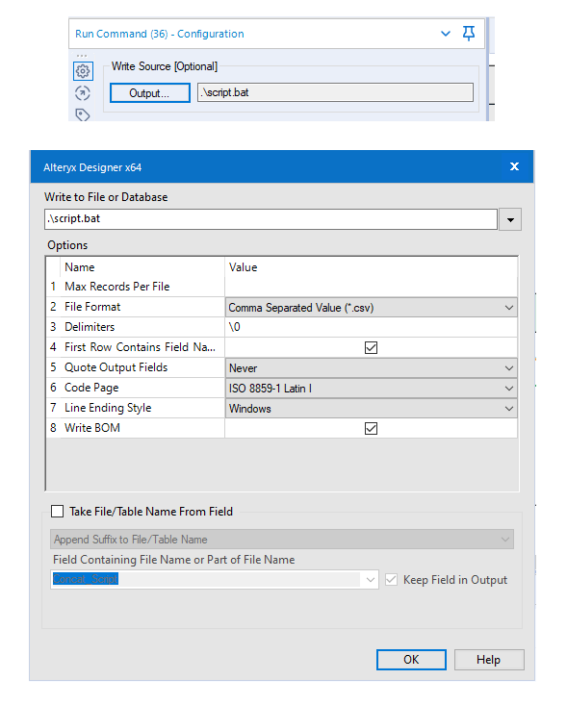
Configure your window to match; then press OK.
In the configuration pane, copy the file path from the first option and paste it as follows:
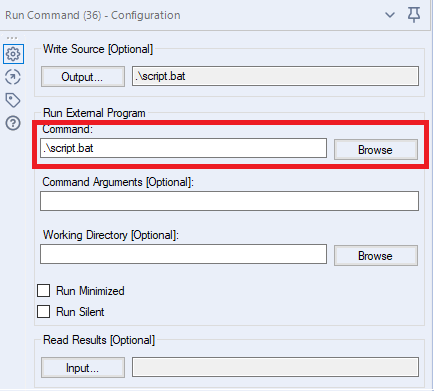
This 'Run External Program Command' option locates and runs the script we just saved.
With the tool configured and ready to go, you can run your workflow.
...And that's it! Navigate to your original input folder to see what's changed: with any luck, your recently-run files have new names, and you now have an automated and resilient process to work with in the future.
Want more on the Run Command tool? The official Alteryx page is a good place to start: https://help.alteryx.com/current/designer/run-command-tool
Notes
- You are unable to upload workflows containing the Run Command tool to the public Alteryx Gallery without first applying for an exemption: https://gallery.alteryx.com/#!exemption. You can upload them to private instances of Alteryx Server and Alteryx Gallery.
- Be aware that other means of sharing may be blocked if there is reference to, or inclusion of, the script: Gmail did not let me email a .ZIP file of the workflow and resources when the '.bat' file was present within it. This is sensible: you don't mess with executables!