

6 August 2018

What I thought it was going to be:
Write some code, connect to an input & output, maybe allow for some configuration and, voilà, tool ready. Something similar to the R tools that I've seen around.What it actually was like:
I started writing some code to get relatively simple stats for an unrelated problem. I tested my python code, and it worked as expected. Once I had the snippet, I went to read the documentation for the Python SDK and... is that it? Fortunately, there was something else, but that looked more like a data dictionary than actual instructions. I like Alteryx (among other reasons) because it makes it easy to use all the tools (well, most of them --optimisation I'm looking at you) and what I found was not meeting my expectations. The most helpful posts I found (here and here) recommend downloading the sample tools built by Alteryx and modify them to one's heart content. So that's what I did.After a few hours of trying to get my tool to work, I took a couple of steps back and decided to create a minimal tool to start understanding all the requirements and oddities of the tool configuration. Once I have that, I will slowly move forward.A Minimal Python Tool:
For this test, I chose to develop one tool with no input and no configuration that will return a single column and a single row with some text. Could it be any simpler?[caption id='attachment_11850' align='aligncenter' width='600']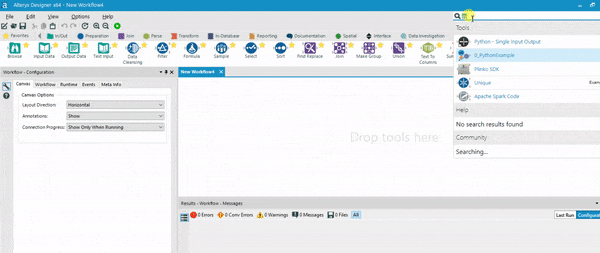 What I am after - a very very simple tool (click to enlarge).[/caption]
Overview:
The tool will need:- A configuration file that will include the name of the connections, the anchor abbreviations, etc.
- A GUI config file: this is the configuration pane that all alteryx tools have. It can be modified to accept freetext, numbers, radio buttons, field selectors,...
- The python module:
- The code itself.
- Initializing the input and output connections.
- Moving records from upstream, through the tool and downstream.
Recipe:
- Choose a name and create a folder with that name.
- Copy all the files from the 'INPUT' sample (and drop any language-specific files, I am using this one as the template because I do not intend to use any upstream connection) and rename them so that 'Python - Input' is replaced by your folder's name. I.e. I call the folder
0_PythonExample, so I now have four files beginning with that string:
- Edit
...Config.xml:- Engine: replace the 'Python - InputEngine.py' with your folder's name +Engine.py

- Gui settings: replace the files and help pointers to your own choice:

- For now, input connections (None) and output connections (one named 'Output') are OK for my needs.

- Change the properties to display useful information.
- Engine: replace the 'Python - InputEngine.py' with your folder's name +Engine.py
- Edit
...Gui.html:- Update the title.
- Since this tool takes no input and no configuration, the
fieldsetsection can be cleaned: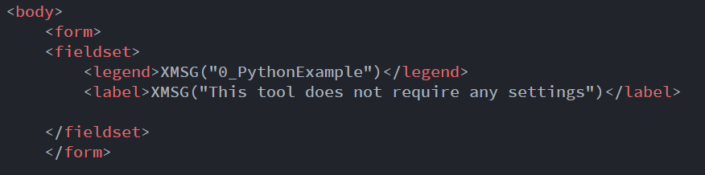
- Edit
...Engine.py:- The tool will not take any input, so all the methods of the
class IncomingInterfacecan be safely left in 'pass'. - The main modifications will happen to the
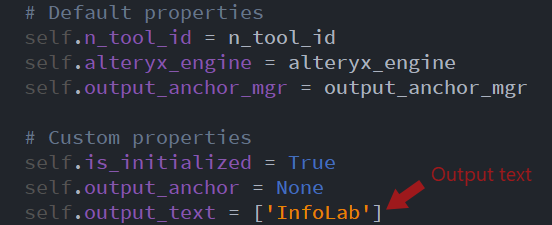
class AyxPlugin:- __init__:
- Keep the #default properties.
- Drop the #custom properties.
- Add the text to be written to the output:
- pi_init: receives the information from the configuration from the GUI. In this case, there is no configuration, so I only need to initialize the output. If the tool had any configuration, this is where the information would be collected as part of the xml string.
- pi_add_incoming_connection: nothing going on here since the tool does not require/accept upstream connections.
- pi_add_outgoing_connection: set to True to accept the ouput connection.
- pi_push_all_records: this is the part that will push the records to the output stream.
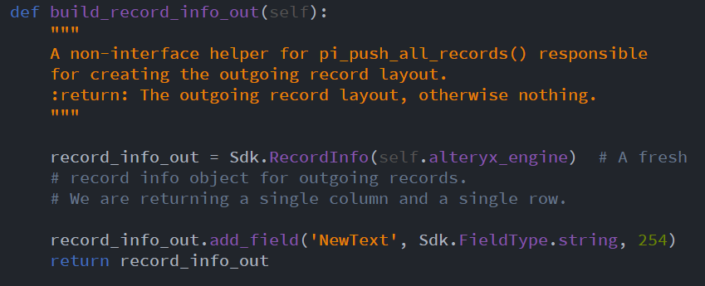
- I am going to follow the approach in the Input Sample and use a helper method to provide the layout of the output, that is, an empty table with the column definitions:
- The layout is a RecordInfo object, I am maintaining the naming convention and calling it 'record_info_out'.
- Each field will be a new column.
- Here, I call the new column 'NewText' and set it as a string of size 254.
- If I had multiple columns, each of them should be defined here.
- With the helper finalized, I can go now to the main method and get the layout

- Then, initialize the output.

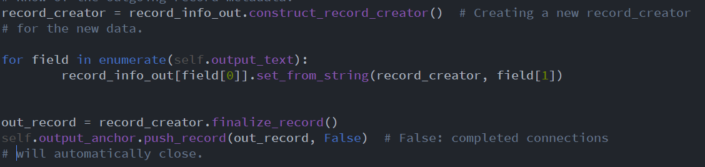
- And start creating the records: in this case there is a single record (row) with a single field (column). For a more general case, each record is prepared by populating all of its fields. Once all the values are ready, the record must be finalized and then pushed out to the downstream anchor. Once the first record is 'pushed' the second can be processed:
- Once all the records have been streamed out we can send a message to the Alteryx interface with a summary:

- And, finally, close the output connections:

- I am going to follow the approach in the Input Sample and use a helper method to provide the layout of the output, that is, an empty table with the column definitions:
- __init__:
- The tool will not take any input, so all the methods of the
- Create an icon and save it as
...Icon.png - Copy the whole folder into the alteryx folder containing html tools (i.e.
C:\\Program Files\\Alteryx\\bin\\HtmlPlugins\\) - Close Alteryx and launch it again...Magic! the tool should be available now.
- Create a package (.yxi) to distribute the tool (instructions here and here for more detail).
- Download the installer for this tool: install it by double clicking on it, it will appear in the 'Laboratory' tools. Unzip the .yxi to explore the files.