

11 August 2017
I'm lazy and inconsistent. When I'm starting new data projects it's usually on the fly. I get some data, I spin up an Alteryx workflow or two, save a handful of parsed .yxdb and .tde files and maybe after that I have a Tableau workbook or two connecting to these .tdes. It's usually only after all this that I create a folder to box this content and sometimes I partition it into sub folders and sometimes I don't. To stay organised, I needed to create a tool that makes setting up projects ludicrously easy.This Alteryx App I've made creates a new project folder in a given location, filled with a set of pre-determined sub-folder names and it also creates a template Alteryx Workflow to use in the Alteryx Workflows sub-folder. It's on the public gallery here and is free to download and reconfigure however you please, including the the template workflow that's packaged with it.https://gallery.alteryx.com/#!app/Create-New-Project/598b1cf3effc2a0f60df8ce0Like my previous workflow for deleting files with Alteryx, this app utilises Windows Command Prompt to create folders in your directory and also to write a template Alteryx Workflow line by line. The workflow has 3 primary action streams unioned together that are used to create and run a single batch file.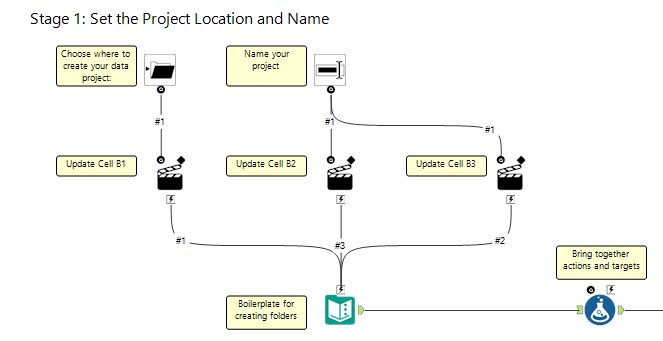 Stage 1[/caption]This section has boilerplate text inputs that are edited with app interface tools. The first column 'Action' contains actions in Command Prompt - 'cd' navigates to a folder and 'md' makes a folder in your current location. So Line 1 navigates to where our project will be saved, line 2 then makes the project folder, Line 3 navigates inside the project folder and then lines 4 onward follow a similar pattern of making folders and navigating deeper. At the moment my default sub-folders are set to 'Data', 'Alteryx Workflows', 'Tableau Workbooks' and 'Gallery & Documentation'. These can easily be changed by editing the respective lines in the Text Input. Within Alteryx Workflows there is another folder for Archived Workflows.[caption id='attachment_10256' align='aligncenter' width='290']
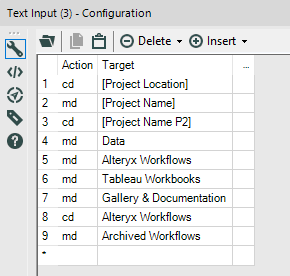 Text Input to Create and Navigate Through New Folders[/caption]The Formula Tool after the text input uses the following code to bring together the Action and Target fields to a command that Command Prompt can understand with a space between them and the target wrapped in quotation marks
 My Template Workflow[/caption]This workflow is packaged with the app on gallery and can be edited however we want as the app writes reads in our template and rewrites its xml elsewhere. It has all of my key documentation laid out already and once opened up I can just double click on any text to edit it. At clients I can change up the colour scheme and add internal branding images as we see fit for them. I love clear and consistent documentation and this nudges me and other users into setting up workflows with a common structure everyone can understand. For personal work I also love the board style To-Do notes at the top for picking up workflows the next morning when I've forgotten what I did the day before.To write this template to our new project, we read in its XML then prepare it to be written line by line by the command prompt.[caption id='attachment_10260' align='aligncenter' width='705']
 Stage 2[/caption]For the XML input of the workflow, we read the .yxmd file as a .csv with no delimiter (\\0) to ensure each line of text comes through as a new row in the field 'Field_1', with 'First Row Contains Field Names' unchecked.[caption id='attachment_10263' align='aligncenter' width='705']
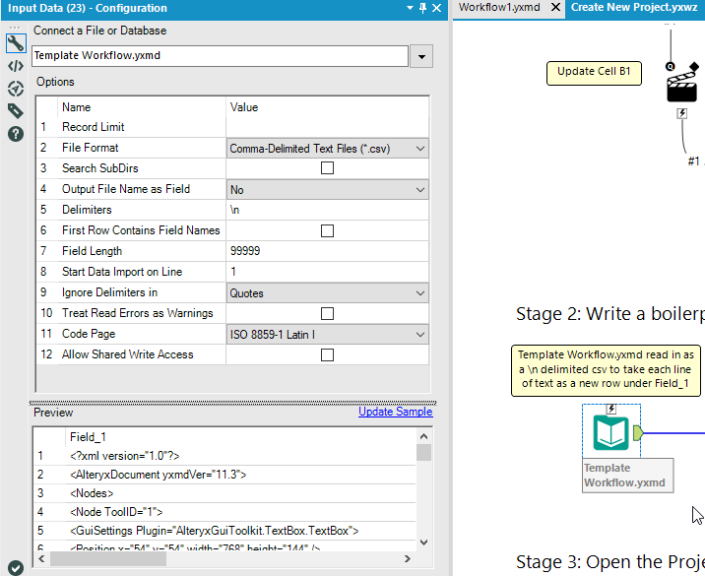 Bringing .yxmd XML into Alteryx[/caption]After this, we use regex to throw in escape hats (^) in front of these characters
 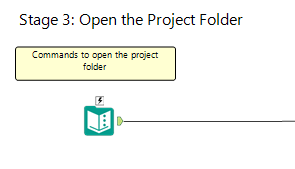 Stage 3[/caption]This is just two lines to add a nice final touch to the code. 'cd ..'navigates up one level to take us back up to the parent folder and then 'start .' will open the folder in File Explorer. If we created deeper subfolders we would need to use more 'cd ..' expressions to move up further levels.[caption id='attachment_10257' align='aligncenter' width='299']
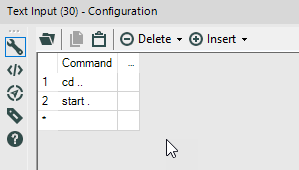 Text Input to Open the Parent Folder[/caption]
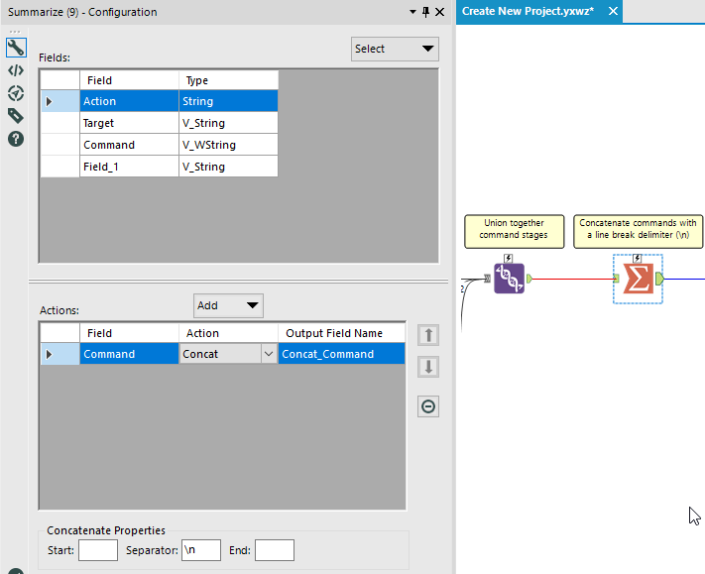 Summarize Configuration[/caption]
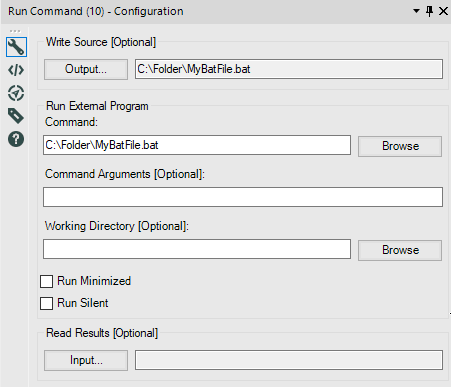 Run Command Config Part 1[/caption]Within the Output configuration, we need to set it up like this. File format needs to be *.csv but in the write location we need to replace '.csv' with '.bat'. This works because both file formats are essentially text files interpreted differently by a computer so we can write as one and change the file format and Windows will interpret it differently.To stop the csv chucking in any accidental commas, we need to change the delimiter to \\0.And finally we need to untick 'First Row Contains Field Names' so that the first line of text in the batch file isn't 'Field_1' or whatever and we only get the body of the text coming through.[caption id='attachment_10255' align='aligncenter' width='526']
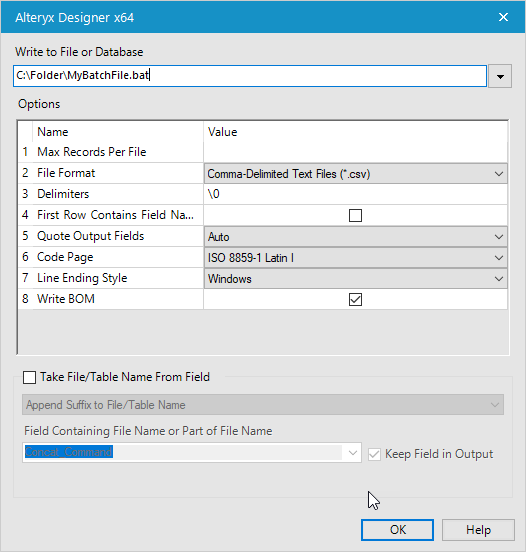 Run Command Config Part 2[/caption]And there we have it. When we run the app it should perform like this:https://www.youtube.com/watch?v=Pt7wP2dtgf0&vq=1080p
Stage 1: Set the Project Location and Name
[caption id='attachment_10259' align='aligncenter' width='663'] Stage 1[/caption]This section has boilerplate text inputs that are edited with app interface tools. The first column 'Action' contains actions in Command Prompt - 'cd' navigates to a folder and 'md' makes a folder in your current location. So Line 1 navigates to where our project will be saved, line 2 then makes the project folder, Line 3 navigates inside the project folder and then lines 4 onward follow a similar pattern of making folders and navigating deeper. At the moment my default sub-folders are set to 'Data', 'Alteryx Workflows', 'Tableau Workbooks' and 'Gallery & Documentation'. These can easily be changed by editing the respective lines in the Text Input. Within Alteryx Workflows there is another folder for Archived Workflows.[caption id='attachment_10256' align='aligncenter' width='290'] Text Input to Create and Navigate Through New Folders[/caption]The Formula Tool after the text input uses the following code to bring together the Action and Target fields to a command that Command Prompt can understand with a space between them and the target wrapped in quotation marks[Action] + ' '' + [Target] + '''Stage 2: Write a Template Workflow
I've created a template workflow that looks like this:[caption id='attachment_10262' align='aligncenter' width='705'] My Template Workflow[/caption]This workflow is packaged with the app on gallery and can be edited however we want as the app writes reads in our template and rewrites its xml elsewhere. It has all of my key documentation laid out already and once opened up I can just double click on any text to edit it. At clients I can change up the colour scheme and add internal branding images as we see fit for them. I love clear and consistent documentation and this nudges me and other users into setting up workflows with a common structure everyone can understand. For personal work I also love the board style To-Do notes at the top for picking up workflows the next morning when I've forgotten what I did the day before.To write this template to our new project, we read in its XML then prepare it to be written line by line by the command prompt.[caption id='attachment_10260' align='aligncenter' width='705'] Stage 2[/caption]For the XML input of the workflow, we read the .yxmd file as a .csv with no delimiter (\\0) to ensure each line of text comes through as a new row in the field 'Field_1', with 'First Row Contains Field Names' unchecked.[caption id='attachment_10263' align='aligncenter' width='705'] Bringing .yxmd XML into Alteryx[/caption]After this, we use regex to throw in escape hats (^) in front of these characters ^&<>\\| to be used in Command Prompt. Then the formula tool wraps each line in the following code:'echo ' + [Field_1] + ' >> ' +''Workflow1.yxmd''Using echo [text] >> file.format, Command Prompt is adding new lines to a text file one by one. One of the great things about this syntax is if the file doesn't exist to append a new line to then Windows will create said file so the first row of code doesn't even need any alteration . By saving the text file as .yxmd windows knows automatically to treat it as an Alteryx Workflow when you go to open it.Stage 3: Open the Project Folder
[caption id='attachment_10261' align='aligncenter' width='295'] Stage 3[/caption]This is just two lines to add a nice final touch to the code. 'cd ..'navigates up one level to take us back up to the parent folder and then 'start .' will open the folder in File Explorer. If we created deeper subfolders we would need to use more 'cd ..' expressions to move up further levels.[caption id='attachment_10257' align='aligncenter' width='299'] Text Input to Open the Parent Folder[/caption]Bringing the Code Together
Now we've got the three blocks of code we need to bring them together into one batch file. The union brings the streams together on the field 'Command' and then we can concatenate them together with a line break separator (\) using the Summarize tool. This gives us a great big string blob in a single cell we can write to a batch file.[caption id='attachment_10258' align='aligncenter' width='705'] Summarize Configuration[/caption]Setting Up the Batch File
As in Part 1 of this series, we need to trick Alteryx into thinking it is writing a csv file and replace the extension with .batBelow is how we want to configure the Run Command tool. Writing a .bat file to an Output location and then running it immediately. Whatever file path we write our bat file to will have to be the same filepath that we enter in the Command field just below.[caption id='attachment_10254' align='aligncenter' width='451'] Run Command Config Part 1[/caption]Within the Output configuration, we need to set it up like this. File format needs to be *.csv but in the write location we need to replace '.csv' with '.bat'. This works because both file formats are essentially text files interpreted differently by a computer so we can write as one and change the file format and Windows will interpret it differently.To stop the csv chucking in any accidental commas, we need to change the delimiter to \\0.And finally we need to untick 'First Row Contains Field Names' so that the first line of text in the batch file isn't 'Field_1' or whatever and we only get the body of the text coming through.[caption id='attachment_10255' align='aligncenter' width='526'] Run Command Config Part 2[/caption]And there we have it. When we run the app it should perform like this:https://www.youtube.com/watch?v=Pt7wP2dtgf0&vq=1080p