

This blog will cover some of the basic authentication and automation when using the REST API from Commercelayer in Alteryx.
Quoting Commercelayer’s website: “Commerce Layer is a headless commerce platform and order management system that lets you add global shopping capabilities to any website, mobile app, chatbot, or IoT device, with ease. Use a best-of-breed CMS to create beautiful content. Make it shoppable through our blazing-fast and secure API, on a global scale.”*
In practice, this means also means that Commercelayer users can access all their sales and order data through the REST API provided by the platform itself.**
Authentication
The first step is to get an access token that you can use in the data queries.
The basic query string looks as follows, with bold text to be replaced with your organisations details:
https://yourdomain.commercelayer.io/oauth/token
Additional body parameters are required to finish the query string:
grant_type = client_credentials
client_id = yourclient_id
client_secret = yourclient_secret
To make it easy in Alteryx, you can add a text input into your workflow.

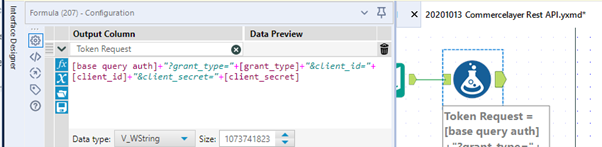
We can then use a formula tool to piece this request together a Token.
[base query auth]+”?grant_type=”+[grant_type]+”&client_id=”+[client_id]+”&client_secret=”+[client_secret]
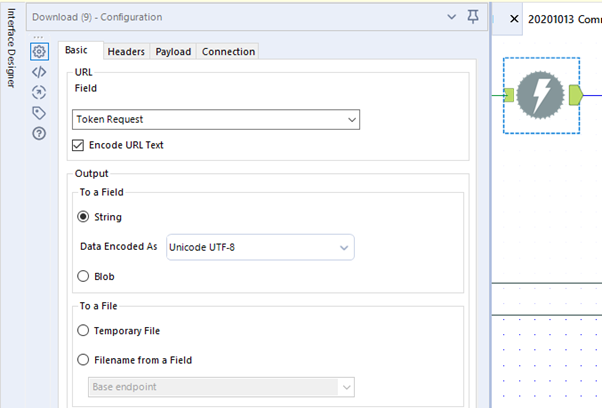
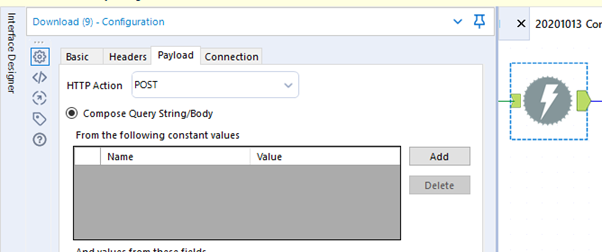
Up next is to bring in a download tool to send off a POST request to the Commercelayer API to return a token.
Make sure that:
- The URL field is set to Token Request under the Basic tab
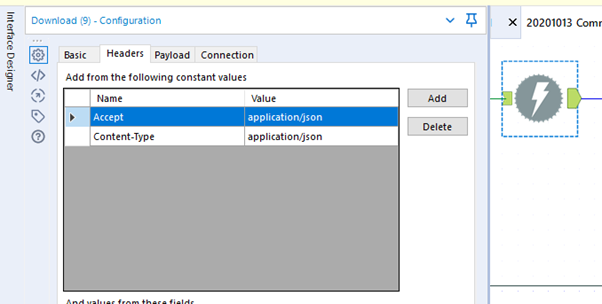
- You add two additional headers under the Headers tab
- (Name) Accept (Value) application/json
- (Name) Content-Type (Value) application/json
- You set the HTTP action to Post in the Payload tab
To process the token that this request will return, we will need to put a JSON Parse tool behind it and set the JSON Field to DownloadData.
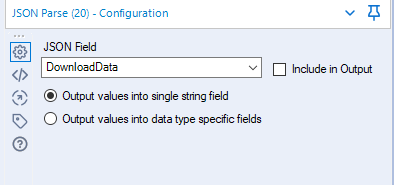
This will return a few rows of data containing JSON_Name:
- access_token
- token_type
- expires_in
- scope
- created_at
All the related values are stored in the JSON_ValueString field.
Please note, that the token received will be valid for two hours, so it could be easy to first store this result in a .yxdb file so you can read it in for your follow-up requests and only request a new token when necessary. Fields such as created_at or expires_in can be used to check whether the token is still valid and you could setup a workflow that only triggers a token request when it’s expired.
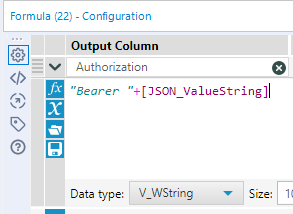
For the Token purpose, we only require access_token. Filter the data to just this row (JSON_Name = access_token) and add a formula tool behind it to create yourself the authorization field required by the Commercelayer REST API. Documentation tells us that the Authorization header needs to have the following format:
“Bearer Token”
Make sure that there is a space between the Bearer and the token and you name the new column Authorization (it is case sensitive).
Make sure to store this Authorization field or have it ready for the data requests below!
Downloading Data
Now that we have established the authentication, by setting up the Authorization field, we can now send API (GET) requests to obtain data.
The basic query string changes depending on what resource you want to obtain.
https://yourdomain.commercelayer.io/api/resourcename/
For example, if you want to access your Line Items you have to replace resourcename with line_items:
https://yourdomain.commercelayer.io/api/line_items/
Let us create an example on how to call the Orders data.
Generate a field that contains your [API Call Line Items] using a formula tool:
“https://yourdomain.commercelayer.io/api/orders/”
Make sure you have your [Authorization] field within the same flow as well.

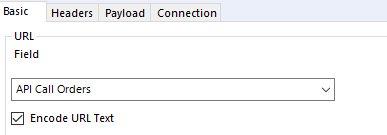
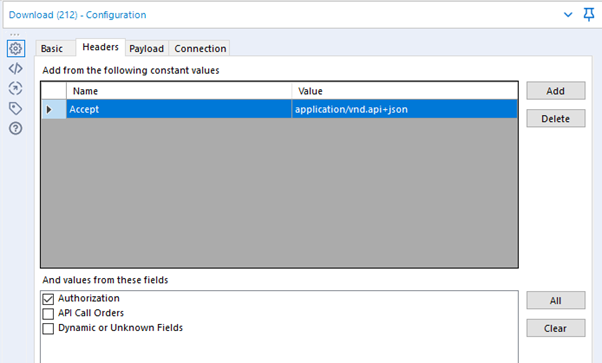
Follow up by dragging in a new download tool and set:
- the URL field to API Call Orders
- Under headers, Name: Accept, Value: application/vnd.api+json
- Under headers, and values from these fields: Authorization
- Under payload, HTTP Action set to GET (or FTP)
By default, the API will return 10 records (10 orders with all their related fields in this case) and will tell you how many more records are available for querying through the API.
Add a JSON Parse tool behind the download tool and point it at DownloadData. (I would recommend either caching the output of the download tool or writing to a yxdb file first so you don’t have to continue to call the API whilst creating a workflow).
Make sure to put a browse tool behind it and scroll all the way to the bottom to find three fields of interest that allow us to query all the data available:
links.first https:// yourdomain.commercelayer.io/api/orders?page%5Bnumber%5D=1&page%5Bsize%5D=10
links.next https:// yourdomain.commercelayer.io/api/orders?page%5Bnumber%5D=2&page%5Bsize%5D=10
links.last https:// yourdomain.commercelayer.io/api/orders?page%5Bnumber%5D=1000&page%5Bsize%5D=10
In the examples above tell us that there are 1000 pages, each containing 10 records. You can use the field from links.next to send another API call using the same setup as before, however, this time you have to make sure the UNTICK Encode URL Text under the Basic tab of the download tool.
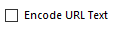
For your reference, the %5B and %5D are ASCII encoding required for the API and stand for [ and ]. The download tool in alteryx can encode the URL text for you, as we did in the initial call, but this is no longer required for the links.next calls as they are already encoded.
If you have a relatively large amount of pages to query, I would recommend to either create a iterative macro that can cycle through the links.next URLs until you hit your last page or to pre-generate your URLs using the generate rows tool.
For more information on how to create an iterative macro to cycle through such API pages you can check out our YouTube channel and playlist on API’s & Data: https://youtu.be/xmMf8RynEuk
Downloading Data from Multiple Tables
The example query used above will only get you the data from one table (Orders, line_items, customers, etc) at a time.
The API allows you to obtain specific fields from all tables in one go. This way you can optimize your query and only return the fields you require for your work by using the include parameters in the query. ***
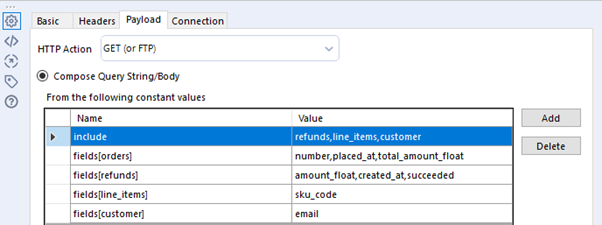
For instance, we want to use the Orders data and add further information coming from the line_items, refunds and customer tables. We can specify the tables and fields in the Payload tab of the download tool using the include parameter.
https://yourdomain.commercelayer.io/api/orders/ can be used as the URL. Under the Payload tab add the following Names and Values:
Include table names separated by commas
fields[table1] field names separated by commas
fields[table2] field names separated by commas
etc
The below setup will allow you to only return a couple of key fields from the API in just one call.
That is all for now. Feel free to contact me about any of the content on Linkedin or Twitter @RobbinVernooij
Resources
*https://commercelayer.io/ (last accessed: 18/01/2021)
**https://commercelayer.io/developers/ (last accessed 18/01/2021)
***https://docs.commercelayer.io/api/including-associations (last accessed 18/01/2021)