

23 May 2015
Well that was a fantastic, inspiring and interesting Inspire 2015 - this year saw over 1000 attendees squeeze into the Westin in Copley Plaza, Boston for the Alteryx event of the year. The biggest conference so far saw the brightest and best Alteryx users battle it out on the Grand Prix stage, as well as seeing technical and business experts talk about how they use Alteryx day to day to talk about how they solve their business problems.Of course it's not all about business problems though, and after Dean Stoecker highlighted the work of Alan Turing in cracking the Enigma Machine in his keynote I thought it would be fun to rebuild an Enigma Machine in Alteryx - because you know why not?!Of course this Enigma Problem has already been solved in Tableau by the wonderful Noah Salvaterra but no one has ever attempted it in Alteryx to my knowledge, until now.... The Enigma Machines was essential very much like a typewriter, it consisted of a keyboard with a series of lights above them, with lights to illuminate the letters as the keys below were pressed. As each letter of the message to be encoded was typed, a corresponding letter in the light panel would show up - giving the letter it should be encoded with in the coded message to send.Inside the machine a battery provided current as the key was pressed, and a series of cables in a plugboard and connections in the rotors and a reflector pushed the current along different paths, changing the letter along the way, until it finally reached the light. As each key was pressed the rotors moved, giving a new unique setup and a different path along which the current would travel, meaning the machine followed a long, complex cryptographic cycle with many, many combinations.Essentially to be able to decode a message the allies would need to know:
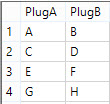 The logic in Alteryx was relatively simple - joining twice to check the two ways data could be coded, e.g. A->B or B->A and then ensuring the rest were picked up using a union.
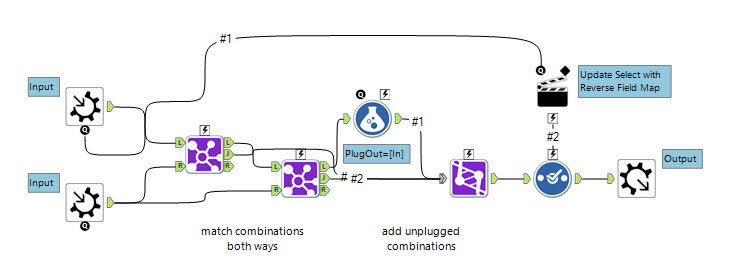
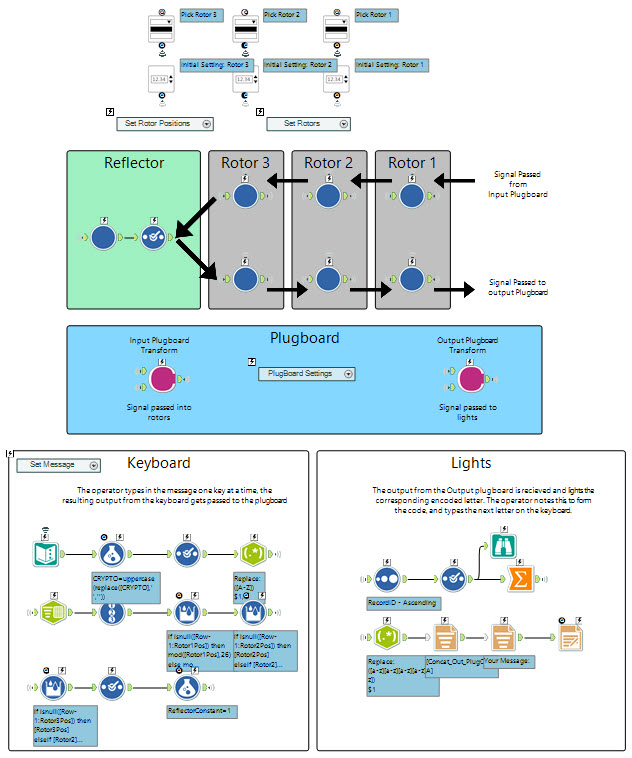 I chose to map the workflow like the machine itself, using annotations to show the order of the flow of the current.The keyboard section splits the cipher text using a RegEx to add commas, before splitting to rows using the TextToColumns tool. To create the data for the positioning of the rotors I chose to use the multi-row formula tool, I included several IF statements to capture the movement of the rotors 2 and 3 dependent on the position of the notches on the rotors (reference here), including the double-stepping.The workflow uses wireless connections so I could keep an ordering logical to the machine, not to the traditional Alteryx horizontal flow [or vertical flow if you're a bit weird :-)].The plugboard and rotor macros work in series, the input to one being the output from the last.Finally the lightboard splits the cipher text into groups of five, traditional as there are no spaces, and then produces a pdf.
The Mechanics of Enigma
For those who don't know Enigma was a cryptographic machine used by Germany in the Second World War to cipher messages to it's troops across the world and subsequently cracked by Alan Turing and the code breakers of Bletchley Park - a feat said to have shortened the war by a considerable amount. The breaking of this code was unthinkable, due to the several layers of encryption offered by the Enigma machine during the ciphering of the message.Basics
The Enigma Machines was essential very much like a typewriter, it consisted of a keyboard with a series of lights above them, with lights to illuminate the letters as the keys below were pressed. As each letter of the message to be encoded was typed, a corresponding letter in the light panel would show up - giving the letter it should be encoded with in the coded message to send.Inside the machine a battery provided current as the key was pressed, and a series of cables in a plugboard and connections in the rotors and a reflector pushed the current along different paths, changing the letter along the way, until it finally reached the light. As each key was pressed the rotors moved, giving a new unique setup and a different path along which the current would travel, meaning the machine followed a long, complex cryptographic cycle with many, many combinations.Essentially to be able to decode a message the allies would need to know:- the arrangement of the ten cables in the plugboard (150 million million possibilities of combining 10 pairs of letter from 26: proof)
- which three of five rotors where used in which slot of the machine (5 x 4 x 3 = 60)
- which starting position the rotors were started in (26 x 26 x 26 = 17,576)
Plugboard
The plugboard consisted of ten cables which connected pairs of letters together, in each case the letters would be substituted: So if A and C were connected then A would be changed to C, and vice versa. Each letter was send through the plugboard twice, once directly after pressing the key, and once after it had been through the rotors and reflector, meaning two changes.My implementation in Alteryx was relatively simple, I set up a macro to perform the change (given it was repeated) and used two column table to show the changes for each cable. I then changed these using a wizard based on user input:The logic in Alteryx was relatively simple - joining twice to check the two ways data could be coded, e.g. A->B or B->A and then ensuring the rest were picked up using a union.Rotors
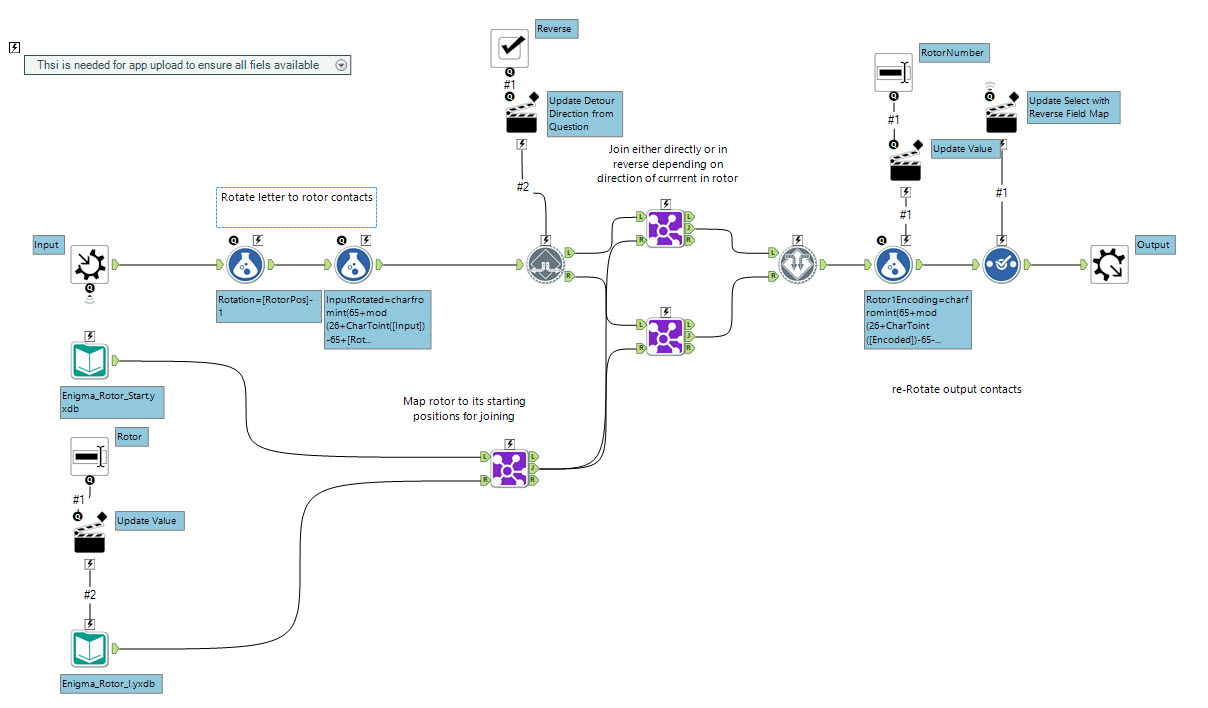
The rightmost 'fast' rotor will spin with each key-press and each rotor has a notch which then rotates the rotor to its left by one step as the notch engages (one a cycle) - each notch is in a different place dependent on the rotor. Also an added factor when coding in Alteryx is the 'double-step' anomaly which would mean the centre dial would step twice in succession when the left-most wheel had also been triggered to step (see explanation here).Each rotor is used twice in the cryptography, once as the current flows to the reflector - once as it flows back again. In the second pass the current obviously flows from the opposite direction and so the cryptographic transposition of the rotor is reversed.To avoid having to track the stepping mechanism in the macro - requiring an iterative macro - I decided to deal with it in the main data flow - leaving a relatively simple macro which was passed the rotor position. I chose to pass in the details of the Rotor and let the macro then load the wheel for that and then do the permutations. Some difficulties I found:- if you load an app with dynamic inputs you need to find a way to get them into the gallery, I had to load them all in a container to ensure they were there.
- the best way of reversing the macro was to add a detour, and then when using the macro in the reverse 'path' then tick a check box.
- the best way of rotating the pins was to use the CharToInt and CharFromInt functions to convert the letter to a number, I used the modulus 'mod' function to constrain them to the alphabet.
Reflector
The reflector sits after the three rotors and 'reflects' the current, swapping the letters as it does, back along the rotors in reverse order. In that effect it is similar to a rotor but without stepping. Therefore I reused my Rotor macro but kept the position the same - adding a reflector input to show the transposition of the letters. Later machines had three reflectors - I've chosen to hardcode mine with reflector 'B'.Putting it all together
I chose to map the workflow like the machine itself, using annotations to show the order of the flow of the current.The keyboard section splits the cipher text using a RegEx to add commas, before splitting to rows using the TextToColumns tool. To create the data for the positioning of the rotors I chose to use the multi-row formula tool, I included several IF statements to capture the movement of the rotors 2 and 3 dependent on the position of the notches on the rotors (reference here), including the double-stepping.The workflow uses wireless connections so I could keep an ordering logical to the machine, not to the traditional Alteryx horizontal flow [or vertical flow if you're a bit weird :-)].The plugboard and rotor macros work in series, the input to one being the output from the last.Finally the lightboard splits the cipher text into groups of five, traditional as there are no spaces, and then produces a pdf.Top Tips
Many tips in this macro can be applied to any application:- notice similarities between processes and build reusable macros
- try and avoid complex iterative processes by creating data rows instead, e.g. using multirows formula
- annotate your module as it makes sense to the user
- use apps to allow users to input data without understanding the detail of the flow